Purple Slaw, Spicy Baked Tofu, and Food52 Love.

I came a little late to the Food52 party, but still it's a website I've enjoyed for several years.  There is always plenty of inspiration when the pantry seems bare but really is well stocked, and the community setting is comforting in the big world of Internet food.  When I see something tagged with "Genius Recipe" or "How to Make _____ Without a Recipe" (or Not Recipes as they are called), I'm always sure to give particular attention.  I think about cooking without recipes pretty frequently - especially since I tend to cook what I find on sale and also what needs to be used up, often on the fly during this homeschooling year. 

Last week, organic purple cabbages were on sale at my food co-op and when shopping on that cool Sunday evening after a weekend out of town with my boys, I couldn't shake the feeling that I needed cilantro and a fresh hot pepper and and some kind of slaw.  The next day, half of it became a medium-spicy concoction that really hit the spot.  What I had originally thought would be more Asian in flavor turned out to be more Southwestern/Mexican and I couldn't get the "without a recipe" moniker out of my head.  The second half of the cabbage was made into a similar slaw, only instead of letting the cabbage drain in a mixture of salt and sugar, I decided to just add some candied jalapenos and their juice.  It was spicier, and even better than my first attempt.  I'm pretty sure you could add anything to the slaw to make it good; just be sure to keep a rainbow of colors.

Untitled
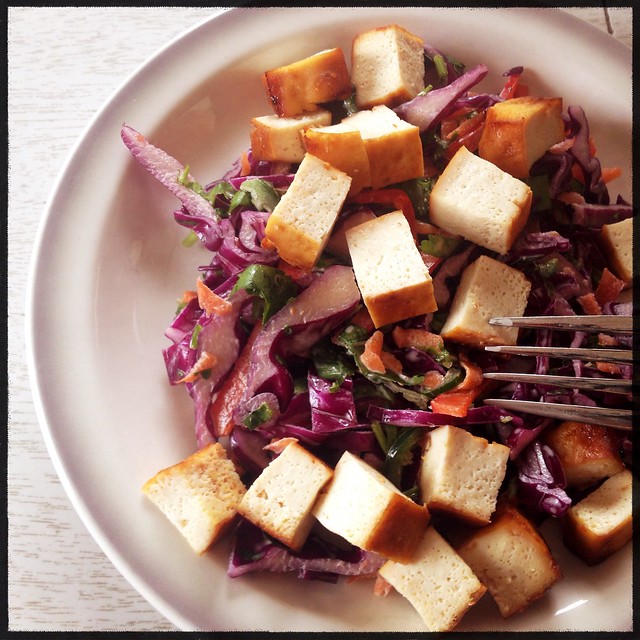
Purple slaw, topped with spicy baked tofu.

I'm not so good at typing up a non-recipe - they beg to be told word of mouth.  Basically, toss the cabbage and salt (and a tad of sugar if you want it nuanced with sweetness) together (you could add the peppers and carrots to the salted mix if you like, or if you forget add them after).  Let it stand at room temp for an hour to draw out some moisture.  Then drain it well and add the rest of the ingredients. You can omit the mayo and use Vegenaise, or skip the creamy mayo component altogether and use a couple tablespoons of cider or rice vinegar.  Just taste and go with it!  It tastes better after it sits a day, and stays remarkably crunchy for nearly a week.

Purple Slaw (vegetarian, vegan option)
serves 4-6 depending on serving size
  • 1/2 head of small purple cabbage (about 1 lb.), cut into quarters and thinly sliced
  • about 1 t. kosher salt
  • 1/2 red bell pepper (or more), thinly sliced
  • 1-2 carrots, peeled and grated
  • 1/2 small bunch of cilantro, minced
  • 1-2 small hot peppers, thinly sliced (or several slices of candied jalapeno and a tablespoon of their brine, minced if desired
  • 1-2 spoonfuls mayonnaise (I like Hain Safflower mayo despite the non-health benefits of that particular vegetable oil...) 

spicy baked tofu.

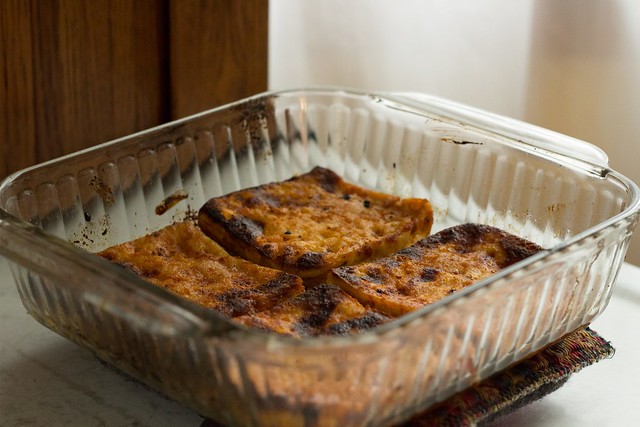
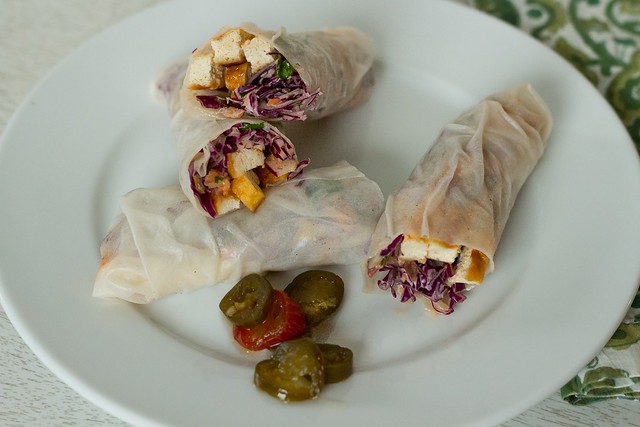
Baked tofu is another non-recipe.  I used to follow a more rigid approach to baked tofu, but recently I've been making it this way with exceptional results.  I cut a 1 pound block of firm tofu into two even slabs, press it for at least a half hour but usually longer in a makeshift contraption of dish towels and plates and weights (cast iron pans).  Then I slice the drained tofu again into 4 total slices.  In the bottom of a baking dish, drizzle in a fair amount of sriracha, an equal amount of maple syrup (or honey), and roughly the same amount of olive oil.  Turn to fully coat, add a little salt and pepper if you feel like it, and let it sit overnight if you want - or just bake it at 425 right away.  I've been using my toaster oven to bake, which probably runs a little hotter than 425 due to the compact baking space.  I just watch it, and turn it about halfway through.  When it looks done, it's done.  I like nibbling it warm, or cubing it cold and adding it to other things.  Like the purple slaw (picture above), or these spring rolls I made for lunch today using the same slaw and more candied jalapenos...  I am totally remembering these for picnic season.

purple slaw spring rolls

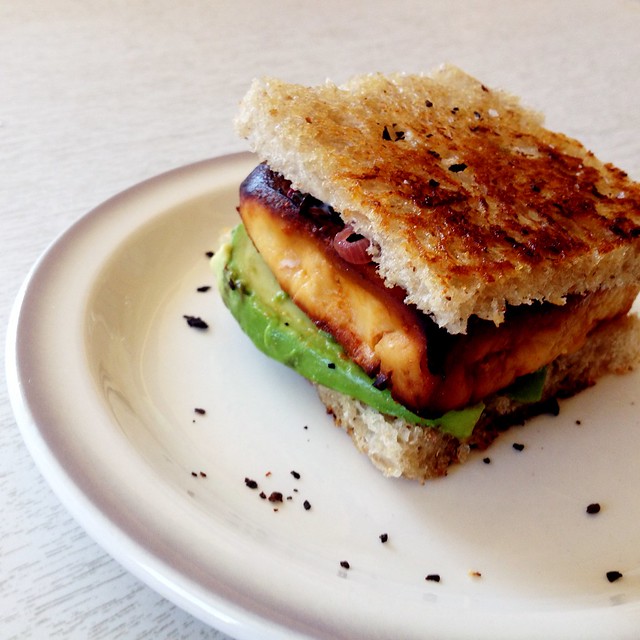
Last week, I used a spicy tofu slice in a grilled sandwich which is also worth noting!  I had a few tablespoons of leftover red chard from the night before (just fried in olive oil with shallot - I'm always surprised at how good greens are this way, and I shouldn't be), some avocado, and sourdough with the crusts cut off and spread on the outside with mayo.  Last summer, Food52 highlighted Gabrielle Hamilton's method for grilled cheese, which was the way a friend of mine made grilled sandwiches more than a decade ago but I had forgotten about it.  It was a wonderful sandwich.

Untitled
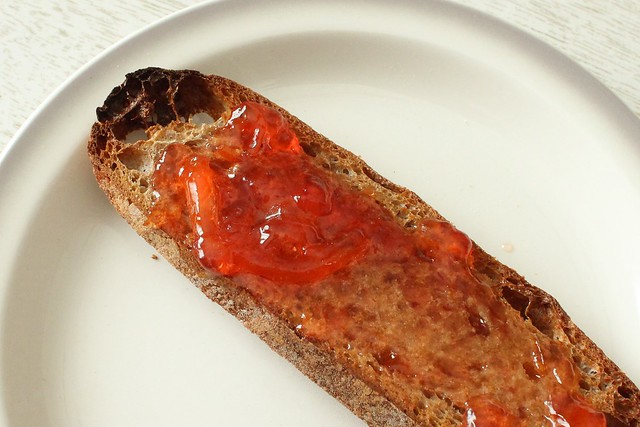
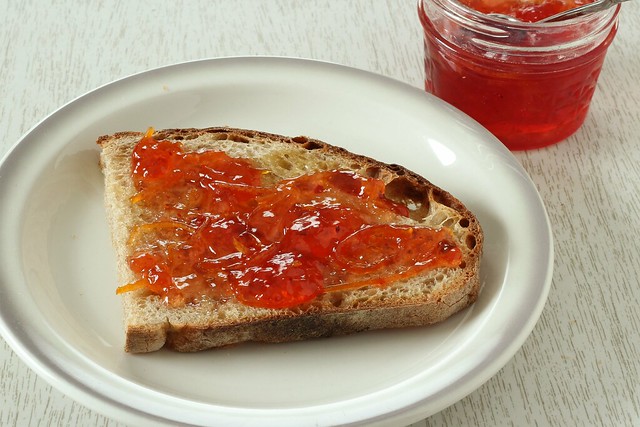
That's a sprinkling of those Urfa Biber chile flakes I'm still obsessed with...

While spreading the Food52 love around, I will mention the latest book to come from their collective: the Genius Recipes book.  I haven't read it yet, but it's on my list.  It includes things like Marella Hazan's tomato sauce and Michael Ruhlman's chicken.  Simple things that always work and are always good - and now all found in one tome.  I don't really need to read it before being sold on it.  Genius is genius.

Whole Wheat Banana Bread.


As much as I love long and slow bread, there is ample room in my heart for quick breads.  Nailing down a favorite would prove difficult: I have spent sleepless nights envisioning almond poppy seed bread or lemon poppy seed bread, I've picked up my walking pace to get home and make Dorie's Oatmeal Breakfast Bread.  A few weeks back I caught a nasty flu bug and lost my appetite for the better part of two weeks.  The experience left me completely over sugar.  It's weird; I still have absolutely no taste for anything sweet (though this berry trifle I made for Easter dinner did hit the spot I admit...).  Five pounds lighter as I head into spring is a good thing I suppose, and with that new-found lightness I went back to my baking schedule slashing sugars even more than before.  I'm wondering if it will stick and I'll turn into one of those people who don't look so forward to dessert...

B.S. (before sickness), I had devoured two baking books: Ovenly by Erin Patinkin and Agatha Kulaga and Huckelberry by Zoe Nathan.  I baked quite a bit from each, admiring both equally for their creative flavors and make ahead ease.  I can't quite get over the Ovenly adaptation of Mollie Katzen's whole wheat banana bread, which I in turn adapted further and have been making weekly.  My boys like it so well I haven't been able to branch out from banana, but I would really like to try it with pineapple puree that's been well drained.  The fruit and maple syrup make it plenty sweet, so I cut out the sugar all together and no one's the wiser.  And of course, extra virgin olive oil is standing in nicely for the recommended flavorless oil.

whole wheat banana bread

Whole Wheat Banana Bread (adapted from Ovenly)
1 loaf
  • 2 bananas, mashed to equal 1 cup
  • 3/4 c. whole wheat flour
  • 3/4 c. ap flour
  • 1/4 c. flaxseed meal
  • 1 T. baking powder
  • 1 1/2 t. baking soda
  • 1/2 t. kosher salt
  • 1/2 c. maple syrup, preferably dark
  • 2 eggs
  • 1/3 c. extra virgin olive oil
  • 1 t. vanilla
  • 1/3 c. Greek yogurt (regular yogurt or buttermilk also works, sour cream was suggested)
Preheat oven to 350 with rack in the center.  Grease a 10x4 (or 9x5) loaf pan with butter and set aside.

In a medium bowl, whisk the flours, flaxseed meal, baking powder, baking soda, and salt together and set aside.  In a large bowl, whisk the maple syrup with the eggs, olive oil, and vanilla until well blended. Add the yogurt and mashed banana and whisk until nearly smooth.

Fold the dry ingredients into the wet, taking care not to over mix.  Pour into the prepared pan and bake for 50-55 minutes until a tester comes out clean.  Cool in the pan for 5 minutes before removing the loaf to a wire rack to cool completely.  Try to resist slicing it until it has cooled at least 1 hour.

whole wheat banana bread

I'm pretty sure the best way to eat this is with a good amount of butter, and it's your call if you would like to toast it first.  If you forgot to buy salted butter like I did last time I was shopping, just sprinkle the top with a little flaky salt.  This bread ages very well, the wheat flavor deepening and the flax becoming more nutty tasting the next day.  Stored at room temperature, you can easily keep it for 4 days or so - it would likely fare longer if stored in the refrigerator.  You could easily add nuts, but I like the soft texture without them for a change of pace.
We had one warm week last month, enough of a breath to carry us through the early part of spring that seems perpetually cool and damp.  It's good quick bread weather for a while yet and I don't mind. Once the world heats up, I don't have the craving for fast bakery like I do just now.  Then I like to let the warmer weather work its magic on the wild yeast and daydream of baking outdoors in an earth oven.  Meanwhile we're keeping an eye on the daffodils and magnolia trees, eagerly anticipating the first of the chives which miraculously seem to have grown overnight due to the rain.  Sometimes it's easy to wish away this type of weather, but all too soon summer will arrive and I'll wish for these cool, dreary days!  Better make some more coffee, slice some bread, and enjoy it while I can.

Old is new again: Chocolate Olive Oil Bundt Cake.

I don't spend so much time around adults.  Because of this, I find that I carry on whole conversations with myself in my head.  As I'm washing the dishes I think about recipes, where things originate and who changed them to accommodate what was in hand.  I'll waiver my opinion if necessity was the mother of invention, or if times changed and so did palates.  I'll wonder just how many times the same chocolate cake was recycled and made new.  And then I'll revisit my stacks of old timey recipes and see what I would do differently or if I would even bother making half of them anymore.

I don't make nearly as much dessert as I used to (although it would seem that is usually what I end of writing about), and when I do feel the need to make something I slash the sugar mercilessly.  I almost make a point to see how much I can cut before a boy will notice, and to my endless amazement it never happens.  They see chocolate.  They eat.  Maybe that is just the way our brains work.  (That also works with adding vegetables into chocolate covered things: zucchini, squashes, carrots, and beets have all been eaten this way too, none the wiser.)

I might not have a knack for a lot of things, but I have the uncanny ability to remember desserts that were eaten and enjoyed and who ate them and enjoyed them.  My special skill allows me to recall then that the last time I made this recipe, a faded photocopy of a Hershey's chocolate bundt cake that my mom wrote upon in her perfect penmanship her mark of highest approval "very good!", was in 2011 when we had a houseful of my husband's friends over to watch the Pacquaio/Marquez fight.  For that occasion I didn't cut the sugar or use olive oil, I made it pretty much as directed and frosted it with melted chocolate chips.  And it was eaten completely.  But my tastes have changed since 2011, and one thing that I find myself loving even more than less sugar is olive oil and chocolate together.  

olive oil chocolate bundt.

For at least the last year, pretty much every time I see a baked good call for canola or sunflower oil - any "flavorless" oil really -I use olive oil instead.  I never worry about the density or richness of olive oil overpowering things... and maybe because I love the flavor of good olive oil so much it never does.  I am able to find the once elusive California Olive Ranch oil easily now, and it is my baking staple.

This cake lasts well for about 4 days if covered well.  I generally store cake at room temperature, and this one develops better flavor on the second day - although the texture is really very nice the day it is baked.  You would do well to serve this sans frosting and with a scoop of vanilla ice cream, or just dusted with powdered sugar.  I made half of the recommended amount of frosting "glaze", which is glossy when first topped and then dries matte. Beating the batter well causes the cake to dome up (as seen in the picture above), but when inverted it isn't noticeable. 

Chocolate Olive Oil Bundt Cake (adapted from Hershey's)
serves 8-12
  • 1 2/3 c. ap flour
  • scant 1 c. sugar
  • 1/2 c. cocoa powder (I use a blend of natural and dutch cocoa)
  • 1-2 t. espresso powder, optional
  • 1 1/2 t. baking soda
  • 1/2 t. baking powder
  • 1 t. kosher salt
  • 1/2 c. olive oil 
  • 1 1/2 c. buttermilk
  • 1 t. vanilla
 Heat oven to 350 degrees and butter and flour a 12 cup bundt pan and set aside.

Combine flour, sugar, cocoa powder, espresso powder (if using), baking soda, baking powder and salt in a large mixing bowl.  Measure olive oil, buttermilk, and vanilla into a smaller bowl, and add all at once to the dry ingredients.  Beat on medium-high speed with a hand mixer (or by hand if you like) for a full 3 minutes, making sure the sides are scraped well into the batter.

Pour into prepared pan, and bake in the center of the oven for 50-60 minutes or until a tester comes out clean.  Cool in the pan on a wire rack for 10 minutes before inverting and allowing to cool completely before frosting.

Chocolate Glaze
(double this amount for a thicker topping)
  • 2 T. sugar
  • 2 T. water
  • 1/2 c. bittersweet chocolate chips
Bring the sugar and water to a just boil in a small saucepan, stirring to be sure the sugar is dissolved completely.  Remove from the heat and stir in chocolate chips, stirring well with a spatula to melt them evenly.  Immediately spoon (or spatula) the thick glaze onto fully cooled cake.

olive oil chocolate bundt.

I have no completed cake picture.  In part because I didn't feel like setting up a tripod in the fading light just before the daylight savings time change... but also in part because I feel the increasing need to only photograph things when I feel like it.  Another thing I think about when washing dishes is if there are any food bloggers that can tell stories without the aid of photography?  While the two go hand in hand, sometimes it's more important to just eat the end results and be satisfied with the enjoyment of cake.  Especially when they have been few and far between.

Decades, Sprouted Wheat.

In two weeks, I'll have been married for a decade.  A decade.  That frame of time seems both long and short as I look back over it.  Time in general has started to feel completely relative in nature: in perpetual fast forward as I look at my boys growing bodies day by day, in slow motion as I watch things in the kitchen sprout and grow, in stubborn reverse as I look back over the things that might have been or could have been if events hadn't played out the way they did.  

A decade, almost all of it full of slow food and homemaking as a profession.  I don't know many who do their taxes and put "homemaker" down in the box - every year I think of that.  The term, also in print on my boys' birth certificates, seems antiquated and humbling and yet it is the thing I am most proud of.  I never dreamed I'd even have children let alone have the autonomy to watch them closely every day, hold onto the minutes, the hours, the years and try (at times) to remember to not wish them away.  I never knew how happy tending a home full time would make me, and I worry that if I ever had to be doing something else full time it would kill me.  I watch over my home, the center of which is (of course) this kitchen, and there is nothing else I'd rather be doing.

Another relationship began 5 years ago, the one involving wild yeast.  That relationship parallels the ones with my husband and children in perplexingly similar ways.  Living, breathing, growing, changing, I can't neglect it and I can't ever predict it.  Just when I think things are going horribly, out pops a tremendous and amazing reminder that slow and steady wins the race.  That glorious things can come from strange circumstance.

sprouted wheat, Ball jar.

In the new batch of cookbooks rented, I've been enjoying Peter Reinhart's Bread Revolution.  It focuses on sprouted wheat breads both with conventional yeast and wild yeast and also a host of quick bread and baked good recipes using sprouted grain flours.  When I had first sprouted my own wheat a few years back, I couldn't get over the flavor of it - but I did notice the difference in how it baked.  Reinhart of course is able to explain this better than I ever could, and leave it to him to come up with a whole book full of recipes highlighting how to use it in the very best way.

Sprouted sourdough almost seems redundant.  After all the process of culturing regular flour with the wild yeast innoculant renders the whole loaf already easier to digest, a true whole and fermented food.  Before reading about it, I never thought the result would be that much better but boy was I wrong!  The flavor is incredible; it's wheaty, earthy, and almost sweet.  It makes the best toast I've ever eaten.

sprouted wheat berries
sprouted wheat flour

The dough seems harder to work with, it's stickier (Reinhart advises oiling your hands, but I just used water and folded the dough in the bowl I mixed in rather than putting it on the counter each time) and more "relaxed" in feel than dough made with regular flour.  I didn't pay good attention to the time when I began and had to get up in the night to form my dough into a loaf - and then rather than set more nighttime alarms, I decided to cold proof it in the fridge until morning.  All of my variables and I was sure the bread wouldn't be anything to speak of, but like sourdough always does it surprised me with it's wonderfulness.

009 :: 02.04.15
Click the photo to read the baking notes.

Isn't that always the way?  The bread always changes the rules just when you think you know it all.  And there is always, always something more to learn.  I made this loaf alongside a whiter one, plain sourdough as I'm used to making.  The boys all wanted this one before the other and it really was that unique.  When toasted, it became brittle and almost graham like.  There is just the heel left, and I'm saving it for breakfast tomorrow with more marmalade.  I will eat it slowly and plot my next sprouted baking experience.

sprouted toast.
I still can't decide if I should make another batch of the kumquat & blood orange marmalade...

I seem to save the heels of bread to toast and eat myself, like I save up all the small moments in my day to day family life that one day I'll likely use to comfort and warm myself.  In another decade, my oldest boy will likely be out of the house and the growing baby boy will be almost a teenager.  I will be greyer and telling more tales of bread, hopefully still learning more and more about it. 

Kumquat & Blood Orange Marmalade.

I've had marmalade on the brain.  It kind of started with the several jars of it still left on the shelves from last year around this time.  It was a good and bitter marmalade, but very soft set - runny even - and I was not grabbing it for my toast as I thought I would.  The thing about old jars on the shelf is that they translate as food clutter to me, and I feel true guilt about it.  Fortunately, a conversation with Deena some time ago led me to remember that her friend used up old marmalade in granola so that's what I did.  I strained out the citrusy bits and subbed it for the honey or maple syrup.  It's good granola: a not stop-dead-in-your-tracks good, but more of a serviceable good.  And it's nice and crunchy too.  It will not be a bother to eat.

marmalade granola

It seems with less time to do actual experiments in the kitchen, I have more time to daydream about what I would do if I did have the time.  I think about what ingredients I'd like to work with and which flavors I'd combine, and then when the time presents itself I'm more than ready to make the most of it.  I'd been thinking about combining kumquats and blood oranges for weeks now, since I first saw the two of them popping up on my grocery trips.  I wanted to add chiles too because we all know that I'm a complete sucker for sweet and spicy things.  Late last week I finally got my kumquats and blood oranges, and on Friday night after the boys were all in bed I got to begin my 2015 marmalade.

blood oranges.

This marmalade may exist in some form somewhere else, but if it does, I don't know about it because I did absolutely no research on it.  I combined techniques I've read about and done in the past with the wisdom of Linda Ziedrich's ratios, and am beyond pleased with the result.  This marmalade is a good balance of sweet and tart and doesn't really read as bitter the way some marmalades do.  As a bonus, it's also a gorgeous color.

kumquat blood orange marmalade

I started tasting a variety of dried chiles after I tasted the sugared blood orange juice/kumquat and orange peel mixture.  My original thought was to use guajillos (my favorite) or mulato chiles but I didn't want to overpower the pretty unique citrus flavor going on.  Then I turned to my new favorite chile flake the Urfa Biber and decided it was just a little too strong.  I settled on New Aleppo, which has a spicy, almost strawberry flavor to it.  I'm calling it New Aleppo after reading this article on how the Aleppo now available from northern Syria is unfortunately impossible to get.  It's a horribly sad thing, for more reasons that just the loss of a spice. 


kumquats & blood oranges

kumquat blood orange marmalade 
(2)

Begin the day before you'd like to can and use organic citrus if possible.

Kumquat & Blood Orange Marmalade
makes about 2 1/2 pints
  • 1 lb. blood oranges
  • 10-12 oz. kumquats
  • 5 cups filtered water, divided
  • 4 cups granulated sugar
  • 1 t. Aleppo pepper (optional but encouraged)
Wash all the citrus well.  Peel the blood oranges with a potato peeler, leaving behind the white pith. Slice the peel into the thinnest shreds you can and place them in a large preserving pot.  Quarter the remaining oranges, pith and all, and pop them into a smaller pot with  2 cups of water.  Bring them to a boil, lower to a simmer and cover them with a lid.  Cook for 30-45 minutes until they are fully soft and can be easily mashed with a masher.  Let them cool slightly.  Meanwhile:
Slice the kumquats as thin as possible into rounds.  Nick out any seeds and save them on the side.  Add the kumquat slices to the orange shreds in the preserving pot, tie up the seeds in a small piece of cheesecloth, and add 3 cups water.  Bring the pot up to a boil over medium high heat, then reduce heat and simmer for 15 minutes.  Remove from the heat, cover, and let sit overnight at room temperature.

When cool enough to handle, pour the mashed blood orange into a jelly bag (or similar) and allow to drain for awhile.  (If you get impatient as I do, squeeze the bag to glean as much juice as possible in a shorter amount of time.  Generally, this isn't something canners recommend since it can cause cloudy preserves - but I'd always rather have the quantity that the clarity!)  Transfer the juice to a jar and refrigerate until you are ready to continue.

Ready jars, lids, rings, and a boiling water bath.  Add the blood orange juice, sugar, and Aleppo pepper to the preserving pot (you should have 4 - 4 1/2 cups of total liquid), stirring well over low heat to dissolve the sugar.  Then bring the mixture up to a boil over medium high heat.  Stir regularly at first and constantly towards the end.  Heat to 220 degrees or to desired set on a cold spoon or plate.  Take the pot off the heat and let it stand 5 minutes before ladling into jars leaving 1/4 inch headspace.  Process in a boiling water bath for 10 minutes, then remove the canning pot from the heat and let the jars stand in the water for 5 minutes before transferring to a towel-lined countertop.

blood orange juice
I was surprised at how colorful it the blood orange juice remained.  At the bottom you can see the sediment that comes from squeezing the jelly bag, I figured it was good pectin and I suspect I was right.

When researching my book, I consulted with the Master Preserver at the extension office in Madison about sterilizing jars.  I never used to sterilize jars in boiling water before canning sweet preserves, and she advised me that this is not the proper thing to do - or at least proper for sweet (non-vinegar) things that are processed 10 minutes or less.  Ever since then, I dutifully put my clean jars in my water bath as the water is coming up to a boil and I let them simmer away until filling them.  I still always wonder just how many people do this, but I always then suppose it's not really adding that much work to a small batch of preserves.

I might have to make time for another small batch of this marmalade since it was so good I ate almost half of a little 4 oz. jar at breakfast time today.  But maybe I'll just appreciate the small batch I have and not over preserve.  I do seem to be eating less and less sweet preserves, and not because I don't whole-heartedly love them.  Maybe something else will spark my interest in the next few weeks of winter and I can daydream my way into another good combination.  I had better save some room on the shelf for that.