Veg of the Month Club: Ramps (A Wisconsin Pie)


Since innBrooklyn announced their new seasonal cooking feature, Veg of the Month Club, I've been excited. I'm reminded of my favorite college professor, an artist who staunchly believed that the more restrictions you had on a theme, the more creative you would be forced to become. I find this is true so many times, especially in the kitchen. There are so many things I'd like to try, and if I just get a nudge in the right direction, I am sometimes all the better off for it.

That was certainly the case with this Veg of the Month Club pick: Green or Spring Garlics. I have to say while I've eaten ramps, the wild growing, leek-like Spring varietal, I never cooked with them myself. Laura gave me a pint of pickled ramps one year, and that was a particular favorite! Our Winter Farmer's Market has closed, and I was unsure where to turn in the city for a few of these delicacies. I was tipped by Lo that Outpost had them at the State Street location, so we took a drive out to Wauwatosa to pick up a small bunch.

After thoroughly documenting them photographically, I tasted the lovely looking greens. I really was shocked with their mild garlic flavor, and was plotting something to make the best use of their tenderness...

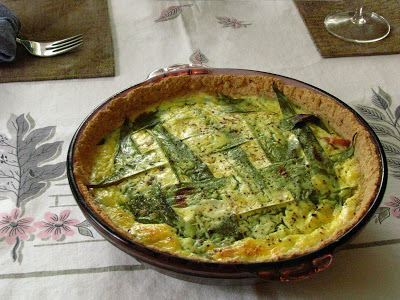
As I collected my ingredients, I knew I was going to aim for a quiche (or Pie, as we Wisconsinites - or at least I - like to call them). I figured since I had wild Wisconsin ramps, why not challenge myself to a fully Wisconsin Pie? I do try to eat local and preserve what I can from other Wisconsin growers (including some of the bounty grown from my own Parent's ample garden), but don't ever really set out using ingredients that are fully from my state. My result was astounding, in my ever so humble opinion, and I can see this pie becoming a Springtime favorite.


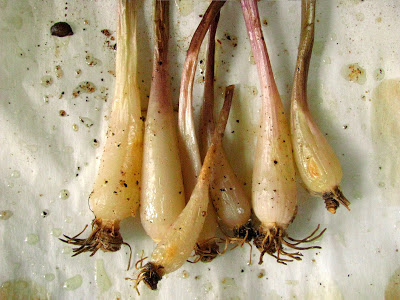
To make less work of it, I made the crust first thing yesterday morning. Then I roasted the ramp bulbs and "baked" the bacon. To roast ramps, drizzle them with olive oil, salt and pepper and put them in a 425 degree oven for 15-20 minutes until they are soft and lightly golden. You can do the same for the bacon, but use a 400 degree oven, and watch it so it doesn't get too dark. I like to use a rack over a baking sheet, but since it was so lean, I probably could have just let it go right on the baking sheet. My beautiful bacon came from the same pig that the rest of my pork stores are from, grown on an Amish farm just down the road from my Parent's house. It was very nearly like ham, so lean and nicely flavored. I think this may be the first of the bacon I've made from the hog, and let's just say until now I thought that Comet/Honeypie had the best bacon...

I swear I did not shellac this bacon.

Wisconsin Pie could be adapted to use your local ingredients, and that is one of the most beautiful things about a quiche, chief on my list however is that they are good any way you choose to serve them: hot, room temperature, or cold. One of the first cookbooks that I ever purchased was Mollie Katzen's The Enchanted Broccoli Forest. In it, she gives a "formula" for quiche that in the years since, I've used frequently. It is a very general and proportional recipe, and includes some suggestions for variations that lend themselves to great or small experimentation.

For my pie, I also decided also to use a completely unusual crust, one I've never used before: Oat Crust. It's not often, my friends, that I adapt a recipe to include more fat, but that is what I did for this one. Originally from Cooking Light, it only used 2 tablespoons of butter, and that was not enough to hold it together. (I imagined their test kitchen working with this recipe, and trying to be painfully patient in their attempts to get it right!) I love the texture of oats in most things, and this crust was no exception. It also gave me the unexpected assistance of soaking up some of the cheese and egg custard of the pie. I didn't actually notice this until I ate a piece for lunch today and could see how custard-y the bottom of the pie had become. It does add to the richness of this regal dish, and I will keep it as a quiche (or pie) base for years to come. (I will also note that the oats I used may or may not have been from Wisconsin. My Mom traded me many quarts of rolled oats - she seals them in canning jars after purchasing 50 pounds of oats from her co-op.)


Wisconsin Pie (a.k.a. Ramp Quiche)

9 in. pie crust of your choice, unbaked (Oat Crust recipe below)
4 oz. mild Swiss cheese, grated (Country Connections Sweet Amish Swiss Cheese)
2 oz. crispy, baked bacon (5-6 slices, but you can use any leftover for garnish - or eating while you wait)
1 bunch roasted ramp bulbs, sliced (there were 7 in my bunch)
Strips of ramp leaves, cut in half or thirds
4 eggs (Amish raised, farm near my Parent's house)
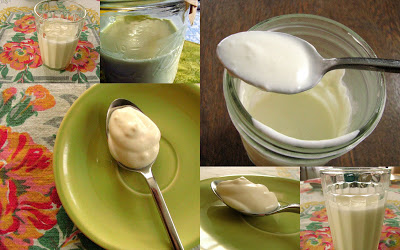
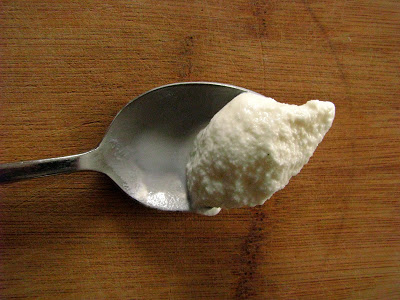
1/2 c. sour cream (my homemade - from Crystal Ball Farms milk)
1 c. buttermilk (my homemade - also Crystal Ball milk)

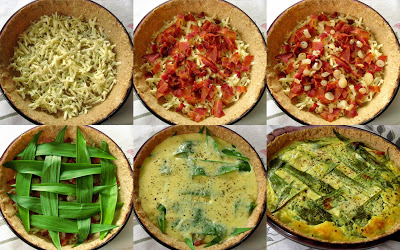
Preheat oven to 375 degrees. Into pie crust, layer cheese, bacon, ramps, and latticed ramp leaves. Whisk together eggs, sour cream and buttermilk and pour over the top. Dust with black pepper (but omit any salt until you taste it, I didn't need to add any due to the bacon and cheese). Bake for 35-40 minutes until the top is puffed and lightly browned around the edges, and a knife poked into the center comes out clean. Let stand out of the oven for at least 20 minutes if you can help it. The longer you let it sit, the easier it is to get neat slices.

Oat Crust

1 cup rolled oats
1/3 c. oat bran
4 T. (half a stick) cold butter, cut into cubes
3-4 T. ice water

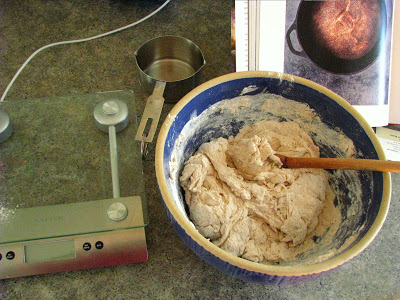
Combine oats, oat bran and butter (and a pinch of salt if you like) in a food pro, and pulse to combine into a homogenized "coarse pebble" mixture. The rolled oats will not be fully processed to a flour state. Add ice water and continue pulsing until the dough holds together when pinched, adding a bit more water if needed. (Since oats are gluten free, you don't have to worry too much about over processing...). Gather dough into a ball (I like to dump it into a plastic bag, and form it into a ball and then a disc this way), and roll out between two sheets of waxed paper.

Lightly grease the bottom and sides of a 9 inch pie plate with butter (a bit of insurance against sticking), remove the top sheet of waxed paper, and carefully use the bottom wax paper to help you fit the crust into the pie plate. Fill and bake! I'd bet this crust would also be good pre-baked and filled with a custard or pudding...but it may be a little temperamental since it is a bit on the fragile side.


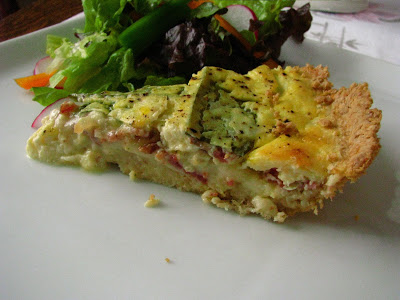
I was fortunate to have Sasa for my Pie dinner, since my Husband is not crazy about this kind of thing... but I do have a feeling if he would have had some, I may have won him over! It was so rich and delicious, I can't imagine anyone tasting it and then disliking it. It had a quiet garlic base, and the bits of bacon were a perfect thing to include to highlight them, though I guess I would be hard pressed to find something that bacon didn't improve.

Because I was so proud of my homemade sour cream, I made Sasa try a bit on the side. A subsequent serving then had to be served with it directly on top...


And wouldn't you know that the two of us ate nearly a whole pie? There were only 2 pieces left, one of which was eaten for lunch today. We just couldn't stop. It was that good.

So many times, restaurant food leaves me so full and heavy. Though this pie contained more rich ingredients than I ever usually use in one place and at one time, it somehow translated as light. Perhaps it was the spring essence of the ramp? Perhaps it was chatting over the slabs of pie for a couple of hours? Either way, I am proud of my state and her ability to healthily produce for us who love to eat and cook, as I'm certain so many others are proud of theirs.

If you have a spring garlic recipe, why not consider sending it over to innBrooklyn for the Veg of the Month Club? There are still a few days left, if you need to be properly "nudged" into making a recipe. Sometimes, that is the best way to cook!

Cultures, Generations, and Rhubarb


Since I got the buttermilk and yogurt cultures from Cultures for Health early last week, I've been a bit preoccupied in my new science experiments. Cultured buttermilk is where I began, after reading on the website that having different cultures too close together could result in cross-contamination. Since my house has been on the cool side, I thought I'd play it extra safe and do one at a time, held in the oven with the oven light on. As I mentioned the other day, this creates a mildly warm culturing environment, perfect for buttermilk making.

The cultures I received were large enough to start two portions. You begin with a small amount, and then build it into a larger amount - which I have determined to be a good thing since the future generations improve vastly. My first buttermilk was on the thin side and very "curdled" looking (I suspect in part due to the non-homogenized milk I've been using), but now that I have the 4th generation, it is thickened nicely and has nudged it's way into the List of Things I'll Never Buy Again.

The only somewhat bothersome thing is that to continue culturing, it is recommended that you use a portion of the existing batch to make a new batch at least once every 7 days. It could seem like a bother, but really, it is as simple as mixing 1 part buttermilk with 3 parts milk and then letting it sit. I'd bet even the busiest person with a hankering for homemade buttermilk could manage this! You let it sit undisturbed except for a peek here and there for 24-48 hours, so in scheme of homemade things, it doesn't get much easier than this. To make a silky smooth version, I used my little milk frother to approximate a bit of homogenization, and then the finished buttermilk was exactly perfect in every way.

After I had a nice 2nd or 3rd generation, I used a bit of it to make sour cream - a good way to use up the leftover heavy cream that I bought for the Schaum Torte Ice Cream. The first attempt at this turned out more like a Mexican crema, but after traipsing around the internet, I heated the cream to 80 degrees for my second attempt, and it was so thick I could turn the jar upside down! Ah, the wonders of culturing! I wish I could remember where I saw that tip, so I could give credit, but alas, my brain is full of microorganisms and I just can't recall. To make sour cream, use 3 tablespoons of buttermilk and 2 cups of heavy cream (half and half will yield a lighter sour cream), mix well and let sit at room temp (70 degrees) for 24 hours. If you have thickening issues, try heating the cream gently to 80 degrees, and then continue.

After the buttermilk was in full swing, I started the yogurt. Per the Cultures for Health instructions, I let the initial cup sit only about 8 hours. It was tasty, but very thin. However, when I used it to start a quart of yogurt and let it incubate for a full 15 hours, it was considerably thicker. This Bulgarian starter also has a wonderful flavor, much less tangy than YoGourmet culture I was using. This culture too needs to be re-cultivated every week or so to keep it viable and healthy, and the Culture for Health people purport that these can be used for years! We'll see how it goes, but so far, I am a very satisfied customer.


Meanwhile, my Mom came down for a visit, bringing a bagful of rhubarb from the garden, and color coordinating vintage finds as an early Mother's Day gift for me. After we got her in the door, she washed and cut up all of the rhubarb: some for the freezer and some to go right into some rhubarb juice. I really wanted to make Mostly Foodstuff's Rhubarb liqueur, but after some discussion (and inspiration from so many of the last CanJam pictures of cordials and infusions from so many different sites lately), I opted to go for rhubarb juice. I canned 4 pints in a hot water bath for 15 minutes (hot-packed). I felt a bit on the wild side, since I didn't use a proper recipe. Since rhubarb is high acid, I used the amount a rhubarb seen above and enough water to come just about half way up. My Mom has canned rhubarb juice this way for quite a long time, though hers is much sweeter than the one I produced. She helped me strain it through some cheesecloth, and told me if I wanted absolutely clear juice not to press on the cheesecloth to get all of the juice out of the expired vegetable. I always go for delicious quantity over color clarity in things like this, so I squeezed until the remnants of rhubarb looked kind of like dry paper pulp. But just look at the amazing color!


I added a scant 1/2 cup of sugar for what turned out to be about a half gallon of juice, but it would be a matter of taste. I would also imagine you could freeze the juice instead of canning it, but I was happy enough to can just 4 little pints of something. I think this is the first time I've done such a small batch, and it got me considering joining the CanJam...


I had just enough leftover juice to have a small cup. I drank part of it hot, which reminded me of a cider, and then put it in the fridge to cool. Cold, the juice has a such a pleasant viscosity, and without too much sugar, it is truly a delicious aperitif. I think it could be used rather well as a cocktail base, too, so everyone can be happy!


The remaining 12 cups or so of rhubarb is now being patient in the freezer. There are so many good rhubarb recipes floating around right now it is certainly not going to be difficult to find inspiration for it's use. The only caveat being that I will need to eat it all myself, since I am the sole rhubarb lover here. Something tells me that won't be much of a problem...

April 2010 Daring Baker Challenge: British Pudding

The April 2010 Daring Bakers’ challenge was hosted by Esther of The Lilac Kitchen. She challenged everyone to make a traditional British pudding using, if possible, a very traditional British ingredient: suet.

Suet. I read through the challenge this month a little more lackluster than most... wondering if I could possibly justify making something that for me was more of an experimentation and not of the "I want to devour this right now" variety of dessert. Suet is beef or mutton fat that is found around the kidneys and loins, and has a lower melting point than most fats. Since British puddings are sometimes steamed, this easily melting fat is a good choice for these baked goods... but all this talk about kidneys and fat and savory puddings did not really serve to whet my appetite. Granted, if I were dining out I could probably give it a go, but in my home I knew I was going to have to change it up to fit my dessert eating audience.

Since I did not go with any type of suet crust and found my own British-style pudding recipe to use, I actually opted out of the challenge this month. I believe than in spirit, I did fulfill the requirements of the Daring Baker credo: to learn more about processes and cultural foods that otherwise I wouldn't have probably given a second thought to making myself.

I chose to do a Sticky Toffee Pudding, based on this recipe. I actually did not really modify it at all, and chose it because I figured I could use the excuse to make English toffee! That, and it did have dates in it, and I know I can use any excuse I can get to add dried fruit to a dessert - it creates the guise of healthfulness that makes any amount of labor or butter worthwhile.


I made the English toffee recipe from Cooking For Engineers. I love this no-frills website; it is a reliable and concise resource. I had no trouble making this butter toffee, excepting that I may have needed to let the mixture get just a little higher in temperature. My candy thermometer said that I hit the 310-315 degree mark, but I suspect my candy would have had more of the traditional "crack" if I had let it go just a minute longer. A more accurate thermometer is certainly on my list. My toffee looks and tastes great, but was just a touch on the "caramel" side of toffee. Since I was going to chop up the portion for the pudding, I suspected correctly it would be just fine. Even the almonds were a good addition to the finished cake.


In January, I came across copper pudding molds in Williams-Sonoma. I love going there in January to see what resides on their clearance table that I just can not live without. This year, it was these two molds, made in France. The smaller is a 4 cup and the larger a 12 cup capacity. Since my base recipe for pudding was a bit on the obscure side as far as yield was concerned, I wasn't sure until the last second what size I was going to use. I do not have a proper pudding basin, but could have as easily used a Pyrex bowl if my amount of batter warranted.


In the end I decided to use the 12 cup mold, even though the batter was shy of the mark:


The only thing I would do differently when I make this again (WHEN I make this again!) is to run the dates through a blender, or my little manual food mill that I used for the Boy-O when he was younger and not picky. I don't think my tasters detected the date fragments, but I did, and their pulpy, fibrous bits would have done well to be more emulsified. I did use weights for this one and you can find a good conversion resource here if you need it.

Sticky Toffee Pudding (from this source, I could not find a name of the author)
  • 4 oz. stoned dates, chopped
  • 1/2 t. baking soda
  • 1 c. water
  • 2 oz. butter
  • 4 oz. castor sugar (sugar taken for a spin in the food pro or spice mill)
  • 2 eggs
  • 5 oz. self rising flour (1 c. AP flour, with 1 1/2 t. baking powder and 1/4 t. salt added)
  • 1 T. cocoa powder
  • 3 oz. plain melted chocolate (I used unsweetened chocolate)
  • 4 oz. chopped toffee
Combine dates, baking soda and 1 cup of water in a saucepan and bring to a boil (the soda will cause it to rise, so use a medium sized pan). Turn off the heat and let stand for 10 minutes to soften the dates. (This is where I would have then emulsified the dates, keeping the liquid as well.) Fill a roasting tin with water (I used a Pyrex bowl, larger than my pudding mold), place in the oven, and preheat the oven to 350 degrees.

Cream together butter and eggs. Sift flour and cocoa powder and fold into egg/butter mixture. Fold in remaining ingredients, including butter. (I added the sugar first, and the batter kind of reminded me of a pate a choux until I added the water. It is a stiff batter.)

Pour the batter into a well greased mold (I think 8 cup would probably be perfect). Bake for 45 minutes - 1 hour, depending on the depth of your mold, and your preference of done-ness. I let mine go just shy of an hour, and until the toothpick came out nearly clean.


It wouldn't be far off to compare this pudding to a luxorious brownie. It is deep, rich and nearly black, a good thing in the dessert world if you ask me. It is so tender and moist in the center, you can feel yourself already needing to start the coffee as soon as you slice into it. It seems the British protocol to douse puddings with a cream or sauce, and this original recipe called for melting Mars (Snicker's) bars together with heavy cream. I briefly considered making some homemade equivalent, but discarded that notion rather quickly. I have to draw the lines of health somewhere! Instead, Maeckel brought some vanilla frozen custard - which was a good, thick and creamy counterpart to the moist cake, and not to mention it adds a decidedly Wisconsin touch.


Of course, that is until the Schaum Torte Ice Cream was made... I froze half of the cake last week, and since my Mom is coming to visit (and she could be the reason I have the sweet tooth I do) I will pull it out after supper tonight to serve with the ice cream. I have a feeling if I let it melt over the top, it will be the best combination in The Whole World.

The Best Ice Cream in The Whole World.


I should preface my remarks of The Best Ice Cream in The Whole World, since that is a pretty big blanket of a statement for me to declare. I am reminded when I see my Parents that when I like something, I frequently clarify them as being the best things in the whole world. Granted, most of them are foods or usually desserts, but as a lifelong ice cream connoisseur, I can assure you that at least in my mouth, this one takes the supreme title.


My story really begins back February, when Lo posted her family recipe for Chocolate Hazelnut Schaum Torte. (You can read all about it, and the contest it was entered in here.) I had eaten similar confections called Pavlovas or Sheet Meringues, but never had even heard of this German immigrant version. Of course the Burp! Kitchen added chocolate, which makes it the king of all egg foam cakes, hands down, in my book. I ate more of this cake in February and March than I ever have in my life (or as my Parents would confirm that I also often say: My Whole Life). I ate it first at Il Mito, where it was featured for a week on their menu - the profits of doing so benefiting the Hunger Task Force of Milwaukee. The next day, it so happened that I ate it at a lunch at MATC Cuisine dining, where it was fairly "squoodgy" in the center. Squoodginess is the hallmark of a great Schaum Torte according to my personal Schaum Torte Academy: Burp! Kitchen. After a week passed, I ate it again at a soup nite they hosted, and it was the best of the best I have ever eaten. Both achingly and angelically sweet, yet light, and yes, squoodgy. I finally knew why this term was used to describe it, since this simple to make egg foam cake is close to divine perfection when baked gently in a springform pan. I made my own for Easter, and figured I really shouldn't devour the entire thing myself (which I was certainly on the way to doing). I scooped out it's fluffy, mallowy middle and froze heaping tablespoons full on a sheet of parchment, to wait for the appropriate time to make it into an ice cream.


Don't you know, that in the course of a month in the freezer, the half of a Schaum Torte shockingly decreased in size? Partly, because the cold compressed it, and partly because I had to taste it, to make sure it wasn't going bad or anything.

Last week, I made the Daring Baker Challenge, which was kind of altered to better serve my dessert eating needs. It is currently nestled in the freezer, half-eaten, and waiting to be unearthed and served with a scoop of this delectable ice cream on the side. I was suspecting it needed just a little something... and this my friends is it. You'll have to check back on the 27th to read all about it.

Meanwhile, you can have a look at the ice cream:


Since Lo has really become my personal expert source for things exactly like ice cream (since she has made some pretty amazing ones), I asked her which plain vanilla ice cream was one of her favorites. She immediately emailed back that it was this one by David Leibovitz. I have read a bit of David's blog from time to time, but never have tried one of his ice creams. This one is my ideal ice cream: light, crystalline and easy melting. Devoid of egg, it is easy to put together and even easier to eat.

David Leibovitz's Vanilla Ice Cream
  • 2 cups heavy cream
  • 1 cup whole milk (I used 2%)
  • 3/4 c. sugar (I used a scant 1/2 cup)
  • pinch of salt
  • vanilla bean
  • 3/4 t. vanilla extract
Heat 1 cup of the cream with sugar, salt and vanilla bean (I used a leftover bean, so I used the whole pod, you can scrape out the seeds if you are using a new bean) over low heat until the sugar dissolves.

Remove from heat, and add remaining cream, milk and vanilla extract.

That's it! Cool it in the fridge - I left mine overnight - for 20 minutes if you like and then churn using whichever method you prefer. (Nigella Lawson has made a similar no-churn ice cream for those without ice cream makers: I would substitute some confectioner's sugar for granulated, and use only the heavy cream. Beat the cream to soft peaks, and freeze. Not really proper "ice cream", but delicious nonetheless and worth trying if you are in a hurry or without mechanization.)

The first spoonful reminded me of the time my family was invited to churn ice cream with our Amish neighbors. We brought ice, and they had everything else ready. We all took turns cranking the non-electric maker in the gentle, kerosene light of their home until this amazing, soft-set cream emerged. It was so good and vanilla-y and the ice crystals that marked my machined effort yesterday are exactly the same as this one I first tried nearly 20 years ago. I was half tempted to pop some popcorn, since this is how our Amish friends ate ice cream - piled high in soup bowls, served alongside equally big bowls of freshly popped and salted popcorn.

Of course, my ice cream wasn't finished in it's vanilla state, though it certainly could have been. When it was nearly done, I spooned in the remaining Schaum Torte (a little more than a cup). I could smell the little engine turning inside, making me remember how old my little appliance actually is. E sent me my ice cream maker for a Christmas present when I was living in Wilton, in the year 2000. Can I believe that this small kitchen appliance is a full ten years old? Can I also believe that one of my best friends could send me something that amazingly cool? Nope. I remember walking back to the Pie Shop Apartment with a huge box one cold December day, and opening it in GOP's company.

As I plugged it in yesterday, I was surprised at the flood of memories that returned to me and also noted that my Rise Against the Machines isn't going very well. I did hang the clothesline, and my ex-Navy Father-in-Law came to work some knot magic (knot tying is totally on my list of things to learn) on the lines, so that they will never go anywhere. I'd bet I could go to a chin up on those lines and bring down the pole before I'd snap the knot loose. But machines aside, I'm glad I got this batch of ice cream done without burning out the motor.


I felt like a drug addict: spooning cold dollops of this amazing ice cream into my mouth as fast as it was melting. I was hungry, but trying not to ruin my appetite by shoveling myself full of dessert in the late afternoon. I was half suspecting that like many things, the ice cream was at it's best right that moment, and freezing it would alter it for the worst. Fortunately, this isn't the case. I have a whole quart of this premium Schaum Torte Ice Cream languishing in my freezer, softly calling my name, and it is as soft-set as when I put it in there yesterday. Another thing for The List of Things I'll Never Buy Again: Ice Cream. Thank you very much Lo, and Mr. Leibovitz!

Recent Kitchen Adventures and the Mechanization of the World as I Know It.

Late last week, my KitchenAid died. Mid-dough, it ceased up and I quickly shut it off. I panicked. I know I have some serious issues when the sudden demise of an electrical appliance causes me to panic. I quickly called the helpline, a number I was able to find in about 30 seconds on the iPhone, and quickly made my way through a cue of automation to a live person.

The funny thing about the mechanization of the world is that it also mechanizes human beings. I'm pretty sure that the woman who initially helped me didn't hear a word I was saying. She, no doubt, was a mid-range, hourly employee who was doing everything by the textbook she was trained by. She was pleasant, but not personal.

Now, I am really not a bad person to deal with. I am as quick to call and complement as I am to call and complain, (and I like to think that I can complain with tact and class!) but when I challenged her on the way that KitchenAid stands behind their products, the one sentence straight out of the manual was not enough for me. I pleasantly got off the phone, but I was Upset. Upset that my Professional grade mixer that I use (actually more often than I at first realized) was going to have to go somewhere out of state for repair, and upset that people don't actually hear you when you talk.

After noting my unpleasantness on my Facebook page, I got a swift response from another KitchenAid employee. Not only was my experience totally different, I came out thinking much higher of the product. Within a few emails, I had a phone number to an actual person with an extension, and the person actually listened to me. Curiously, she gave me the exact same information as the first person I talked to, but she did it in such a human way that I realized that my initial displeasure was totally unwarranted.

Further, we discussed that the use of my beater blade may have contributed to the problem. I did not know that the beater blade is really not recommended for use with stand mixers, I mean, Dorie Greenspan of all people was recommending this product! I would say in the past 2 months, I was relying on the beater blade more and more for the amazing job it does incorporating batters without having to stop and scrape down the sides. This is what happens when humans listen to humans and really Hear them, real results can happen - and this is true with so much more than KitchenAid stand mixers. When my machine is repaired, I will be retiring my beater blade... and I would have to say I'd recommend you do the same if you have one.

One machine I don't know if I can give up is my digital scale...

The dough that brought down the mixer was the Multigrain Sandwich bread. I was able to finish it by hand, and gave one loaf to Peef and Lo, and just finished the last of our loaf on Monday. On the first batch, I had a third of a leftover loaf which I dried and pulsed into fine breadcrumbs. I am waiting for the perfect opportunity to pan fry some breadcrumb-dredged fresh mozzarella for one of my favorite ways to use up breadcrumbs...the crumbs smelled earthy and nutty and would be perfect fried onto some cheese and tossed into a spring salad. I think my waiting may be due to my recent obsessions with culturing (which will naturally lead to at home cheese making, I think...).

Another revelation, is that when I first started playing around with doughs, I usually did so by hand since I did have a circa 1940's mixer (my first stand mixer that now resides at Sasa's house), but I rarely used it except for cookies or cakes. After the floor-denting incident of my second KitchenAid (which really was not strong enough to keep up with what I was asking it to do: it vibrated off the counter when I was attending the Boy-O and that mixer even still works and is in my Parent's apartment as a spare), I kind of migrated to the whole "no knead" world of doughs, which is fine and convenient and does yield excellent results. But I think I have lost touch with the dough a little, and forget that it is really a living thing, full of organisms that respond to my hands.

I recall Marcella Hazan writing that to make pasta dough, it should be mixed by hand on a wooden board for a full 8 minutes. I used to do this, set to a timer, and it is fully physical work. Now, I usually get it into a mass, but rely on the power of the Pasta Queen to complete the kneading for me, rolling it through the metal rollers repeatedly with a bit of flour dusting on each pass. Faster, yes, but is it more satisfying to let machines take over? I'm not really sure. In the following days that I am KitchenAidless, I believe I will return to some good, old-fashioned hand kneading experiments. After all, these hands are the greatest multipurpose tools ever designed, and maybe I need to appreciate them a little bit more.


I got two cultures, a yogurt and a buttermilk, from Cultures for Health that was a resource Lo recommended to me. I was so impressed with the site, and their wealth of free information, that I could have also invested in some kefir and kombucha starters as well. I figured it would be best to start off slowly, one culture at a time, so I started the buttermilk on Monday. Simply mix part of the powdered culture with fresh milk and leave at warm room temperature (70 degrees) for 24-48 hours. I went the full 48, since I suspect my room temp was a bit on the cool side to begin with. I then took the tip of placing the jar in the oven with the oven light on. A strange amount of heat is generated this way... and it was a perfect way to not turn my home into a sauna for 2 days.

Now that I think I have a viable 1/2 cup of cultured buttermilk, I can begin to build it into a larger portion - according to the site, I can keep portioning off the culture and use it indefinitely! I am using this ambient oven-heat trick now to keep my culture comfortable since especially in these early spring days, when I don't have the heat on much, it can be a bit on the chilly side. Another thing for The List of Things I'll Never Buy Again, all thanks to this post by Julia which made me realize that I could do this, and easily!


I sometimes get behind in reading as much as I like, but do often peruse the photos of my flickr contacts. Marisa at Food in Jars posted photos that I knew would be explained on her site and I clicked to find exactly what I wanted: Cold Brewed Coffee. I am pretty bland in my coffee-brewing techniques at home, and rely on my favorite, local Alterra, to get me a fix of anything special I may be up for. Since I am rather home-bound most of the week, a good cup of drip joe is usually just fine for me, and I drink it (16 oz. from my little 4 cup Cuisinart) in a range of temperatures throughout the morning. I turn off the maker as soon as it is brewed, and seriously drink it from it's hot goodness around 8 until it is stone cold around 11:30. I did the method Marisa outlined last night, and enjoyed some iced coffee this morning. It's worth playing around with, and is pretty much labor and machine free!


Meanwhile, Boy-O is on the pancake diet. It is all he will eat. I have committed to making them as healthy as I can and use only oat flour, whole wheat flour and a tad of olive oil. (I can make them in my sleep: 1/2 c. rolled oats, ground in a spice mill to flour, 1/2 c. whole wheat flour, 1 1/4 t. baking powder, 1/4 t. baking soda, 1 c. buttermilk (soon to be homemade!), 1 egg, 1 glug - a Tablespoon or so - of olive oil. Mix and let stand about 5 minutes to let the batter thicken before commencing with your flap-jacking.) I can get him to eat an apple, if there is peanut butter for him to dip it into, and really nothing else. I have no idea why he is getting pickier instead of less picky, and am trying not to worry about the holes that must be evident in his nutrition... I hope this phase passes soon, and that I don't turn into a caterer which I fear has already happened.

So when this morning, as I actually swept the kitchen floor instead of plugging in the vacuum, I was reminded how much I have come to depend on machines. I used to sweep all of the time, then I bought this vacuum (the best one ever, by the way) a couple of years ago and have lost the art of the broom. I've come to the point that I use the stand mixer to even mix my no-knead bread, since I like letting it raise in the 6 quart bowl, and I figure "why not just let the dough hook do it?" since I will have to wash a spoon anyway. I let my iPhone signal me when I have email, I brush my teeth with a Sonicare, I let my dryer do most of my clothes drying. Well, today I'm getting some more clothesline and going to start to knead some dough ladies and gentleman: because I fear I am getting citified! Stay tuned, because it's going to be the Rcakewalk's Rise Against the Machines around here for awhile! Not sure where that is going to lead me, but it may even lead me more outdoors and less into the world of postings... but I'll be sure to check in, I'm sure.