December 2010 Daring Baker Challenge: Stollen

The 2010 December Daring Bakers’ challenge was hosted by Penny of Sweet Sadie’s Baking. She chose to challenge Daring Bakers’ to make Stollen. She adapted a friend’s family recipe and combined it with information from friends, techniques from Peter Reinhart’s book... and Martha Stewart’s demonstration.


Even before this month's challenge was revealed, I was contemplating making the very near cousin of stollen, fruitcake. I made fruitcake two years ago for the first time, diligently dousing it liberally and nearly daily with brandy or rum, I can't quite remember. It was a delicious result, albeit rich and dense. Meanwhile, I have never made stollen and only had tasted it once when a German employee I worked with brought some in around Christmastime one year.

All the while I worked with this beautiful dough, I was completely infatuated with it. Of course I even tasted the dough raw, an early confirmation that it was going to be my new favorite Christmas bread. It really isn't that hard to make, and the flavor will beguile even those who dislike fruitcakes.

While fruitcake is assertive and outspoken, stollen is decidedly comforting and understated. It has just a nuance of alcohol, from the rum soaked raisins, and pleasant citrus notes from the candied peel. The finished bread is rather dry, but toasts superbly and keeps well.

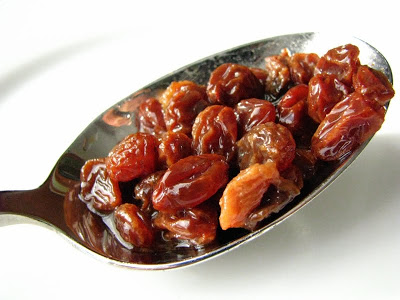
I soaked my raisins for 3 days in dark rum:


On the second day of rummy raisin soaking I made the candied peel. I used 4 oranges and 1 lemon, all organic. I don't think that I've ever made candied peel, but I will be making it again. Fortunately, I had more candied peel than the stollen recipe called for! It was delicious on it's own, but even better dipped in tempered dark chocolate.

Candied Peel (Elizabeth LaBau)
  • 3 oranges, or you could substitute 2 grapefruit or 4 lemons (I used 4 oranges and 1 lemon)
  • 4 cups sugar, plus more for rolling
  • 4 cups water
Peel citrus. Make 4 cuts along the curve from top to bottom, cutting through the peel but not the fruit.

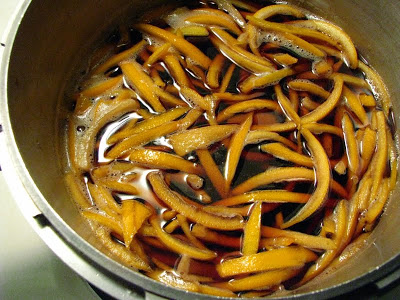
Remove the segments of peel carefully, trying not to tear them. Cut the peel into thin strips between ¼ inch to ½ inch wide. If using fruit with a very thick skin, you might want to use a paring knife to slice away some of the bitter white pith, but if it’s a thinner-skinned fruit, you can skip this step.

Place the strips in a large saucepan and cover them with cold water. Bring the water to a boil, then drain the pot.

Repeat this process two more times. This step removes a lot of the bitterness from the peels and makes the final product much sweeter, but don’t worry, some of the citrus tang remains.

Once the strips have been boiled 3 times, combine the 4 cups of sugar and 4 cups of water in a saucepan and bring it a boil, stirring occasionally until the sugar dissolves. Wipe the sides of the pan with a wet pastry brush to prevent sugar crystals from forming, then add the orange peels to the boiling syrup. Reduce the heat to medium-low and continue to simmer the peels for an hour. By the end of this time they should be very limp and start to look translucent.

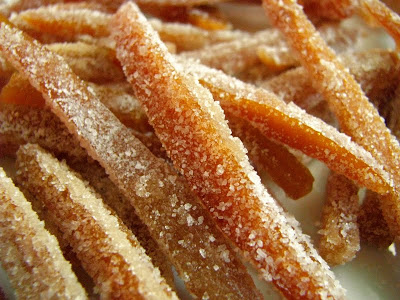
Remove the pan from the heat, and let the strips cool in the syrup.

Take the peels from the syrup and place them on a wire cooling rack set over a baking sheet. Let them drip and dry for about 30 minutes, then roll them in granulated sugar. Place them back on the wire rack in a single layer, and let them dry overnight at room temperature. If you need to speed up this process, you can put them in the oven on the lowest setting for about 30 minutes


Stollen dough is a yeasted dough that is slowly raised under refrigeration. In addition to the candied peel and rummy raisins, I added shaved almonds and dried tart cherries. The tart cherries were instead of candied artificially red cherries, and I have to say they were delicious. I dipped some of the leftover cherries in the tempered chocolate, and they were great as well. They may have been nearly black instead of bright red, but they were better in my opinion. The things that bothered me most about my fruitcake were redeemed in using the best non-artificial fruits in my stollen.


Our instruction was to make one large stollen wreath, but I decided to cut the dough into fourths and make smaller versions that I could gift. Another great thing about stollen is that it stores well in either the freezer or the fridge, so I didn't feel bad about not knowing just whom I would gift them to. One went to my Mom, and then on to her freezer since we had entirely too many sweets at our Christmas feast. Another went to my in-Laws who shared it with another neighbor. The final 2 wreaths are here with me now, one partly eaten from visitors last week and the other waiting on his fate in the coldest part of my basement.


Out of the oven, the wreaths get a brushing of butter and confectioner's sugar. The more coatings of butter and sugar, the longer the preservation time. Since I was planning to consume them fairly quickly, I did two applications that Penny recommended. In storage for about 2 weeks, the sugar "disintegrated" into the top of the bread a little, and marred that pretty snowlike appearance. But, since the bread is best served toasted, this did not really matter and probably saved my toaster from a bit of melted sugar mess...


It's not so often that I completely follow instruction on the first go around, but this recipe I did. I used metric measure. This dough was masterfully written and tested, and turned out better than I imagined it would. It doesn't stick as it's rolled out, making it one of the easiest yeast dough recipes I've ever made. I am in Love.

Stollen (from Penny, of Sweet Sadie's Baking)
  • ¼ cup (60ml) lukewarm water (110º F / 43º C)
  • 2 packages (4 1/2 teaspoons) (22 ml) (14 grams) (1/2 oz) active dry yeast
  • 1 cup (240 ml) milk
  • 10 tablespoons (150 ml) (140 grams) unsalted butter (can use salted butter)
  • 5½ cups (1320 ml) (27 ozs) (770 grams) all-purpose (plain) flour (Measure flour first - then sift- plus extra for dusting)
  • ½ cup (120 ml) (115 gms) sugar
  • ¾ teaspoon (3 ¾ ml) (4 ½ grams) salt (if using salted butter there is no need to alter this salt measurement)
  • 1 teaspoon (5 ml) (6 grams) cinnamon (I used the spicy cassia)
  • 3 large eggs, lightly beaten
  • Grated zest of 1 lemon and 1 orange
  • 2 teaspoons (10 ml) (very good) vanilla extract
  • 1 teaspoon (5 ml) lemon extract or orange extract
  • ¾ cup (180 ml) (4 ¾ ozs) (135 grams) mixed peel (link below to make your own)
  • 1 cup (240 ml) (6 ozs) (170 gms) firmly packed raisins
  • 3 tablespoons (45ml) rum (I used 3 T. rum every day for three days, and the raisins soaked nearly all of it up! I added the raisins and any remaining rum to the dough.)
  • 12 red glacé cherries (roughly chopped) for the color and the taste. (optional) (I used dried, organic, tart cherries)
  • 1 cup (240 ml) (3 ½ ozs) (100 grams) flaked almonds
  • Melted unsalted butter for coating the wreath
  • Confectioners’ (icing) (powdered) sugar for dusting wreath

Note: If you don’t want to use alcohol, double the lemon or orange extract or you could use the juice from the zested orange.

Soak the raisins
In a small bowl, soak the raisins in the rum (or in the orange juice from the zested orange) and set aside. See Note under raisins.

To make the dough

Pour ¼ cup (60 ml) warm water into a small bowl, sprinkle with yeast and let stand 5 minutes. Stir to dissolve yeast completely.

In a small saucepan, combine 1 cup (240 ml) milk and 10 tablespoons (150 ml) butter over medium - low heat until butter is melted. Let stand until lukewarm, about 5 minutes.

Lightly beat eggs in a small bowl and add lemon and vanilla extracts.

In a large mixing bowl (4 qt) (4 liters) (or in the bowl of an electric mixer with paddle attachment), stir together the flour, sugar, salt, cinnamon, orange and lemon zests.

Then stir in (or mix on low speed with the paddle attachment) the yeast/water mixture, eggs and the lukewarm milk/butter mixture. This should take about 2 minutes. It should be a soft, but not sticky ball. When the dough comes together, cover the bowl with either plastic or a tea cloth and let rest for 10 minutes.

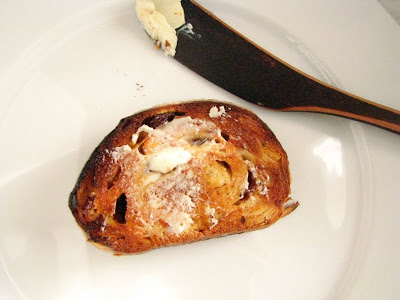
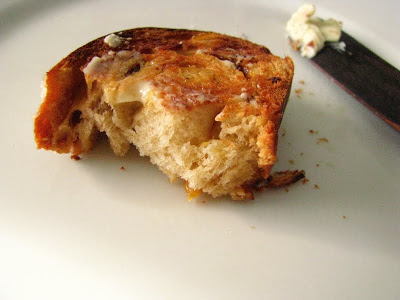
Add in the mixed peel, soaked fruit and almonds and mix with your hands or on low speed to incorporate. Here is where you can add the cherries if you would like. Be delicate with the cherries or all your dough will turn red!

Sprinkle flour on the counter, transfer the dough to the counter, and begin kneading (or mixing with the dough hook) to distribute the fruit evenly, adding additional flour if needed. The dough should be soft and satiny, tacky but not sticky. Knead for approximately 8 minutes (6 minutes by machine). The full six minutes of kneading is needed to distribute the dried fruit and other ingredients and to make the dough have a reasonable bread-dough consistency. You can tell when the dough is kneaded enough – a few raisins will start to fall off the dough onto the counter because at the beginning of the kneading process the dough is very sticky and the raisins will be held into the dough but when the dough is done it is tacky which isn't enough to bind the outside raisins onto the dough ball.

Lightly oil a large bowl and transfer the dough to the bowl, rolling around to coat it with the oil. Cover the bowl with plastic wrap.

Put it in the fridge overnight. The dough becomes very firm in the fridge (since the butter goes firm) but it does rise slowly… the raw dough can be kept in the refrigerator up to a week and then baked on the day you want.

Shaping the Dough and Baking the Wreath

1: Let the dough rest for 2 hours after taking out of the fridge in order to warm slightly.

2: Line a sheet pan with parchment paper.

3: Preheat oven to moderate 350°F/180°C/gas mark 4 with the oven rack on the middle shelf.

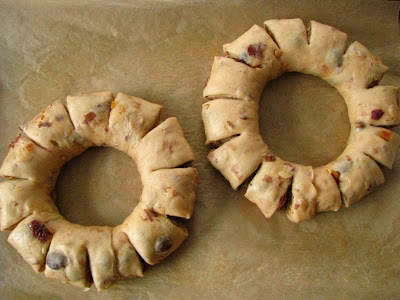
4: Punch dough down, roll into a rectangle about 16 x 24 inches (40 x 61 cms) and ¼ inch (6 mm) thick. Starting with a long side, roll up tightly, forming a long, thin cylinder.

Transfer the cylinder roll to the sheet pan. Join the ends together, trying to overlap the layers to make the seam stronger and pinch with your fingers to make it stick, forming a large circle. You can form it around a bowl to keep the shape.

Using kitchen scissors, make cuts along outside of circle, in 2-inch (5 cm) intervals, cutting 2/3 of the way through the dough.

Twist each segment outward, forming a wreath shape. Mist the dough with spray oil and cover loosely with plastic wrap.

Proof for approximately 2 hours at room temperature, or until about 1½ times its original size.
Bake the stollen for 20 minutes, then rotate the pan 180 degrees for even baking and continue to bake for 20 to 30 minutes. The bread will bake to a dark mahogany color, should register 190°F/88°C in the center of the loaf, and should sound hollow when thumped on the bottom.

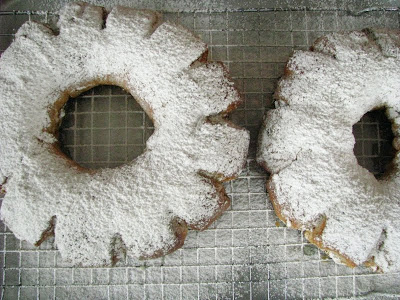
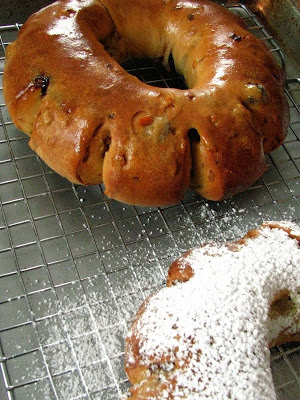
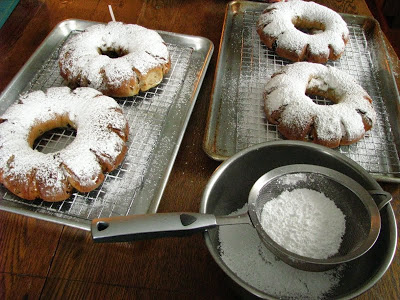
Transfer to a cooling rack and brush the top with melted butter while still hot.
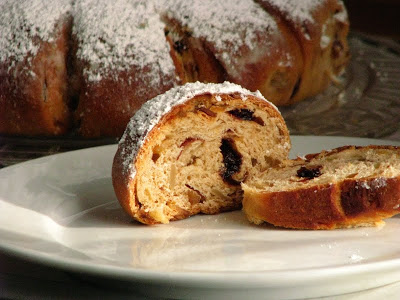
Immediately tap a layer of powdered sugar over the top through a sieve or sifter.
Wait for 1 minute, then tap another layer over the first.
The bread should be coated generously with the powdered sugar.
Let cool at least an hour before serving. Coat the stollen in butter and icing sugar three times, since this many coatings helps keeps the stollen fresh - especially if you intend on sending it in the mail as Christmas presents!

When completely cool, store in a plastic bag. Or leave it out uncovered overnight to dry out slightly, German style.

Storage:

The more rum and the more coatings of butter and sugar you use the longer it will store. The following is for the recipe as written and uses the 45 mls of rum and two coatings of butter and icing sugar.

Stollen freezes beautifully about 4 months. The baked stollen stores well for 2 weeks covered in foil and plastic wrap on the counter at room temperature and one month in the refrigerator well covered with foil and plastic wrap.


This is exactly the type of dessert I've been favoring lately: not too sweet and as good for breakfast as it is for after supper. I'm fairly certain that the longest time frame in my recent baking history was in the few hours I made myself wait to cut into the fresh stollen. The Boy-O ate the snowy white sugar from the top, but handed me the rest of the bread. I happily ate his portion. As if I thought this bread could get better, the next day, I tried some toasted. It reminded me of a waffle, toasted perfectly outwardly, but remaining a tad soft in the center.

Some stollens have marzipan middles, and I can scarcely imagine anything improving this bread, but I may try it with this variation sometime in the future. I'll bet I won't wait until next Christmas to try it, that's for sure. A huge thank you to Penny for selecting this fruitcake variation that I'd likely never have made otherwise. It will certainly be a part of my Christmas baking in years to come! Remember to check out other Daring Baker interpretations of stollen: the Daring Baker site has a re-vamped blogroll to aid you!


(this post has been Yeastspotted.)

Christmas Baking

Every year, I feel as if the last parts of December hurtle by at the speed of light. Each month brings it's own enjoyments, but December is a tricky one. He enters quietly, on the heels of the Thanksgiving feast, and the days quietly tick by until Christmas Eve.

Benevolent Christmas Day enters, that singular day when it seems the whole of the world is silent and reverent. Stores are closed, streets are empty. Families gather and some lonely souls feel lonelier than any other day of the year. Then, all too soon, collective breaths are released as the 26th dawns and the same harried consumers who wait all year for Black Friday are at it again: on line at countless stores stocking up on merchandise hideously discounted. The world returns to it's day-to-day life and I wish the time would slow down, that my Christmas present could somehow miraculously meet all of my Christmas pasts and that my memory was as clear as I will it to be.

The week between Christmas and New Years seems like a spare month, unrelated in all ways to December. In the past, when I held conventional jobs, I always took Christmas week off. The seven days separating holiest day of the year from the last day of the year hovers weightless and without expectation. There is not really much that needs to be done. The house is a mess, I enjoy the last week of my lighted Christmas tree, I inventory how many cookies are still left to be consumed.

Vowing a platform of homemade or consumable gifts for this year, I have 13 or 14 varieties of sweets as of the 22nd of December, 2010. With each batch that left the oven, I thought of the people that would most like each varietal. A single batch never seems like that much work, or that many cookies and then suddenly, I view the stores in the basement hiding spots and it's overwhelming how much sugar I have pack-ratted away.


mint chocolate crackles.

I never follow the good advice of making the same tried and true cookies that I've made for years. There are a few that are old friends of course, but my Christmas season of baking is generally made up of new recruits, cookies that have piqued my interest from other blogs, my kitchen library, or from rented cookbooks.

One such rented cookbook was Crazy About Cookies by Krystina Castella . I had actually bookmarked three varietals to try out this year, but only got to two of them. The first was a delicious cross between date bars and fig "newton" type bars. I have had these on the brain since Julia posted a picture of Linda Ziedrich's version! Krystina uses both dates and figs, reduced in pineapple juice. Being a proud VitaMix owner, I made fresh pineapple juice with ice and whole pineapple - core and all. I think it made the the filling pleasantly tropical. I have to make these again using some whole wheat flour.


Krystina's book also had a recipe for marzipan, which I have never made at home. I used almond meal that was not made from blanched almonds, so it was more "rustic" in appearance than I was prepared for. There is also a raw egg in the dough, so with these two "undesirables", I quickly searched for a way to make a baked marzipan cookie. Fortunately, I came upon this recipe from Chef Jeena. I was excited to try these little cloaked cookies, and I was not disappointed. They were surprisingly light, perfect with coffee or tea, and intriguing due to their shape. They will go on the save list.

Because I used two sources, you may have a little more marzipan than cookie batter. Marzipan freezes well, and can be added to all kinds of baked goods. I want to try dropping some in to the center of a muffin...


Marzipan Cookies (adapted from Krystina Castella and Chef Jeena)

For the marzipan:
  • 2 1/4 c. almond meal (finely ground almonds) - use blanched almonds for the whitest result
  • 1 c. powdered sugar
  • 1 c. superfine sugar
  • 1 t. lemon juice (pretty sure I used a tablespoon by accident...)
  • 1/2 t. or more almond extract (I can never have too much almond extract)
  • 1 egg, beaten
Combine almond meal and powdered and superfine sugars together in a bowl and mix well. Add the rest of the ingredients, and mix until a dough forms. Taste to see if you added enough almond extract. Using about a tablespoon of dough, roll dough into balls.

For the Cookie Batter Topping:
  • 1/2 c. butter, room temperature
  • 1/2 c. granulated sugar
  • 2 T. milk
  • 1/2 t. vanilla extract
  • 1 egg
  • 2 egg whites
  • 1 1/2 c. ap flour
  • 1/2 t. baking soda
  • 1/2 t. baking powder
  • pinch of salt
  • 1 t. "mixed sweet spice", I used combination of cinnamon, nutmeg, ginger and cloves
Preheat oven to 350.

Cream butter and sugar until fluffy. Add milk, vanilla, and whole egg and blend until well combined.

Sift flour together with baking soda, baking powder, salt and sweet spice. Add to butter mixture and mix briefly to combine.

Beat egg whites until frothy, but not forming peaks. Add into batter, mixing until well combined. (Try and be gentle, and not over beat.) Add a little additional milk if batter seems too dry. It will be sticky and rather thick.

To make the cookies, top a marzipan ball with a little "hat" of batter. It may take a few tries to get your method down, but I smashed the balls down slightly so there was a flat base that wouldn't topple over the weight of the "hats" (see photos). Leave plenty of space for expansion between cookies. Bake for 15-18 minutes, until the tops are lightly browned.


Chef Jeena recommended topping with powdered sugar or a drizzle of icing, but I liked them as is.

I also finally made some peanut butter cups. I have wanted to make these forever and never have. When I saw the pictures from Chicho's Kitchen this fall, I made it a point to bring an end to the procrastination. I didn't officially temper the chocolate, which may have been a mistake, but they are still tasty. I did temper the chocolate to dip some candied orange peel (leftover from my secret Daring Baker's Challenge, but more on that after Christmas...), and what a difference it made. I followed the instructions from the King Arthur's catalog that just happened to print it in their latest issue.


Glossy, gorgeous, tempered chocolate!

I now have one last batch of cookies to bake, the Kringle Cookies that won the Journal Sentinel's cookie contest. The sour cream and butter dough is resting now in the refrigerator, and later, I'll cut them and fill them with jam prior to baking. I'm thinking to use some of the last of my tart cherry jam and maybe some strawberry that is ample on the basement shelves.

As I approach the end of my baking, I realize that Christmas still holds every fascination for me that it did growing up. Every year, making cookies, I think of my Mom making hundreds of sugar cookies to give away. After they were baked and cooled, the whole family would stand around in the kitchen decorating them. Mom would spread the icing, and the rest of us would decorate with sanding sugars and red hots, silver dragees that would nearly break your teeth (you aren't actually supposed to eat them!). My brother's favorite cookies were church windows, made with colorful mini-marshmallows and coated in chocolate and coconut. Though none of us have made them in years, I can still taste them when I think about it - and that is all part of the magic of Christmas. The good and the not so good of all the years past come flooding in at Christmastime, and remind me in particular of the most important things given to me in life.

Giving cookies seems appropriate to me because of that. Something sweet and given with no strings attached: I hope my recipients gain just a touch of the joy that I've had making, baking and giving. It seems such a small gesture compared to what I've been given.

Merry Christmas!!!


Cookies.

I have not been so prolific lately. Eating less, but more of my leftovers, this new nod to frugality leaves me a bit lackluster for postings. I am not, however, lackluster for December and all of it's joys.


My favorite of yearly traditions happens in December: cookie baking. In the spirit of giving, I suppose, the long-standing tradition of Christmas cookies does not fall dormant with me. I not only celebrate Christmas, I am excited about it and of the prospects of giving sweet things to people I know and love, and perhaps even to some of those that I may not know so well. When my freezer hasn't been so blessedly stocked in years passed, I start cookies the week after Thanksgiving, letting them linger in the frozen depths for a few weeks. Batch a day baking in the past has garnered me 12-15 varietals of treats to pack into tins, and by the time I'm finished I hardly notice the work. I start with long-curing things like rum balls and fruitcake (I opted out of that this year), and end the week before Christmas with last minute candies like fudge.

But this year, my freezers are full to their brims, and I am starting later than usual to be ensure proper freshness in my finished labors. This afternoon I made chai snickerdoodles, playing around with the spice mixture to include the chai blend I have from the Spice House. Snickerdoodles are something I don't often make. Maybe it's their ridiculous name, but they often seem bland or unsatisfying to me. They're not. I think what I missed all this time was proper seasonings, something more sophisticated to satisfy my snobbish palate. But no matter their exquisite taste, they really remind me of how much I enjoy baking cookies.

Baking cookies is really unlike any other type of baking. They change each moment; a minute or two of baking time makes worlds of difference, and so does the temperature of the cooling sweet. The flavor of a hot or warm cookie is often vastly different than a cooled one. Because of how delicious they were, and because it was a frigid, blustery Sunday afternoon, I took the time to fully appreciate all the changes they went through - even listening to the sounds they made as they cooled on the pans.


Just out of the oven.

Fat balls of butter-heavy dough melt just enough in 10 minutes of oven heat, but they don't have so much butter that they spread into crisp and not chewy cookies. They come out of the oven puffed with hints of cracks, and then fall gently, deflated, remaining chewy in their middles. I ate one hot, one warm, and one at room temperature, and loved them all ways. Both my boys loved them, too. I found enough space to hide the remainders in the freezer, where they will remain fresh until giving time... away from all of our leering hands.

This particular variety has chai spices in both the dough and in the granulated sugar coating. The chai spice from the Spice House doesn't have any nutmeg in it, so I added a little. It does, however, have quite a lot of cardamom which lends a slight bitter note to these new favorites.

Chai Snickerdoodles (slightly adapted from Amrita at The Sweet Art)

makes 3 dozen depending on the size you make them
  • 1 1/2 c. raw sugar (I pulse it up briefly so it resembles granulated a bit more)
  • 1/2 c. of butter
  • 1/4 cup oil
  • 2 eggs (room temperature - you can soak them in hot water for 15 minutes or so if you forget to take them out)
  • 2 3/4 c. AP flour
  • 2 t. cream of tartar
  • 1 t. baking soda
  • 1/4 t. salt
  • 1 t. Cassia cinnamon
  • 1/4 tsp ginger
  • 1/2 t. chai spice from the Spice House (or use spice mix proportions from The Sweet Art)
  • 1/8 tsp nutmeg
For rolling, mix together in a small bowl:
  • 1 t. Cassia cinnamon
  • 1/4 t. ginger
  • 1/8 t. nutmeg
  • 1/2 t. chai spice mix
  • 1/4 c. white granulated sugar
Preheat oven to 350.

Cream sugar and butter together until fluffy. Add oil, and then eggs, beating a full minute after each addition.

Mix all remaining dry ingredients together in a small bowl, then add them to the butter, oil and eggs. Mix briefly until a soft dough forms.

Form balls of dough, and roll in the sugar/spice mix. Bake at least 2 inches apart for 8-10 minutes until done, and let cool for several minutes on the baking sheet before removing to a wire rack to cool completely.


Cooled 5 minutes on the pan.

I'm not sure that there is anything better than turning on the oven on a cold day, and then gobbling up warm cookies as they emerge. And while not particularly "Christmassy", I have a feeling that this varietal will go over well. I'm sure I'll have plenty of more traditional cookies rolling out of the oven during the next week or so that I won't need to worry. Meanwhile I'll go on enjoying my freezing December, the Christmas season, and eating more warm cookies. And I'll be more than thankful for all three.

Meanwhile...

One thing about keeping a project such as a food blog: I sometimes feel obligated to post something, even if I don't particularly feel like it. Usually this feeling of urgency happens when days span into a whole week of silence on the page. It's certainly not because there has been no cooking and/or baking going on.

Part of the recent reason has been sickness, nothing so serious- just a common cold. The day before Thanksgiving I rapidly worsened. Sneezing, at my most impressive, 12 times consecutively when my eyes watered, and my nose ran, and I lost all traces of an appetite. Great. Just in time for the biggest feast of the year. I felt better fairly quickly, and then felt like a relapse accosted me. Perhaps even a second separate cold, complete with a tiny sore throat. Fortunately, this second baby cold was no match for the probiotic/sourdough/kombucha launch that is usually my regimen, and today I finally feel top notch and more like writing about foodstuffs.

Last Friday, I was feeling pretty hungry for the first time in a whole week. I also had an uncontrollable urge for something chocolately. I made some Sourdough Brownies, which I'm pretty sure are my favorite brownie to date. I wouldn't lie and say that they tasted so much of my sourdough starter, but the starter obviously lent it's magic juju to the texture. They were black and rich, moist, but still a bit crumbly. I used the last of my macadamia nuts and some walnuts which were a surprisingly great combination. The best thing about using sourdough in a baked good continues to be that I get to use it up! I feed the little guy twice a day, so it quickly grows. One week, I'm going to try and slip some into everything I make. Maybe I'll have some time and creativity in the new year. Meanwhile, I still can't cut back on his feeding; I feel if I am good to him, he will be good to me. And he has already been so good.


It's safe to say that I am positively addicted to baking with raw sugar. If I want it to dissolve more into a batter, I run it quickly through the VitaMix so it approximates granulated. In most things, I leave it to it's large-grained self and I'm never dissatisfied. I love the crunch of it in these otherwise fudgey brownies.

Chocolate Sourdough Brownies (adapted from Loreli Aguda)
  • 1/3 c. butter
  • scant cup sugar (I used raw)
  • 2 oz. bittersweet chocolate
  • 1 egg, beaten
  • 1/2 c. AP flour
  • 1/4 c. cocoa powder
  • 1/2 c. sourdough starter
  • 1/2 baking soda
  • 1 t. vanilla
  • 1/2 t. salt
  • 1/2 c. chopped nuts of your choice
Preheat oven to 375. Grease a 9x9 inch pan with butter and set aside.

Melt butter and chocolate over low heat in a small saucepan. Set aside to cool. In a medium bowl, whisk together flour, cocoa powder, baking soda, salt and sugar and set aside.

Stir egg, sourdough starter and vanilla into cooled chocolate mixture, and mix until well blended.

Add wet mixture to dry mixture and stir gently to combine. Fold in nuts, and spread into prepared pan.

Bake 30 to 35 minutes or until the edges begin to pull away from pan.


last bite.

Saturday morning, it was snowing, our first snow. The first snow is always exciting to me, and it makes me so happy that I live in a place with changing seasons. I frequently get sidetracked when we have fluffy snow, the kind that falls in perfect flakes on your mittens. I spend whole minutes examining each tiny flake, the perfection of fractals in something so minuscule. I may get to complaining with the rest of them: the conditions of the driving, the VIPIR radar and the TV meteorologists and their "wintry mix" lingo, but I secretly love Winter. I wish that I was 8 again and didn't get cold playing outside, no matter what the thermometer says. Instead, I'm in my '30's, and baking things dusted heavily with powdered sugar, my grown-up equivalent to playing in the white stuff.

Rum Balls are always the first of my Christmas baking. They truly benefit from lazing around for a few weeks, allowing their "rumminess" to fully develop. I usually hide them in my basement so I don't keep snitching them.

This recipe is from Bon Appetit, and I've been making the same one for some time. I don't recall ever having a problem with the "dough" being too soft to roll, but that kind of happened to me this time. It could be because I used agave nectar instead of the corn syrup, (and had found a natural version of vanilla wafers that were an ounce shy of the requirement,) but I just added an extra half cup of walnuts and then let the batter rest in the fridge for 45 minutes before rolling them out. I guess, I used the raw sugar in these too and that could also have added to the textural differences. These could be vegan if you use vegan chips. With all of those changes, I'd better write it down, so we all don't forget.


Rum Balls (adapted more than I thought from Bon Appetit)
  • 1 cup semisweet chocolate chips (about 6 ounces) (I used the weight version, and bittersweet chips)
  • 1/2 c. raw sugar
  • 3 T. agave nectar
  • 1/2 c. dark spiced rum
  • 2 1/2 cups finely crushed vanilla wafer cookies (about 10 ounces) (I used a 9 oz. box of Back To Nature, pulverized in the food pro)
  • 1 c. walnuts, nearly pulverized in food pro - leave a few larger bits (may need to add an additional 1/2 c. nearly pulverized nuts, like I did...)
  • 1/2 c. or so powdered sugar for rolling in

Stir chocolate in top of double boiler set over simmering water until melted and smooth. Remove from over water. Whisk in sugar and agave nectar, then the rum.

Mix vanilla wafers and walnuts in medium bowl to blend; add chocolate mixture and stir to blend well. If the "dough" seems soft, refrigerate until the chocolate hardens up enough to roll into balls.

Put a half cup or so of powdered sugar in shallow bowl. For each rum ball, roll 1 scant tablespoon chocolate mixture into generous 1-inch ball. I use a smallish disher. Roll balls in powdered sugar to coat evenly. Cover well and refrigerate.

Bon Appetit says they keep up to 5 days, but I say up to a month, or maybe even longer. But they'll never last that long.


This morning, I felt particularly cold driving the Boy-O to school. When I rushed back to my warm kitchen, I made caramels for the first time. I confess that I have a bottle of somewhat ancient corn syrup hiding in the cupboard, usually for a recipe that calls for a tablespoon here and there like those rum balls. I did not have enough to get the 1/4 cup I needed for these soft caramels, so I subbed in honey for the rest. I frequently think of Alton Brown, without whom I would be clueless about sugar. In particular, his explanation of sugar and how to heat it without it becoming a brittle mess is genius.


Intermission.

The part with Shirley Corriher that unfortunatly splits this video in half is the most helpful when it comes to heating sugar. So without furthur ado, part 2:


And, now you know all about sugar.

The key, it seems, is to mix a tiny bit of fructose with the glucose to prevent seizing. Since I was using the raw sugar, which is less "pure" than the white stuff, I'm sure that also altered the final result. But I'm happy, since they are amazing caramels: soft, sweet and briefly salty. (I also read that honey does have a high percentage of fructose, so maybe in the future, I'll try it without any corn syrup and use all honey!) I didn't add quite as much salt to the actual caramel, preferring instead to infuse the lumps of caramel with a few grains of my large Celtic sea salt when I wrapped them up. Oh, and I got 100 pieces of candy. I counted.


Soft Caramels (adapted from Foodiebride)
  • 1 cup heavy cream
  • 5 tablespoons unsalted butter, cut into pieces
  • 1/2 tsp vanilla
  • heavy pinch of kosher salt,
  • 1 1/2 c. raw sugar
  • 1/4 cup Lyle’s Golden Syrup (can substitute light corn syrup) (I used corn syrup and honey, 2/3 of which was syrup and 1/3 was honey approx.)
  • 1/4 cup water

Line bottom and sides of an 8-inch square baking pan with parchment paper, then lightly butter parchment. I used a 9x9 pan, since that is the only size I have.

Bring cream, butter, vanilla, a pinch of kosher salt to a boil in a small saucepan, then remove from heat and set aside.

Boil sugar, corn syrup, and water in a 3- to 4-quart heavy saucepan, stirring until sugar is dissolved. (Stir only when the mixture is cold to combine, then use the swirling method.) Boil, without stirring but gently swirling pan, until mixture is a light golden caramel.

Carefully stir cream mixture into the caramel (mixture will bubble up) and simmer, stirring frequently, until caramel registers 248 on thermometer. Pour into baking pan and cool 30 minutes. Sprinkle fleur de sel or Celtic sea salt over the top of the caramel for a nice salty crunch and let sit until completely cooled. Cut into 1-inch pieces (I buttered a pizza cutter), and then wrap each piece in a 4-inch square of wax paper, twisting 2 ends to close. I started cutting the caramels after they rested about 45 minutes, and it was still hot. But, I kind of liked wrapping them up into "tootsie roll" shapes. It took me several dozen to figure out the best way to wrap, but now I've got it down!


They were soft, even when firm enough to hold the square shape for photographing purposes... and quickly molded into the shape my hands forced them via the parchment paper. You could wrap them in plain waxed paper, but I though this looked nice. I determined to put the square of soft caramel in the center of a rectangle about 4x3 inches. Fold it up like a cigar, then kind of mash the right side first to crinkle the paper, otherwise the parchment tears. Then, twist up the right side tightly. When working the left side, first firmly press the soft caramel toward the center, then repeat as for the right side. You'll have plenty of tries to get it right. And, you can eat the mistakes. I effectively ruined my lunch appetite. That's alright. It was worth it.

Meanwhile, I'm looking forward to eating some of plain old white bread for supper tonight. I just had to try making a new loaf of white bread it even though I'm sourdough crazy lately. It's an insanely easy and traditional white sandwich bread King Arthur posted the other day. I used yogurt instead of the sour cream, and it made the loveliest soft dough. It raised up out of the pan like a beautiful cloud, confirmation that even bland American white bread can be transformative and nourishing in and of itself once in a while. Especially when eaten with other healthy things. Oh, and it does makes killer toast.

I recently started another blog: rcakewalk loves links. It's a place where I've decided to keep track of my recipe links that are still taking over my life. I'm getting better about posting a quick reminder where I found something, so check it out if you wonder what's going on in my kitchen over here. I will be posting more of the links I'm intending to make soon. It's likely comprised of cookies and candies for holiday giving... some of my favorite baking of the year!

So, after proofreading this post, I'd hardly know I was sick and not feeling so productive! I guess there is more to the meanwhile than I often realize, and that is why it's nice to keep up a schedule of a blog. So much happens and is made, and sometimes unfortunately it is forgotten. A blog is a nice way of simply remembering just when and why and how I did something. And, who am I kidding... I am addicted to it. As sure as sugar calls my name from the other room, I want to tell someone about something I've just made, and this happens to be the perfect format for not annoying those who do not wish to be annoyed!

Not-So-Exciting (Yet So Exciting) Pumpkin Muffins


In the chicken yard of baked goods, muffins are probably at the bottom of my baking pecking order. Don't get me wrong, I love them - they just seem to be something more "utilitarian", something to satiate a hunger pang rather than something I'll go out of the way to bake just for the joy of baking. Because they tend to be more virtuous than cupcakes, some muffins beg to be slathered in jam or butter: a hope of becoming more than they are. Some are perfect candidates for the freezer, pucks of frozen nutrition, waiting for me to remember that I stashed them in there. They do come in handy when I remember I'm hungry as I'm running out the door, but I don't often crave them, pushing them aside for other sweet, compact grab-ables such as cookies.

Every once in a while, I make a muffin that I want to eat all 12 of, and then set out to make a second batch. When that happens, I make a note and then change my tune. "What was I thinking", I ask myself, "I love muffins"! I would all of a sudden travel the world over to be able to crawl humbly back to my kitchen and mix up a batch of hand-sized quick breads, and I wouldn't even wait for them to cool before popping them into my mouth.


I have two confessions, and one of them involves Martha Stewart. The first confession is that I'm cheap. I like to think I'm cheap with class, but not always is that the case. When standing overwhelmed at the baking aisle at the non-food-co-op-grocery prior to Thanksgiving, I evil-eyed the cans of pumpkin. I don't know why, but I could not bring myself to buy the 15 oz. cans, when the 29 oz. cans were cheaper per ounce. I solemnly cursed the manufacturers that they are always putting one ounce less in something just so that a purist baker somewhere will succumb to buying the 15 oz. cans instead of a 29 oz. can so that she won't be short. Seeing as I don't buy all that much canned food, my steaming was brief, but still. Do they think I don't notice? I do. I still buy the large cans to spite them, then store the leftovers in the fridge for a few days until I can figure out what to do with them... in the case of this post, making pumpkin muffins.

My second (and unrelated) confession is that I have no real opinion about Martha Stewart. She's smart, obviously driven, and has more well appointed houses than I'll ever have. She cooks, bakes, decorates, and reads and still has time to gild a lily. I like her books, love their layouts and photography, but often find fault in her recipes. I take her recommends with a grain of salt, and don't buy into every new adventure she concocts. When I grabbed SoNo Baking Company Cookbook from the new shelf at the library, admittedly it was for the gorgeous cover. When I opened it up and read the preface by Martha herself, I discovered that it's writer was at one time one of the minions of Martha's staff. I had the book sitting on the counter for 2 weeks before reading any further.

Just a few days ago, I finally cracked it back open and was rewarded handsomely with this recipe. Besides a tome of hugely interesting baked goods, I also found in it that I shouldn't judge Martha. She is what she is, and she does recognize great talent. John Barricelli writes this book well, and also clearly has amazing ideas about baking. When I couldn't actually decide what muffin to try first, I knew he had me. And after the first bite of soft, almost-as-good-as-a-cupcake pumpkin muffin, I knew that this indeed is a great book.


I hardly alterered John's recipe. I did reduce the sugar slightly (and I used raw instead) and omitted the raisins on request of the Boy-O. He eats them fine on their own, but doesn't like them "in things" all of a sudden. I added walnuts instead, and sprinkled some on the tops prior to baking. Because the muffin is so moist and cake-like, they stuck out like ants on a rock. No matter, they tasted great all toasted up. Next time, I'll probably leave them off though.

Pumpkin Muffins (adapted from John Barricelli, The SoNo Baking Company Cookbook)
  • 1 1/2 c. ap flour
  • 1 t. baking soda
  • 1 t. kosher salt
  • 1/2 t. cinnamon
  • 1/2 t. ground ginger (or 1/2 T. grated fresh ginger)
  • 1/4 t. ground nutmeg
  • 1/2 t. ground cloves
  • 1 c. sugar (1/2 cup is plenty!)
  • 1/2 c. coconut oil (or part coconut part olive oil)
  • 2 eggs, room temperature
  • 15 oz. pumpkin puree (I just now noticed that the recipe called for half a can of pumpkin... I used a whole can equivalent, and I was more than happy with the results!)
  • 1/4 c. unsweetened applesauce
  • 1/2 c. raisins, optional (John suggests adding 1/2 c. nuts and/or chocolate chips as well)
  • 2 T. chia seeds, optional
Preheat oven to 375, with rack in middle position. Spray a standard 12 cup muffin tin, or butter generously.

In a medium bowl, whisk flour, baking soda, salt and spices together.

In a large bowl, whisk sugar, oil, eggs, pumpkin and applesauce together. Add the dry ingredients and fold until the mixture is well combined. Fold in raisins and chia seeds if using, and any other mix-ins.

Portion into muffin tin, about 1/4 c. per muffin (I use a disher). Bake for 20-25 minutes, until tester comes out clean.

Transfer pan to a rack to cool for 10 minutes. Then, using a knife as an aid, gently upturn the muffins onto their sides to cool completely in the pans.


Well, I guess the extra pumpkin I unknowingly added explains the incredibly soft and custard-like interiors... and why I got more than a dozen. I baked the remaining batter into bite-sized mini muffins, and Boy-O ate all 6 of them straight away, I ate the remaining 2. He was impatient for the bigger ones to cool, and couldn't wait to gobble up even more of them, so we know this is a good recipe.

Just as I was thinking I was "pumpkin-ed out", these beauties prove me wrong. I almost think that I could never be tired of pumpkin. Or muffins. Now that we're best friends again, the muffin and I have to have some more serious talks. If you have any varietals that I need to meet, please be sure to let me know. Meanwhile, it's almost cookieposter time... unless I decide to give Christmas Muffins this year. I doubt I'd hear any complaints if I use more of John Barricelli's recipes.