Rhubarb Redux, and Kuchenish is a Good Word.


I could eat my weight in rhubarb. This year, I have found several neighbors who grow it but don't eat it, and I will never understand why some detest its spunky flavor. One or two such haters live under my roof. When I read aloud yesterday that rhubarb can be good for cutting cancer risks and improving conditions after some types of cancer, my Husband (who has had cancer) said he'd rather have cancer than eat rhubarb. The prolific neighborhood rhubarb has an outlet in me for the perennial crop, and I probably went a little overboard for the holiday weekend - baking up gluten-free, rhubarby treats all for me.

gluten free rhubarb crisp
gluten-free rhubarb crisp.

I think every pan of rhubarb dessert I've ever made has a corner mysteriously missing before the pan has been out of the oven 5 minutes. It's hereditary; I am not sure I could help it if I tried, though admittedly I haven't tried very hard. I usually wait until I have rhubarb-loving company to make rhubarb desserts, but I was tired of waiting - and when one of those neighbors gave me some fresh rhubarb, I decided to make myself some low-sugar, mostly wheat free experiments. They were both so good that I have to record them for the future.

rhubarby notes.

When I bake for myself, I often use little scribbled sheets of notepaper, a general idea of the baked good I want to come up with or a crib note for future endeavors. In the case of the adapted crisp, I used a common big spoon from my silverware drawer, which I measured and found to be the exact same as a standard tablespoon measure. That discovery just made my personal baking that much easier.

gluten free rhubarb crisp

This crisp was inspired by La Tartine Gourmande, which has been on my library shelf for the past few weeks. I have read some of Beatrice Peltre's blog of the same name, but never realized until I was looking through the desserts chapter of her book that the recipes were all gluten-free. I'm not sensitive or allergic to gluten (that I know of) , but do believe that we all can benefit from less wheat, so I figured I would grind up some alternative flours and give it a go. I loved it.

Rice flour (at least rice flour made at home) is always a little gritty, but I don't mind this, especially in a crisp topping where the crunchiness is appreciated. The day after, the rice does soften up a little bit, but I still really liked the combination of sweet rice, slightly bitter amaranth and almond. The topping to filling ratio of this crisp leaned heavily in the topping's favor. Exactly how a crisp should be if you ask me. I made all of my flours in the VitaMix, but it is increasingly easier to find alternative flours at co-ops, other natural food stores, and traditional grocery markets.

Gluten Free Rhubarb Crisp (adapted from La Tartine Gourmande)
1 8x8 pan, about 6-8 servings if you're lucky

Filling:
  • 12 oz. rhubarb, chopped into small pieces
  • 1 apple, unpeeled, chopped into small pieces
  • 1 T. honey
  • 1 T. brown sugar
  • 1/4 t. cinnamon, more to taste
  • squeeze of lemon juice

Topping:

  • 40 g. (1/4 c.) almond meal
  • 50 g. (1/3 c.) rice flour
  • 40 g. (1/3 c.) amaranth flour
  • 50 g. (1/4 c.) brown sugar
  • pinch of salt (omit if using salted butter)
  • pinch of cinnamon
  • pinch of ginger
  • 6 T. cold butter (3 oz. or about 85 g.), cubed
  • 35 g. (1/3 c.) rolled oats
  • large handful of chopped almonds, about a heaping 1/3 of a cup

Preheat oven to 350.

Butter an 8x8 baking dish, preferably glass, and set aside. Mix filling ingredients in a bowl, and stir well. Spread into the baking dish in an even layer. Save the dirty bowl to mix the topping.

To make the topping in a food processor, combine the flours, sugar, salt and spices and pulse to combine. Add butter, and pulse until the mixture resembles coarse pebbles. Pour into the bowl used to make the filling, and add the oats and chopped almonds and mix well by hand. Spread evenly over the top of the filling. (You can make the topping by hand by crumbling the butter into the flours with your fingertips or a fork. Aim for the same, pebbly consistency.)

Bake for 35-40 minutes, or until well browned and bubbly around the edges.

rhubarb kuchenish
kuchenish.

After the success and rapid decimation of the crisp (yes, I pretty much ate it for breakfast, snack and dessert for 2 days solid), I turned my thoughts to the Rhubarb Kuchen of my youth. Kuchen is probably my all-time favorite dessert if you don't count chocolate cake, and it wasn't until I ate the crisp that I thought about altering it.

This is one recipe I've never thought about altering before. Tigress altered it last year, and did a good job of it, but it was still heavy on the refined sugar and leaden with kuchen-trademarked amounts of butter. I don't have anything against butter, but I was craving a more virtuous, breadfast-y version of kuchen, one that I didn't need to feel bad about eating all myself. I found my answer in dates.

rhubarb kuchenish
I really loved adding chia seed to the topping.

I simmered whole, dried dates in water and let them cool to make a near sugar-free version of rhubarb kuchen. Really, it's only kuchenish, because there is no bottom layer, but if you eat it with yogurt or ice cream, you'll hardly miss it. I have now made 3 rhubarb desserts in the past 4 days, but to my defense, there is still a nearly full pan of the last kuchenish left.

For the first attempt, I used whole wheat flour along with the oats but I liked it just as well using amaranth flour. For the second test, I also increased the volume and used frozen rhubarb from last year since I have to make room for the new crop. The fresh rhubarb is preferable, but the frozen still makes a respectable result. If using frozen rhubarb, I would recommend using an additional egg to add to the creaminess of the filling.

rhubarb kuchenish

Rhubarb Kuchenish (adapted from our family recipe of Rhubarb Kuchen)
bake in a 8x8 pan for thicker, longer baking dessert or 9x13 for thinner, shorter baking one

Filling:
  • 12 oz. (about 1 c.) dried dates
  • 2/3 c. water
  • 6 c. rhubarb, measured after chopping to medium sized dice
  • 2-3 eggs
  • pinch of cinnamon, optional

Topping:

  • 1/2 c. rolled oats
  • 1/2 c. whole wheat (or amaranth) flour
  • 1/4 c. brown sugar
  • 2 oz. (4 T.) butter
  • pinch of salt (omit if using salted butter)
  • 2 T. chia seeds
  • pinch of cinnamon, optional

To make the filling, simmer the water and dates in a covered pan for 10 minutes or so until soft. Cool to room temperature, then puree using a food processor, food mill, or immersion blender (that's what I used). Mix with the rest of the filling ingredients, and spread into a buttered baking dish.

Preheat oven to 350.

Make the topping by crumbling the butter into the flour by hand or with a food processor. Then add oats and the rest of the ingredients and toss to combine well. Spread over the filling in an even layer, and bake until golden brown and bubbly around the edges, 40-60 minutes depending on the size and depth of your baking dish.

kuchenish bite

Stored in the refrigerator, both the kuchenish and the crisp will keep several days - if not a week - but I know that is wishful thinking for me. I am reminded why I have been dutifully staying clear of baking desserts for myself. I crouch over a piping hot dish of fresh-from-the-oven rhubarb with fork in hand, burning my mouth to shovel those first few bites in, to examine if rhubarb made with dramatically less sugar is just as beguiling as the real thing. It is, I think. I feel a little better knowing that if I eat a whole pan of rhubarb dessert, it has just a trace of refined sugar in it. If you make one, let me know what you think, will you?

Daring Baker Challenge May 2012: Challah

May’s Daring Bakers’ Challenge was pretty twisted – Ruth from The Crafts of Mommyhood challenged us to make challah! Using recipes from all over, and tips from “A Taste of Challah,” by Tamar Ansh, she encouraged us to bake beautifully braided breads.

<span class=

I have never made challah before, but was thrilled at the idea of making it for the challenge this month. Generally, I prefer the "lean" breads to enriched ones, rarely making fortified loaves that include butter, sugar and eggs. Sourdough has thoroughly taken over my life, wild yeast ruling almost all of my bread baking experiments. I nearly let sourdough play a role in this bread, but after considering Nancy Silverton's recipe, I thought better of it after her description of the interior was "ropey". I didn't want ropey bread. I wanted soft-as-a-pillow, tender bread, one that reminded me of the Pan de Muerto from last November.

Bread that was a full dessert in a slice.

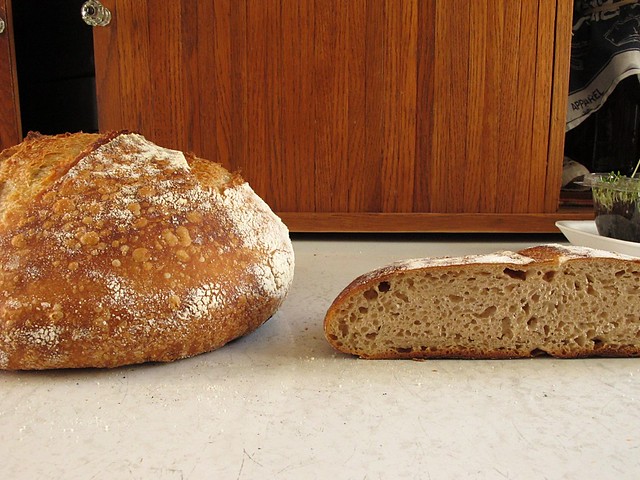
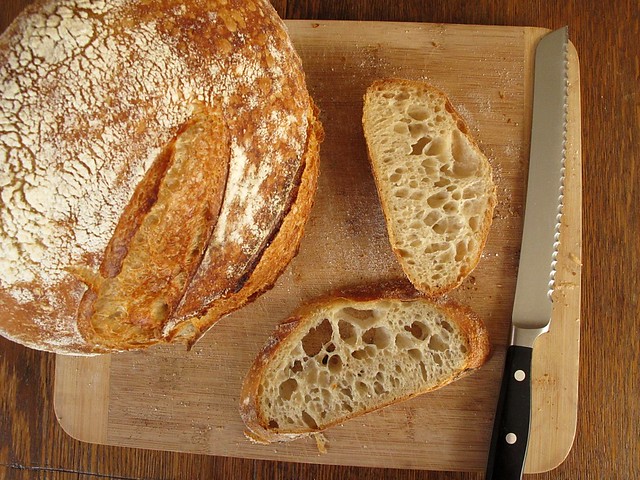
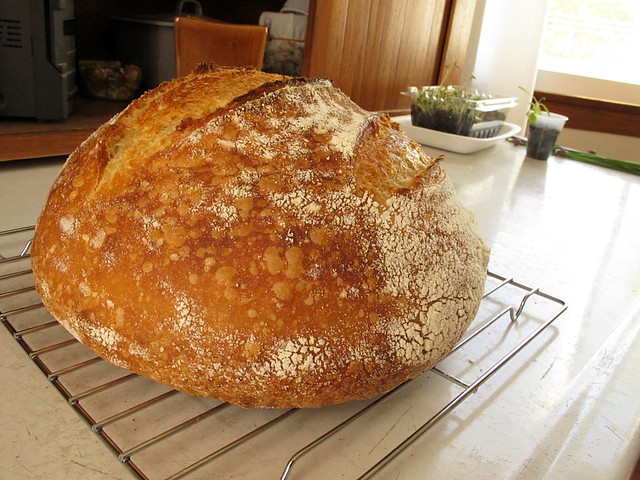
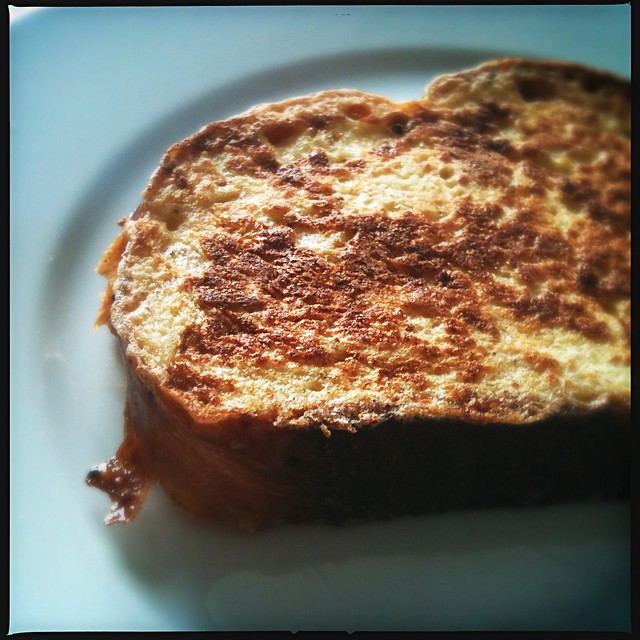
This bread is not as fortified as Pan de Muerto, and much lighter than brioche (which I haven't made either - what am I waiting for?) This bread is beautifully soft and close-crumbed, just barely sweet and could easily be swayed in either direction for a sweet or savory application. Just baked and fresh, it is light and almost airy, and it makes the most wonderful toast as it stales gracefully.

Fortified breads always stale more quickly than lean ones, but when good toast is at play I couldn't be more happy. This bread toasts to a golden brown, and the innards seem to be refreshed by the toaster. It's delicately crunchy, and the burnished crust surprisingly doesn't get any darker. It's really a loaf of bread I would even make exclusively for toast. And that is saying something.

<span class=

I decided to use Peter Reinhart's recipe for challah from Crust and Crumb. Even though I have had this book for a whole year now, I am still just as excited about it. Every time I crack it open, I find inspiration and good storytelling - and even though I have read it cover to cover, I still feel like I'm learning new things. It is one of my favorite books, and one that I know will continue to prove itself over and over.

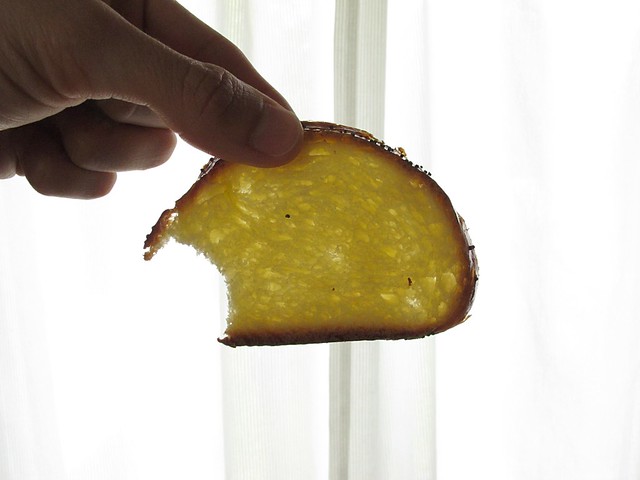
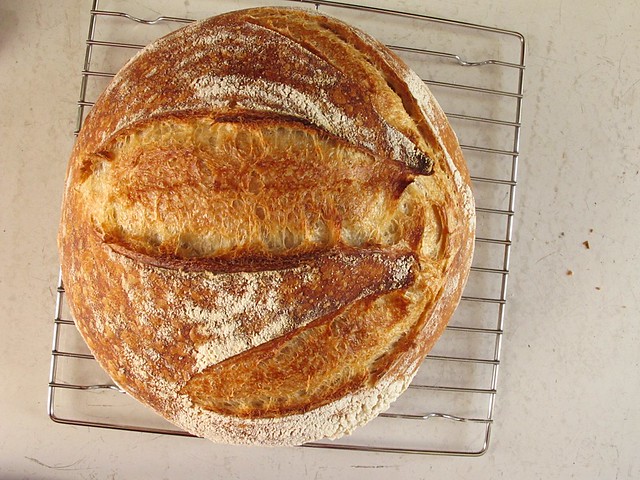
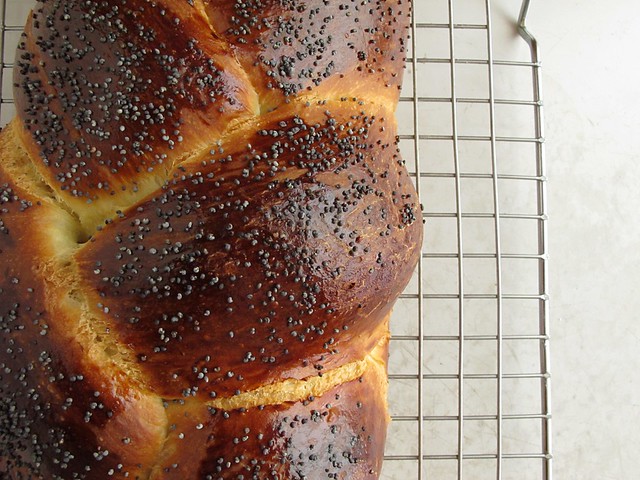
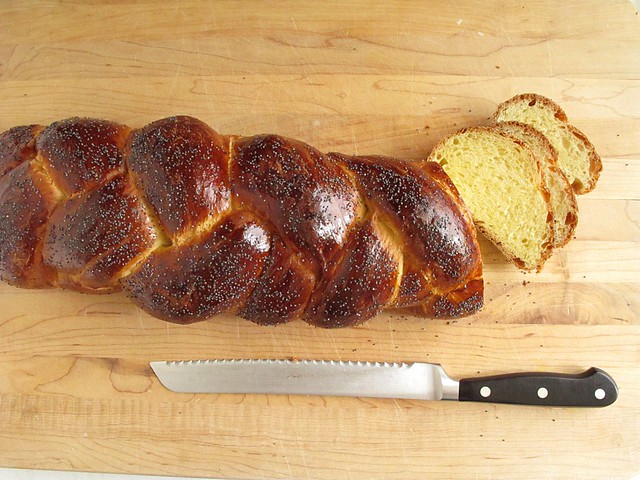
The only thing I found that differed in the recipe was the baking time. My loaf was fully baked at just over 25 minutes. I confirmed the internal temperature to be certain I wouldn't have a doughy middle when I cut into it; after it cooled, I cut into it and it was just perfect. Deep dark exterior and creamy yellow crumb, I worried that my mahogany crust would taste burnt, but it did not at all.

<span class=

I made this loaf entirely by hand. Since the demise of my stand mixer, I approach all bakery projects a little differently. As I made this one, I thought of my Amish friends just down the road from my Parents. When I last visited, Lizzy had showed off her retro-fitted stand mixer - one that had no electricity, but was converted to a hand crank that worked on the principle of leverage. It was a genius design really, that allowed for faster mixing as the handle was moved in towards the center of the crank. I'm not sure how that man-powered machine would do with kneading breads, but I have to say that I am half considering that type of model if/when I replace mine.

<span class=

While a highly fortified (and sticky) dough like the Pan de Muerto could not be made without a stand mixer, this one did just fine. It was a bit of a workout, but the dough was so silky and soft in spite of the little stickiness that it was a pleasure to work with. I just kneaded until a bit of the dough passed the windowpane test, about 15 minutes or so, using additional flour as sparingly as possible.

Challah (Peter Reinhart, Crust and Crumb)
makes 1 loaf
  • 16 oz. ( 3 1/2 c.) bread flour
  • 2 oz. (1/4 c. sugar)
  • 1 t. salt
  • 2 t. instant yeast
  • 1 oz. (2 T.) unsalted butter, softened
  • 2 large eggs
  • 2 large egg yolks
  • 1 egg yolk for egg wash
  • 2 oz. (1/4 c.) milk, room temperature
  • 4 oz. (1/2 c.) water, room temperature
  • poppy seeds (or sesame seeds) for topping, optional

Combine all ingredients in a mixing bowl except the egg wash egg yolk and seeds for topping. Stir until it forms a ball, then turn it out onto lightly flour counter and knead 12-15 minutes until the dough is "soft, pliable, and neutral to the touch". It should be slightly tacky and pass the windowpane test. (Reinhart says that if using a stand mixer, this will take about 10 minutes.)

Place the dough in a clean bowl, cover tightly with plastic wrap, and let rise for about 1 hour until it swells noticeably. Then, remove the dough from the bowl, and knead by hand for 5 minutes. Return to the bowl, cover with plastic wrap, and let rise a second time for another hour. It will swell noticeably a second time.

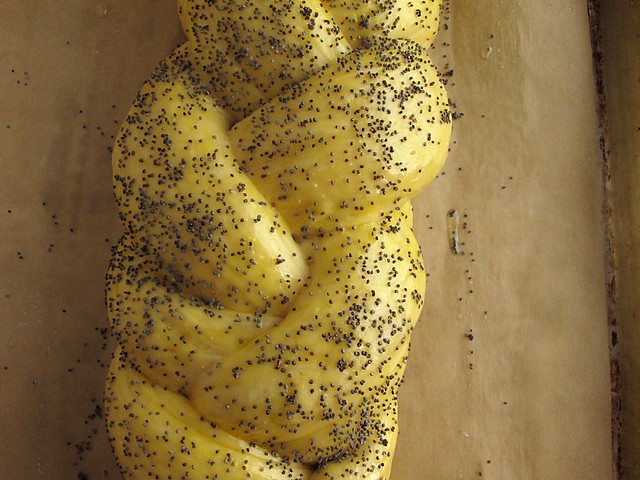
Divide the dough into 3, 4, 5, or 6 (or 12 to represent the 12 tribes of Israel) strands for braiding. (I weighed my dough, then divided by 4, since I did a 4 strand braid.) Round the pieces into balls, and cover with oiled plastic wrap. Let them rest for 20 minutes.

Working quickly "to minimize handling of the dough", roll each piece into a long snake that is fatter in the middle and tapered at the ends. Reinhart says to make the ropes about 8 inches long, but mine were longer, about 12 inches. (The loaf will be longer and thinner if you do it my way, and shorter and plumper if you stick closer to the 8 inches.) Secure the ends together and braid - there is a good video here illustrating the 4-strand braid that I did. Transfer the loaf to a parchment lined baking sheet.

Whisk the egg yolk for egg wash, and brush the loaf with the beaten yolk. Re-cover with the oiled plastic wrap, and let rise until doubled in size, about 1 hour. Reserve the egg yolk for a second brushing. (I actually brushed with the egg yolk, sprinkled with the poppy seeds and then let it rise. I omitted the next step of brushing with egg yolk a second time.)

Towards the end of the final rise, preheat oven to 375 with the rack in the center. Just prior to baking, brush again with the egg yolk and sprinkle with poppy or sesame seeds if using. Bake for 45 minutes (mine took just less than 30) until deep golden and the internal temperature registers at least 185 degrees in the center.

Let cool at least 45 minutes before slicing.

<span class=

My bread may have baked in less time because it was longer and thinner, and perhaps it was darker because I didn't brush it with the egg yolk a second time just before baking it? At any rate, it was a great loaf of bread. I shared half with some friends, and baked some into French toast the next morning. It was the finest French toast that I ever made!

<span class=

I have long been fascinated with Jewish food traditions although I am not Jewish myself, so I really enjoyed the challenge this month, and the opportunity to learn a little more about the Jewish customs surrounding challah. Challah is traditionally made weekly, a duo of loaves made as well as you can make them to commemorate the holiness of the Sabbath and represent the double portion of manna provided to the Israelites so they could observe the commandment of not working on the Sabbath. I read in several different sources about the symbolism of challah, how the braids and white flour have special meaning, how a portion of the dough was presented as an offering, and and how when presented at the table the loaves can be covered with a decorative cloth to represent the dew that covered and preserved the manna. But, I particularly enjoyed this paragraph from Peter Reinhart which makes challah-making as important to a Christian baker as a Jewish one:
Challah, like bagels, has evolved from its Jewish roots into a mainstream bread enjoyed by people of all backgrounds. When made properly, it is a stunningly appealing loaf, plump and shiny, its braided strands symbolizing the interweaving of heaven and earth, God and mankind. Whether or not we read deeply into the symbolism of challah, we face the same challenge as with all breads: how to make an excellent loaf.
I look forward to making more challah, perhaps some loaves that are more plump and more intricately woven. Meanwhile, I will check the Daring Baker blogroll for more inspiring loaves! Be sure to also check out the recipes on the Daring Kitchen website, there is a range of richness stemming in the amounts of butter used.


This post has also been Yeastspotted.

Notes to Self.

I tore into this loaf this morning, the heat of the oven still lingering in the heart of it, unable to stand the anticipation. I am ordinarily staunchly observant of waiting until a loaf of bread is completely cool, two hours at minimum before even considering the first slice. The bread is still developing, it is curing, standing in the room temperature and maturing into what it will become. It is beautiful to glance at and wonder the flavor of. It is the best test of my self-control.

sourdough (<span class=

This particular loaf is the elusive Tartine bread - the one that I have tried to make since sL turned me on to Chad Robertson and his gorgeously photographed book. As the reviews of Tartine Bread told me, some people were dismayed that it took him 22 pages to explain a loaf of bread, but maybe even experienced bread makers like me need that much information. When working through this loaf yesterday to the letter, I realized that the reason high-hydration doughs weren't working out so well for me, the reason that the Tartine bread wasn't working out for me, was that I didn't do a couple of important things. And I was impatient.

I had omitted the bench rest - and when I had done a bench rest in the past, I didn't form the dough well enough before letting it rest. I think I was even baking it at a higher temperature, the same temperature I bake my traditionally kneaded loaves, instead of starting it out higher and lowering the oven by 50 degrees the second I put the bread in. I couldn't figure out before why all of the airy holes in my Tartine bread were centralized directly under the top crust - and while the bread tasted ok, this plagued me. I wanted beautifully, consistently artistic bread, I wanted lacy, open holes with a wet-custardy interior. I wanted to go to California and beg Chad to let me work a day or two in the bakery. I just needed to develop the loaf into a better shape, taking more time to let it rest.

A nagging problem of mine is that I cannot bake bread every day. I imagine how much faster I would learn things if I could bake daily instead of once or twice a week. My last loaf (on the right in the photo below) was so disappointing, that I was convinced to mix up a new loaf of bread yesterday - and instead of continuing on the string of hit-or-miss breads I was doing I opted for the Tartine ratio once again.

comparison.
yeah, that one didn't really rise at all.

It's not a stretch for me to realize that one of the benefits of writing things regularly into a food blog is that I record in indelible Internet ink those things that are important enough to my kitchen life to remember. Things that may help others too, but mostly things that I don't personally want to forget. In this case, I want to write the Tartine method in a condensed way that I will remember. I want to remember that I can not rush the bread.

The bread reminds me that I need to be patient. I need to wait for it, even if I don't want to. I need to remember that even bread that "flops" still has a place and a use in my kitchen. I baked some of the non-stellar loaf this week into a modified strata-esqe quiche, and appreciated it as toast.

interior.
but this bread is a joy to eat, plain and unadorned, contemplatively.

I do not rely on the temperature of water, and I am at the mercy of room temperature - whatever that variable may be. My goal as bread maker is to be able to adapt to my environment, to roll with Mother Nature in all of her endless glory and take it into consideration. I have a 5 gallon jug of spring water that I use for baking, at my ambient, varying room temperature and that is the temperature I use for mixing dough. I also let the bulk fermentation occur at room temperature, in the case of Tartine method, I fold it every 30 minutes for the first 2-3 hours, then once an hour until the dough looks like it has accomplished about a 30% increase in bulk overall. The below "Tartine Condensation" is what I will follow on my next loaf.

The ratio is for a 75% hydration sourdough bread. I make a single loaf at a time, so double everything for two loaves. Post baking, this loaf weighed in just shy of two pounds. I feed my starter early in the morning, and then wait until a spoonful floats in a glass of water, 2-3 hours or maybe 4. This is really crucial to good rise it seems. (It's a good thing my kid decides to get up at 5:30 every morning now, that really helps me out.) I use 1 1/2-2 t. of salt for a single loaf of this bread. The original method calls for 10 g. of salt per loaf, and I'm not sure if my scale isn't that great with small amounts or what... but that is way too salty for my taste.

I also like to retard the bread in the fridge overnight. I let the dough rise for a couple of hours until I can tell it is rising, then I put it in the fridge. I take it out when I turn the oven on to heat, and bake it after it has been at room temp for only about a half hour. I never thought baking still pretty cold dough would work that well, but it does. Lesson learned.

Tartine Bread Method Condensation

Mixing Dough:
  • Weigh 350 g. of water into a large bowl. Add 100 g. of starter and stir to disperse.
  • Add 50 g. wheat flour (I use high-protein wheat) and 450 g. white bread flour. (500 g. total) Mix by hand until well-incorporated.

Autolyse

  • Rest the dough (autolyse) for 20-40 (I go for 30) minutes.
  • After autolyse, add salt (1 1/2 t. if using fine, RealSalt or 2 t. if using Kosher) and 25 g. water. Squeeze the dough to incorporate the salt and water - the dough may break apart, but will come back together. It will be sticky. I leave the dough in the same bowl for bulk fermentation. I just make sure I've scraped the edges down and it is reasonably free of bits that could become dry and hard.

Bulk Fermentation:

  • Let bulk fermentation commence. The whole bulk ferment will take at least 4 hours, (I note the time and set a timer on my phone). Every 30 minutes, fold the dough by bringing the bottom of the dough up over the top, as described in the book, by using your hand first dipped in water to prevent sticking. I do this for the first 3 hours, then once an hour until the dough looks like it has completed the bulk rise (about a 30% increase in the total bulk of the dough). For the final hour(s) of bulk fermentation, fold extra gentle to avoid knocking out air.

Initial Shaping and Bench Rest:

  • On an unfloured surface, turn out the bulk of dough using a spatula. Lightly flour the surface of the dough, and using a bench scraper as an aid, flip the dough over so that the floured bit is on the bottom. Fold up the bottom third of dough past the center, stretch the right and left sides in over the center mark respectively, then fold down the top past the center mark, and roll the dough toward you as gently as you can. You want a basically round shaped bread. Try not to use much flour, and use the bench scraper to aid you.
  • Let rest for 30 minutes uncovered, out of any drafts. Dough should spread some into thick "pancake" shape, but not be "drippy" as Chad says. If it is drippy or if it doesn't look like you formed the dough well, reform carefully and let sit again.
Final Formation and Rise:
  • Lightly flour the top of the dough. Slip bench knife under it and flip it so that the floured bit is again at the bottom. Form again as before for initial shaping, bottom third up, right and left sides in respectively past the center mark, top down and roll the dough towards you - being sure to be firm yet gentle.
  • Line a basket with cloth, sprinkle it well with 50/50 flour and rice flour mixture, and put the loaf in smooth side down. Let it rise for 1 1/2 - 2 hours until it looks like it's on the way to rising well, then put in the fridge overnight. When the dough is rising, I cover it with the ends of the towel, and slide the whole basket into a plastic shopping bag a la Peter Reinhart. I put it in the fridge in the same set up.

Baking:

  • Take bread out of the fridge, remove it from the plastic bag if you used it, and preheat oven to 500 with a covered cast iron pot inside. Wait 30 minutes until the oven comes up to temp. Remove pot, carefully turn out bread into the pot. Score artistically or utilitarian-ally, put the lid on and put in the oven. Immediately reduce heat to 450 and bake 20 minutes.
  • After 20 minutes, remove lid. Bake an additional 25-35 minutes until the level of darkness on your bread is achieved. Cool on a wire rack as long as you can stand it. Then, eat.
sourdough (<span class=
blisters.

As my stand mixer has died, and I'm not so certain it will be resurrected (and I'm not so sure I will invest in that machine again, and I am not sure what to do...), I am planning on lots of practice with this type of low-knead or no-knead sourdoughs. While my hands are healing, I still need to be careful, lest they attack me again. I've even taken to wearing garden gloves this year, something I have never done before - and that is also a big help. (In fact, when folding the dough during the bulk fermentation, I use a disposable kitchen glove on one hand that I use for the length of the rise. I dip it in water, just like I would with ungloved hands and it works fine and saves me a handwashing every 30 minutes.)

I will now remember to slow down. Bread is a true slow food, perhaps the first slow food, and all attempts by me to speed up the process never end well. They may end edibly, but not really worth writing about. When the bread feels like a duty to eat, I am not happy. When it emerges fat-bellied and golden, slightly sour, miraculously perfect... then it is my deepest pleasure to sit with the heel of it in my palm - turning it over and examining the crust then chewing it unadorned by jam or butter to taste the real taste of bread. Slow bread that needs all the time I can give it. Well-noted.

What I Did With the Homemade Tofu...

I'll admit that I didn't really know what to do with my newly accomplished, 100% from scratch tofu. It seemed too much work to just do ordinary things with it; it felt as if I needed to fuss and create something new and exciting which is what ended up happening around lunchtime today. As I stood with steaming, crunchy, soft, sweet, salty tofu in hand, I knew I hit the mark. And the inspiration came from my cookbook shelf.

fresh tofu appetizers.

Some time ago, I picked up a copy of Jessica Seinfeld's (yes, Jerry's wife) Deceptively Delicious at a thrift. For the small price, I figured it would give me some inspiration, and it did have nice photography and was spiral bound. Somehow, the spiral bindings always get me...

I seem to go in "cookbook jags", rereading books that I have in my collection and then kind of cooking my way through them, in my own fashion of course, long after I've acquired them. I can follow instructions, but I would say (outside of testing written recipes) I have only loosely followed instructions for the past couple of years. The recipes in this book perfectly complement my experimental outlook in cooking life, and they end up being pretty healthy as well.

The gist of the book is to hide pureed vegetables in "kid-friendly" foods. The trouble with my kid is that he doesn't like "kid-friendly" foods, so most of this book tantalizes me but no one else in my family. I am happy he won't go anywhere near a soda or a chicken nugget, but I have a harder time of hiding veggies in anything that isn't a direct descendant of a carbohydrate. The best I can do is to veg-pack the pizza sauce that goes on our homemade pizzas that I try to make once a week. I take an abnormal amount of pride that my kid only eats sauce pizza. I bolster it with any red vegetable and even a sneaky carrot or two. It's nothing the pinch of sugar and plenty of oregano can't fool his tastebuds with.

tofu, broccoli puree

Last night at dinner, I steamed a little extra broccoli with the express notion that I would puree some of it to include in a hidden-veg recipe. Broccoli, strangely, is one of the vegetables my son will eat without question - so I also knew I was going to be doing some experiment for myself. I ended up using it with my very own, soft set tofu. I was shocked at both its hidden flavor and adhesive qualities. I thought for sure the whole outer coating would slide right off the slippery tofu, but it did not... and the creamy interior was such an amazing texture I just stood alone in my kitchen muttering aloud just how good it was. Next time, I may play around more with the spices but really, this is a pretty amazing little starter for a vegetarian meal.

fresh tofu appetizer, <span class=

My homemade tofu is much softer than the local, commercial tofu that I have bought, though I am sure commercial tofu is a fine substitute. I also used my own sourdough bread crumbs, that I grind very fine. Any fine dried bread crumb is a good bet. I also used something for the dipping sauce I fondly refer to as "Volger Sauce". I'll explain that below.

I did have to work carefully with the homemade tofu, it was delicate and would break if I wasn't so careful. But that said, I was surprised at the sturdiness of these after pan frying them. If you were the putzy type, you could probably wrap the whole tofu nugget entirely in a lettuce leaf (endive, butter lettuce?) and secure it with a toothpick - but eating them hot like little lettuce/tofu tacos was pretty unbeatable, and had the bonus of keeping my fingers relatively clean.

Fresh Tofu Appetizer (adapted from Jessica Seinfeld)
(makes 10 good sized pieces, easily scaled up for more)
  • 10 oz. fresh tofu (not the silken variety of buying commercial)
  • a heaping 1/2 c. dried sourdough breadcrumbs (seasoned with salt, pepper, and paprika to taste)
  • 1-2 T. chia seeds
  • 1/2 c. pureed broccoli
  • 1 egg, beaten
  • olive oil for frying
  • Volger Sauce and honey for adorning or dipping
  • lettuce leaves for wrapping

Cut the tofu gently into 1/2 inch thick slices and cut into large sized cube shapes.

Toss the breadcrumbs and chia seeds together in a medium sized, shallow bowl.

Combine the egg and broccoli puree in a small bowl.

Dip the tofu pieces one at a time in the broccoli puree/egg mixture and turn to coat it completely. With a fork, carefully lift it into the breadcrumb mixture and use a spoon to help coat it completely. Use a fork to carefully transfer it to a plate and repeat with remaining pieces of tofu.

Heat a non-stick skillet over medium heat. When hot enough to sizzle a drop of water, add 1 T. of olive oil and add half (5) of the dredged tofu nuggets. Pan fry 3-4 minutes on the first side, carefully flip and continue frying for about 3 minutes longer. The tofu will be nicely browned and will feel firm.

Serve on lettuce leaves with equal parts Volger Sauce and good honey.

fresh tofu appetizer, pan-fried.fresh tofu appetizer, cut

So, what exactly is Volger Sauce? Lukas Volger wrote a book I adored on Veggie Burgers, and this sauce was one of the accompaniments from it. I have had a little bottle of it in my fridge since first dip of my finger made the journey to my mouth. It's a wonderful homemade condiment, and adds a little zip to all kinds of things. (Volger makes a particularly great veggie burger with tofu and swiss chard, and adds a few drops of this sauce to each side just before frying them... that could be what made me think of trying it on these little bite-sized appetizers.)

To make it, combine 1/4 c. pomegranate molasses (I use this from POM, which may make it a tad thinner), 1/4 c. soy sauce, tamari or shoyu, 1 tablespoon molasses and 1 teaspoon of toasted sesame oil. Shake it up, store in the fridge, and use it on all kinds of stuff.

Kindly pay his web site a visit too, there is all kinds of greatness going on over there.

fresh tofu appetizer

I love when lunches appear like this, even though this lunch was pretty light and that's why I've considered it an appetizer. I have always held lunch in very high regard, if only because for the better part of the last 6 years, I can make whatever my heart desires. The liberating freedom that comes from cooking for only me is something I treasure, and when something is a success, the victory is all the sweeter.

(To check out one more Jessica Seinfeld hidden veg recipe I made last week, click here.)

From Bean to Block: Making Tofu from Scratch

I made tofu from scratch this morning, and surprisingly, it wasn't time consuming and it didn't make too much of a mess. But the soymilk I made yesterday to make the tofu today? Well, that's another story.

pressed tofu

I began reading up on homemade soymilk last week and wondered what my efforts would produce. Many people claimed that the homemade version was "beany" and unpleasant. Some people took hours to separate the beans from the hulls after soaking them, claiming it would rid you of the nagging beaniness. Most of the recipes looked similar, but when paging through my VitaMix cookbook, I noticed their recipe called for one thing most of the others I read had not: the beans were steamed prior to blending. (But then just today, I read this nice post from Tiny Urban Kitchen. Give it a perusal.)

I followed their instructions, using metric weights for a 1 quart yield of soymilk, but even when straining through a very fine nut milk bag, I couldn't get the yield until I boiled more water and re-blended my mixture. Then, the texture and thickness of the soymilk was more like commercially available soymilk, and also was exactly the 1 quart yield I was after. As one other recipe source I read said, "You can not over-strain your soymilk". I wore kitchen gloves, and pressed persistently.

soybeans.

I could have cheated and just purchased some soymilk, but after reading so many vegan recipe websites for making my own, I realized that there is an awful lot of stuff in prepared soymilk. The only things in homemade soymilk is soybeans and water, and it seemed fairly painless, so I decided without much debate I would make my own. What I didn't count on was a bit of a mess, and a whole lot of manual pressing to get the soymilk to a thin consistency.

I soaked my whole, organic soybeans for 8 or 10 hours yesterday during the day. They turned from tiny, round pellets into golden yellow, familiarly bean-shaped things. Then, I steamed them for 20 minutes, until they were tender and didn't taste too beany. One tip? When steaming soybeans or boiling soymilk do not turn your back on the pot. It will boil over, and it will make a mess everywhere causing you to wonder why you didn't just buy a half gallon of soymilk and be done with it.

After steaming, cool the beans, boil the water, and blend. I used my VitaMix which does a superb job of emulsifying, but any blender should work ok. Like I mentioned, I had a super thick first batch, so I boiled more water and poured it over the soybean pulp that was very thick, returned it to the blender and then strained it again. You can see how I pretty much dirtied every bowl in my kitchen. I may just blend it in two batches when I make it again, that will probably cut down on the mess a little. For the ratios to yield 1 quart of milk:
  • 300 g. (1 1/2 c.) soybeans
  • 840 ml (3 1/2 c.) boiled water for first strain
  • 580 ml (scant 2 1/2 c.) boiled water for second strain

When I finally got there (at 11 o'clock last night), I declared the messing around with it to be fully worth it. I found the soymilk to be extremely tasty, it was wholesome and maybe slightly beany in flavor, but certainly not unpleasant. It was a creamy white color, a good thickness and I had exactly one quart. I cleaned up my mess, and went back to reading and monitoring the Brewer's extra innings...

<span class=

The transformation from soymilk to bean curd was then no trouble at all. Not too long ago, a friend and I split a package of Nigari flakes, a tofu coagulant, purchased from Cultures for Health. (The pound package makes 200lbs of tofu, so we'll have plenty to practice with!) When she gave me my portion in a glass jar, it looked and sounded like sea glass, a dreamy clinking that smelled vaguely of the sea itself.

The directions for tofu making call to dissolve 1 teaspoon of the nigari flakes into 1 cup of warm water to culture 2 quarts of soymilk that has been boiled for 5 minutes, then cooled to around 165 degrees. My precious yield of soymilk was only 1 quart, so I halved that. I was expecting large curds to separate from the soy "whey", the way that dairy curds do, but they were very small, a curdled look that I hoped would work when it came time to press it. I let it sit for 25 minutes as recommended, then poured it into my makeshift press of pint-sized, plactic berry containers, one lined with several layers of cheesecloth and the other used as the press with a heavy cutting board perched on top of it. I had to pour the coagulated milk into my mold in several additions, letting some of the liquid drain off so that it would fit. Ideally, a mold/press set up that was this size, but maybe twice as high would work better.

coagulated <span class=

I only let the curds press for 30 minutes, and had a nice, semi-firm mass of beautiful tasting tofu. I nibbled a few bites, wondering what to turn it into that would be worthy of a day's worth of experimentation. I still haven't decided, so I packed it into a glass bowl, covered it with water and added a pinch of sea salt to see if it would help it to "cure" a little bit when I am pondering.

My quart of soymilk made 300 g. (10 oz.) of fresh, finished tofu.

pressed tofu2

I've been kind of into making alternative milks lately - and for no specific reason. I really love almond milk, and made some a week ago that I thoroughly enjoyed every drop of. I drank it neat, out of small glasses and savored it. I tried out a peculiar rice milk recipe that had me boiling rice for several hours. I was left with a thick, viscous liquid that was maybe a little strange, but I'm still enjoying it blended with ice and extra cinnamon like some strange horchata, or including it in smoothies to use it up. A cup of rice gave me close to a gallon of rice milk when I was finished diluting. There is no denying that it is economical, but come to think of it, I made quite a mess with that project too.

Soymilk is definitely more labor intensive than other nutmilks, but I really love the result so I will likely be making it again. As for the tofu - that is so simple, it practically makes itself. All you need is the culture, and a small measure of patience. The finished tofu can also be cultured further into tempeh, if left for more time at a constant 88 degrees for a day or two - maybe I'll try that sometime in the future as well.