Salad Dressing Cake.

I guess it all started when I wanted a tuna sandwich for lunch one day last week.  I love tuna sandwiches, but I hate hate hate the conundrum of purchasing mayonnaise.  I like lacto-fermenting my own, but haven't done that so much since I made the commitment to higher quality olive oils.  I don't have any "neutral flavored oils" in my kitchen arsenal at all anymore; if it can't be made with butter, olive oil, coconut oil or bacon grease, I probably will opt out.  But that tuna sandwich was nagging me, and I recalled this recipe for super quick mayonnaise made with a whole egg and an immersion blender.  Armed with a new bottle of olive oil, I figured I'd give it a go.  I didn't have any purchased mayo on hand, so it was my only option if that tuna sandwich was going to become a reality for me...

salad dressing cake

To the basic mayo recipe, I added a spoonful of dijon mustard and extra lemon juice; the recipe did work (although the texture wasn't quite as lovely as the yolks-only, lovingly hand whisked versions).  My only complaint was that the quality extra virgin olive oil I used made the mayo seem a bit too rich and mineral-y.  It was edible, but I didn't want to go through the trouble of lacto-fermenting it, and I didn't have a good excuse to go all out on a mayo binge to use up the cup or so I had leftover.  I also didn't think I could pass it off on the rest of the family - I have one kid who can't even eat condiments yet, another who won't eat them out of choice, and finally a husband who is a harder sell than I am.

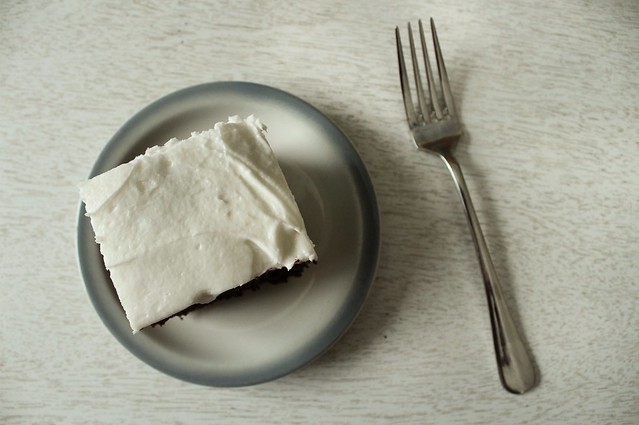
Fortunately I remembered about salad dressing cake.  Salad dressing cake could very well be the first cake I ever made myself, mixing the simple, pantry-staple ingredients with a whole cup of mayonnaise, Miracle Whip actually, which was what we called mayo at my house growing up.  It was proof that miracles do indeed exist.  How on earth could you make a chocolate cake with a cup of sickly sweet and thick Miracle Whip that left no trace on the tongue of mayo?  How could you make a cake that was so perfectly full of moisture, a good keeper at room temperature or in the fridge, and barely messed up the kitchen?  It's magic.  And I'm glad I remembered it now. 

salad dressing cake

You can frost this cake however you see fit, but I can't properly enjoy an everyday chocolate cake at my house without a simple butter infused, powdered sugar based buttercream spiked with almond extract.  I don't ever measure, I just try not to make too much, and if I do, I store the leftover in a glass jar until I need to make another cake - which will then usually happen sooner than later because I have extra frosting.  It's a vicious cycle.

I also encourage you to make immersion blender mayo with 100% olive oil for this recipe.  You get a nuance of olive in the background for those that are interested in tasting it, yet it's subtle enough that the rest of your family won't go noticing it.  They'll just think you made the best chocolate cake ever.

Salad Dressing Cake
makes 1 8x8 inch cake
  • 2 c. ap flour
  • 1 c. granulated sugar
  • 1/2 c. cocoa powder
  • 1/4 t. kosher salt
  • 2 t. baking soda
Preheat the oven to 350 degrees.  Butter a glass 8x8 inch baking dish.

In a 4 cup measure (or medium sized bowl), combine the mayo, cold water, vanilla, and espresso powder if using and stir well to combine.  (I still had a dirty immersion blender from making the mayo, so I used it to blend the wet ingredients.)

In a large mixing bowl, sift or mix well the dry ingredients.  Pour the wet ingredients over the dry and stir until just mixed thoroughly and no dry spots remain.  Use a spatula to ease it into the prepared baking dish, and smooth the top out towards the corners to counteract some of the doming action in the center as the cake bakes.  Bake in the preheated oven for 35-45 minutes, until a tester comes out clean.  Cool completely before frosting.

salad dressing cake


Sourdough Surprises: Monkey Bread

Monkey bread.  A pretty straightforward breakfast sweet, whose charm lies in the communal, pull-apart nature of the finished loaf.  I've never made monkey bread, but I have made many pans of cinnamon rolls, and thanks to Sourdough Surprises I had also made babka.  I married the two for this challenge, basing the monkey bread on Nancy Silverton's brioche recipe and hastily mixing up some sugared cinnamon to roll the portions in before letting them rise in a bundt pan.

sourdough monkey bread

I forgot how much I loved Silverton's brioche recipe.  I halved the recipe and ended up with about 2 lbs. of dough, suspiciously perfect for one 12-cup bundt pan.  I planned it out 3 days before Valentine's day, so I could bake it for a somewhat special morning.  This bread is not unlike a soufflé in that it tastes best moments after leaving the comfort of the oven.  When pulled apart barely cooled, the little puffs of dough taste feather light, a quality that leaves soon after the heat is gone.  I wouldn't say it's any less delicious when cooled, just different.  But that said, I'd probably recommend planning ahead to appropriately devote the morning to enjoying it.

sourdough monkey bread
monkey bread

Since I recounted the recipe for brioche on the babka post, I'll not post it here.  I used half measurements, by conventional weight, and my yield on the dough was almost an even 2 lbs.  I portioned the dough into 1 oz. bits, then rolled each into a taut ball.  Meanwhile, I had melted about 4 tablespoons of unsalted butter in a pot on the stove.  I also had mixed a dish of approximately 1/2 c. brown sugar, 1/4 c. granulated sugar, a few generous shakes of the cinnamon jar, a pinch of cloves and a pinch of salt.  When all the balls were ready, I rolled them first in butter and then in the cinnamon sugar and then positioned them concentrically in a well buttered 12-cup bundt pan working from the center out.  I sprinkled any leftover sugar mixture evenly over the top, taking care to let some fall down into the crevices. When the dough appeared about half risen, I preheated the oven to 350.

unbaked monkey bread
monkey bread

I baked the bread for about 35 minutes if I remember correctly.  I checked the internal temperature when the top looked nicely browned, and it was around 200 degrees, so I figured (correctly) that it was done.  I let the bread cool in the pan for 5 minutes before inverting it onto a plate - during which time I could see the bread settle down into the pan and shrink back a little bit.  After inversion I was surprised at how beautifully glossy the top became; this was short lived, since I didn't go overboard with the sugar and it absorbed into the tops of the puffs as they cooled more completely.

I was also surprised how much the dough rose. I know I shouldn't have been, but I guess 3 days of preparation and waiting, and then the beating the little portions into submission... I thought I had worked all the life from the bread.  Sourdough continually surprises, it has a deep life that is hard to beat back.

This bread is really not all that sweet.  I mean, it is sweet, but it's not tooth-achingly sweet.  It's a polite sweet that tricks you into eating far too much.  I had 32 light little puffs of portioned dough and they didn't last long...  I didn't eat them all myself if that's what you're thinking, but I certainly could have.

sourdough monkey bread

I'm excited to look around at the other ideas this month.  I know I could have taken monkey bread to a savory place, but I just couldn't bring myself to do it.  I'm curious how many were brave enough to tackle that!


Mixed Citrus Marmalade.

I think I may have found the secret for bringing the sun back to our winter, and it's making marmalade.  I'm not talking about the sunny feel of the citrus or the sunny completion the finished preserves take on, I'm talking about the actual sun.  It's as if making a batch of this stuff actually worked as some variation on a rain dance, coaxing the sun from wherever it has mysteriously disappeared to the past several weeks.  I made this yesterday morning, and I've seen more sun streaming through my windows in the past 24 hours than in the past month.

marm jars

I've been patiently waiting to see organic blood oranges for about a month, and I just found them in my co-op last week.  I like to make at least one bright, citrussy thing in the winter, because it seems like there is all this time to fill - and there is no disputing that winter citrus is king of the fruit world.  Every November, like clockwork, I begin trying to squelch the absolute need I get for a good grapefruit, and by January they are hitting their stride.  Oranges seem to be reliably good from December on and I eat at least one a day, usually in my morning smoothie with plenty of ginger and sometimes some blueberry.  Cara Cara oranges pop up around January with their cross-flavor of sweet and tart; they're meaty and deep colored, but not as red as the blood orange.  Blood oranges appear last in my northern neck of the woods, and as Linda Ziedrich aptly said, they have kind of a berrylike essence.  I like that they aren't so sweet.  

blood oranges. 

And I like that I had my eye on a mixed citrus marmalade recipe in Diana Henry's new book Salt Sugar Smoke which focused on all my favorite types of citrus.  Her recipe called for Seville oranges, which I can't say I've ever seen here in Wisconsin.  I used navel oranges instead - and changed up her recipe a little in other ways too.  She used a method for making marmalade that I'd not used before: letting the peel soak in the citrus juices and water overnight before cooking down.  I like starting things the day before, so this was a favorable way to do things.  I'm not sure if it had much flavor contribution, but this turned out so well I'll likely do it the same way in the future.

She calls it "Nick's Good Morning Breakfast Marmalade", so named for Nick Selby who is a master jam maker and the English grocery and kitchen Melrose and Morgan, who gave her the recipe.  One taste makes me want to hop right over the pond to visit them in person, I'll tell you that.  My version strays slightly from the British originals, but it is still lovely.  Silky, barely set, and perfectly sunny in the deepest part of this never-ending winter.


citrus zest

Begin the day before, since the peel needs to soak for 8-12 hours.  I always weigh sugar in metric weights, so I can mix types and not worry about keeping track.  This one calls for 10 cups of sugar, which is ridiculous for my continuing quest at sugar consumption reduction, but it's absolutely worth it.  Use a raw sugar to feel a tinge less guilt.  Sharpen your chef knife to get the thinnest shreds of peel possible, and remember that organic citrus is best since you are eating the peels. 

Mixed Citrus Marmalade (adapted from Diana Henry & Nick Selby)
yields about 10 half pints
  • 1 pink grapefruit
  • 4 blood oranges
  • 3 navel oranges
  • 4-5 lemons total, divided (to equal 2/3 c. lemon juice and some zest)
  • 10 c. granulated or raw sugar (1916 g.)
Wash all citrus well.  Using a peeler, carefully peel grapefruit, oranges and 1 or 2 lemons (your choice), leaving as much of the white pith behind as possible.  Stack the peels and slice into thin shreds.  Put them into a large preserving pot (5 quart).

Next, juice all the citrus except the lemons into a large measuring cup.  Save the pulp and any seeds and tie them up into a square of cheesecloth.  After you have all the citrus juiced, add enough water to equal 10 cups and pour over the peel in the preserving pot.  Add the cheesecloth bag of pulp and seeds to the pot, stir well, and put a lid on it.  Let it stand 8-16 hours before continuing.

When ready to continue, prepare a hot water bath canner (and jars) and juice lemons to equal 2/3 c. lemon juice.  Measure out the sugar and have it standing by in a bowl.  Bring the preserving pot to a boil over medium high heat, then reduce heat and simmer, letting the peel cook until it is tender and the liquid has reduced by half (to 5 cups).  The peel will likely be soft sooner than the liquid reduces, so keep an eye on it and remove the peel with a slotted spoon or spider when it's done.  The whole process should take about 90 minutes.

After the liquid is reduced and the peel is soft, remove the cheesecloth bag and discard.  Stir in the lemon juice and sugar and stir to completely dissolve.  Bring back up to a simmer over medium high heat and skim any foam that forms.  After skimming is complete, add back the peels.  Stir frequently, and simmer until the marmalade gets to the set or gel stage (220 degrees, I let it go to about 223 degrees, it's not a heavily set preserve however.) Once it hits the gel stage, remove from the heat and let stand for about 10 minutes as you ready your sterilized jars.

Fill jars leaving 1/4 inch headspace and process in hot water bath canner for 10 minutes.  Remove to a towel lined counter and cool completely.

zests.

I left one jar uncanned to enjoy now, but the yield was right on.  I always have trouble distributing the peels evenly among the jars, but I suppose that's OK.  The peel of the grapefruit in particular adds a lingering bitterness that some might not love as much as I do.  When I consider giving away a few jars, I'll keep that in mind and hold back the ones for myself with the most peels!  Diana Henry said she reserves this marmalade specifically for morning toast, but I think the color and texture would be perfect to top a plain cheesecake or small tart.  I also think the thick syrup would be good mixed with seltzer water.  But I'll probably take her lead and hoard the jars for morning toast or other morning confections.  It's making me want to make a fresh batch of croissants or maybe some sourdough biscuits...

marm spoon

About CakeWalk

The CakeWalk name originated in my head one day as I was walking.  I do like walking, and food can be easy if you enjoy it tremendously, kind of like a cakewalk.  And, I do adore cake.   Then I discovered that in addition to being an easy dance or a task easily accomplished, it was also a company on the east coast that develops music production software.  If you are looking for electronica, let me tell you, you are in the wrong place. While I have a great fondness of music of almost any type (but with a special nod to jazz), I also love to cook and bake, and this is the CakeWalk I have become.

When I began CakeWalk in April of 2009,  I was basically looking for a good outlet to obsess at length about all of the foodstuffs that I was nonchalantly emailing my friends.  I didn't realize that what I was sending every few weeks to that select few was the beginning of my online life.  In the duration of my first year as rcakewalk, I found even more than I bargained for:  new friends from all over the place and hundreds of bookmarked recipes from blogs around the planet.  My second year found me diving deeper into whole nutrition, making even more from scratch and changing my once negative views about heavy cream, butter, and coconut oil.

Year three began with commitments to only homemade ice creams in the freezer and purchasing mostly local and sustainable eats.  I had an itchiness to figure out home cheesemaking, deepen my understanding of wild yeast breadmaking, and possibly to build a still in my basement.  As years four and five dawned, the still hadn't been built, but then I found out that it would have been illegal anyway.  Cheesemaking was still on the list, but I had plenty on my plate - and then my second little son was born last summer, 7 years to the day after my first.

I've now hit my stride both online and in the kitchen.  Most everything eaten in our home is from scratch, and I continue to read voraciously on diet and whole health as it pertains to our food system.  I attracted the eye of a publisher, and wrote a canning and preserving cookbook which was released last fall!

Continue to follow my day-to-day operations as I make most of it from scratch. I am thankful for the little and the lot as I continue to learn and make, obsess a bit over whole health and true whole foods, and try to articulate just why it is I love to be in the kitchen so very much.

(Gluten Free) Biscotti as Exercise.


Why does nothing warm me up faster (and better) than turning on the oven?  If this winter is good for anything, I’d bet it’s good for the collective weight gain of all of those who agree with me.  I shiver at the steady stream of carbohydrate intake for my picky kid, and yet I’m doing my fair share to keep him in steady supply.  Maybe I can’t help it; the very definition of comfort food is entwined with carbs.

On these cold mornings, the ones that you almost have to laugh at, I need something with the coffee.  Oh, I’ve had my reasonably healthful breakfast, but later in the morning when the deep black joe hits the cup, it’s begging to have the company of something sweet as well.  Maybe I comply under the guise of warming the kitchen, but really, it’s just nice to have a little something to nibble.  A little second breakfast of homey, comforting carbs to chase the caffeine. 

It can also be argued that the kitchen work itself is althetic too.  Ample amounts of hand dishwashing, that elegant dance of opening and closing cupboard doors and drawers: in my mind this qualifies as exercise.  And have you ever rolled out laminated croissant dough by hand?  I swear this itself is key to a well toned midsection.  When I'm cooped up in an endless winter, unable to take my usual walks, I take this revitalization instead.  And I add a few new sweet tidbits to my unending mental pastry library.

buckwheat biscotti

Of the many sweets that I find impossible to stay away from, I actually show impressive restraint with biscotti.  Unlike more traditional cookies, I can eat only one and be satisfied.  I can look forward to a single, crunchy brick every morning and feel secure in their preservationist ways since a batch of biscotti can last well on a month in an airtight glass container.

I got it in my head to try a gluten-free one the other day, maybe because my Mom is coming to visit next week and she tries not to overdo in gluten, but probably also because I really like trying out new gluten-free recipes. I really like alternative grains - or in the case of this buckwheat heavy recipe, alternative seeds.  I've always loved the flavor of buckwheat flour, and I ground my own from bulk buckwheat I had kicking around in the pantry.

buckwheat.

Buckwheat is among the prettiest seed too, the tiny triangular things pop between the teeth when eaten raw or toasted.  I prefer this sensation even more when I've sprouted and dehydrated it first.  Then, it's a foolproof addition to granola as Marisa McClellan brilliantly noted in her first book.  I grind most of my nut flours and whole grain flours in my Vitamix, which works so long as you are careful not to turn the oilier of them into nut or seed butters. (I measure by weight into the dry container and then blend.)  This recipe called for almond flour, which I mixed up after the buckwheat was already turned to flour.  It helped the almonds become more flourlike, while preventing them from becoming butter.  Of course, you can use already ground buckwheat and almond flours.

I mixed this up by weights, check out the original recipe for approximate volumes.

Gluten-Free Chocolate Almond Orange Biscotti (adapted from Martha Rose Shulman)
(yields about 3 dozen)
  • 88 g. buckwheat flour
  • 37 g. cornstarch
  • 120 g. almond flour
  • 60 g. unsweetened cocoa powder
  • 2 t. baking powder
  • 1/2 t. kosher salt 
  • zest of one orange, grated 
  • 55 g. unsalted butter
  • 125 g. brown sugar
  • 2 eggs
  • 2 t. vanilla extract 
  • 70 g. blanched, slivered almonds
Preheat the oven to 300 degrees. Line a baking sheet with parchment. Mix buckwheat flour, cornstarch, almond flour, cocoa, baking powder and salt. 

Cream the butter, sugar, and orange zest for 2 minutes on medium speed. (Scrape down the sides of the bowl and the beater with a spatula.)  Add the eggs and vanilla, and beat together for 1 to 2 minutes, until well blended. Scrape down the sides of the bowl and the beater. Add the flour mixture and beat at low speed until well blended. (The batter will be very sticky.) Add the slivered almonds and mix at low speed until evenly distributed through the dough. 

Divide the dough into 2 equal pieces, and shape them into wide, flat logs, about 10 inches long by 3 inches wide by 3/4 inch high. Use wet hands to do this, and make sure they are at least 2 inches apart on the baking sheet. Place in the oven on the middle rack and bake 40 to 45 minutes, until dry, beginning to crack in the middle, and firm. Remove from the oven and allow to cool for 20 minutes or longer.
Place the logs on a cutting board and use a serrated knife to cut them on a diagonal into 1/2-inch thick slices. (They are more brittle than traditional biscotti, so cut carefully.)  Place on a parchment-covered baking sheet and bake again in the middle of the oven until the slices are dry, 30 to 35 minutes. Remove from the oven and allow to cool completely before storing in an airtight container.


buckwheat biscotti

You'd never know these were absent of gluten.  They have a pleasant crunch and aren't as brittle-tough as some biscotti, so they don't require a dunk to soften them enough to be palatable.  The orange is subtle, as (surprisingly) are the almonds.  It's a very nice dark chocolate biscotti, that I've considered storing down on the basement pantry shelf to further improve my exercising and restraint.