
I must admit, that since Lahey obsession has set in, I really haven't felt like making any other bread variations. I was quite happy in making my new standby which is the Pane Integrale with a bit of extra flax meal added. Not only is it delicious and healthy, it lasts a freakishly long time. A long time if it isn't gobbled up, that is.
Well, because I was out of town for the weekend, Monday morning came with no 24 hour Lahey dough to work with. I decided to give another bread a try - since I bought this book at the same time as the Lahey book and confess to never having cracked it open until this morning. I was almost out of AP flour, which was alright since most of the bread recipes in Healthy Bread in Five Minutes a Day are predominately whole grain. When I came across one for Quinoa Bread, I knew this was the perfect opportunity to have a loaf of bread ready for my dinner deadline. And, I'm kind of a sucker for anything with quinoa in it.
The main differences in the two approaches to "no-knead" bread as I see them are these: 5 Minute a Day bread uses much more liquid and yeast, rises faster and can be stored in most cases for up to 2 weeks, and Lahey bread uses a fair amount of liquid, but only produces one loaf at a time that takes around 24 hours to complete. I
think the Lahey bread is my new favorite method as well, since it is baked in an "oven within an oven". (My new Lodge pre-seasoned 5 quart dutch oven is working out splendidly, by the way.) No messing about with pouring in water for steam, and considerably less mess, which is something of note for someone who by nature tends not to be the neatest when working with doughs. I also find that the flavor is a bit more to my liking.
think the Lahey bread is my new favorite method as well, since it is baked in an "oven within an oven". (My new Lodge pre-seasoned 5 quart dutch oven is working out splendidly, by the way.) No messing about with pouring in water for steam, and considerably less mess, which is something of note for someone who by nature tends not to be the neatest when working with doughs. I also find that the flavor is a bit more to my liking.
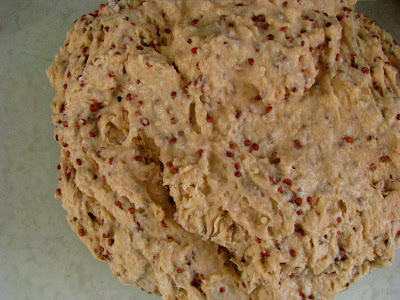
Quinoa bread dough.
Rather than lament the omission of my bread baking in a pot, I decided to mix up the Artisan Bread in 5 Quinoa bread, and then treat it like I would a Lahey bread, sans waiting for 24 hours. My resulting loaf was still ABin5ish, but had enough Lahey characteristics to satisfy my obsessions. And it tasted great too, with the slight nuttiness of quinoa adding a millet-like texture to the bread. I know on the ABin5 website, they give tips for baking in pots, and I remember perusing it some time back, but I just used Lahey's methods and temperatures outlined in his book. I'll recount my recipe and procedure below, but the ingredient list isn't changed much from the original except that I did use half the recipe. You can easily double the dough and store it under refrigeration for up to 10 days.
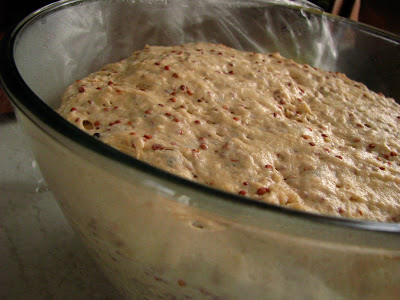
1st raising.
2nd Raising.
Quinoa Bread (Layhey-ified, but still Artisan Bread in Five Minutes a Day's recipe.)
- 1 1/2 c. white whole wheat flour
- 1 1/2 c. ap flour
- 1/4 c. bread flour (you can use all ap flour, but I was out after 1 1/2 c...)
- 1/2 c. quinoa
- 1 t. active dry yeast
- 3/4 t. kosher salt (could actually use a bit more, to my taste)
- 2 T. vital wheat gluten
- 1 1/2 c. plus 6 T. lukewarm water
Mix dry ingredients together, then add water and mix well with wooden spoon, spatula, or stand mixer with paddle attachment. Cover the dough, and let it raise at room temperature until it rises and collapses slightly, at least 2 hours. (Actual time will depend on how much yeast, how warm or cool your room temperature is, and how lukewarm your water was.)
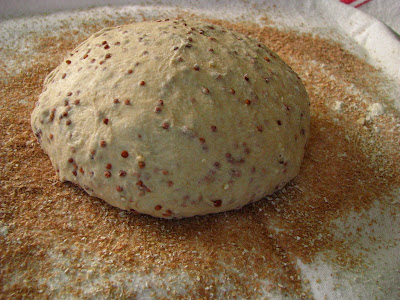
Dust a clean linen (or non-pilling) kitchen towel with ample amounts of wheat bran and/or oat bran.
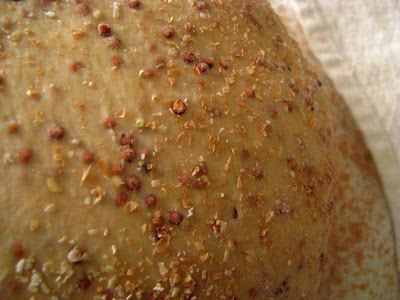
(I could have used the whole half batch of dough here for a single loaf, but I used about 2/3 of it.) Using a bit of extra flour, shape it into a round as quickly as possible, aiming for forming a tight "skin" on the outside of the dough by pulling the top around to the bottom. It's a sticky dough, so use some extra flour if you need it. When you have a nice neat boule shape, rest it on the wheat bran dusted towel, and cover loosely with the sides of the towel. Sprinkle the top of the loaf with a bit of extra bran if it seems too sticky. Let it raise for another 2 hours or so, until the loaf looks pleasantly plump, and an indentation made by your index finger lingers in the loaf after you press it in gently.
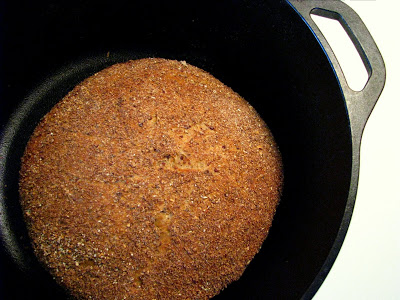
Preheat oven to 475 degrees about a half an hour before baking, and put lidded dutch oven in the oven before doing so. When the oven is to temperature and the pot is heated, carefully remove the pot from the oven, and take off the lid. Quickly and carefully, invert the loaf into the pot, trying not to "plop" it too much if possible. Put the lid back on and bake for 30 minutes. After 30 minutes have elapsed, remove the lid, and bake another 15 minutes until loaf is golden brown and sounds hollow when tapped.
Be patient, and try not to cut into the loaf until it has cooled completely.
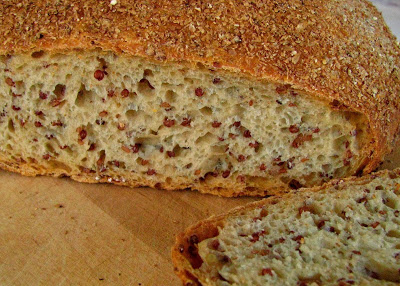
I was happy with the final product, when it cooled and I finally cut into it and ate the heel plain for my initial discriminations. It made good sandwiches for dinner tonight, and I'm looking forward to having it toasted for breakfast tomorrow. I am also happy at the additional complete protein it contains, and that my Husband thought it "wasn't bad"! I'll call it a win, and keep it around in my bread-making repertoire. Next time, I may try starting it a day earlier and reducing the yeast down to the 1/2 teaspoon that is the hallmark of Lahey bread. Now I'm kind of curious...