Alton Brown

Baklava: Daring Baker Challenge June 2011

Erica of Erica’s Edibles was our host for the Daring Baker’s June challenge. Erica challenged us to be truly DARING by making homemade phyllo dough and then to use that homemade dough to make Baklava.


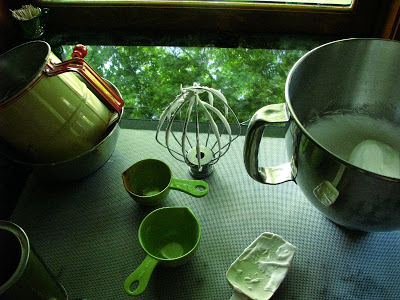
I kind of cheated this month. As you may have noticed, I sat last month out: the marquise dessert was just too rich for a personal dessert, and I had no excuse to make it to share with others. When I read this month's challenge was to make phyllo dough, I felt a little crushed. I had recently tried making it for the April Daring Baker Challenge, and determined that to even try to make it well I would need another pair of hands to help me stretch it. Not being overly organized in planning such a helping party, I decided not to try it at this time.

But I have never made baklava at home, so I figured I would do so using the organic phyllo dough that I recently spotted at my co-op. Cheating? Maybe. But so delicious was this version of baklava that I'm glad I didn't sit out another month just because I didn't want to try my hand at making the dough again.


Baklava is one of my most favorite sweets. When I worked second shift, I'd occasionally stop by a 24-hour Greek restaurant on my way home to sit at the counter and get a coffee and a thick syrupy square that I'd eat painstakingly slow while reading on the side and watching the Greek boys cooking through the pass thru window. The combination of flaky, crisp dough and dense sugar soaked nuts still makes me excited, even though it very nearly makes my teeth hurt to eat it. Why I've never made it before, I have no idea. Oh wait - I do know why. It's because I would have a hard time rationing myself of it's overwhelming allure to my palate.

I do not watch a whole lot of cooking t.v., in fact never unless I DVR it first. But for some reason, not too long ago I watched an old episode of Alton Brown's Good Eats in which he made baklava. I was so impressed with his approach. Had I decided to make this dessert before the 25th (for the 27th posting deadline), I would have also made my own rose water as he did.

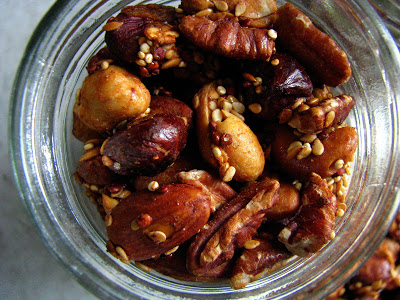
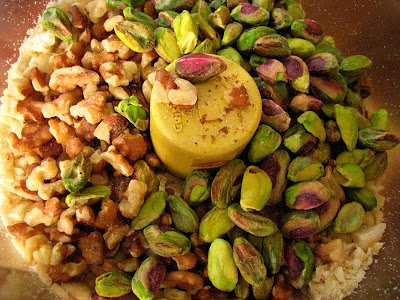
I made the nut combination of almond, pistachio and walnut from his recipe for the April challenge and it was so great that I couldn't wait to try it layered between phyllo and saturated with thick honey syrup. But this time, I did not use the "crispy nuts" technique, and used raw nuts blended with Jamaican allspice and cassia cinnamon. I like this particular combination of nuts so well, I think it would be a good substitute in lots of nutty things.


The result was a perfect combination of sweet spice and flowers - heavy, heady and tasting of far away. I almost thought I'd liked to have added some black pepper to the filling, playing up the bitterness of the allspice a bit more. Maybe next time... I also used regular melted butter instead of clarified, being short of time. (I know that is not a good excuse. There is also no good excuse I didn't grind my own spices either, but I only had powdered allspice on hand. It was fresh from the Spice House as was the Cassia cinnamon, so I'll stand by my conversion. I tasted the nut mixture on a fingertip until I was satisfied of the flavor, you could do the same.

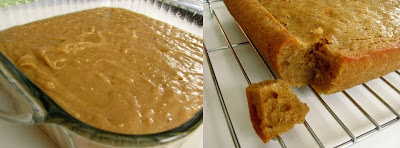
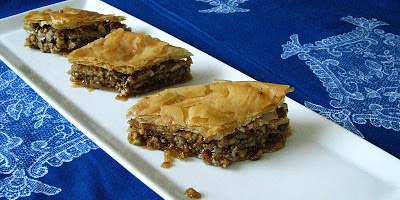
I realized after that I also forgot the sugar in the filling, and to be honest I didn't even miss it. The honey syrup makes the finished dessert plenty sweet. I used half of the amounts of Alton's original recipe, it fit well in a 8x8 square glass baking dish.

Baklava (slightly altered from Alton Brown)

Filling:
  • 2 t. ground cinnamon
  • 1/2 t. (plus) ground allspice
  • 3 oz. blanched almonds
  • 3 oz. raw walnuts
  • 3 oz. raw pistachios
  • 1/8 cup water
  • 1/2 t. rose water
  • 8 oz. phyllo dough, thawed
  • 4 oz. melted butter
For the syrup:
  • 1/2 + 1/8 c. honey
  • 1/2 + 1/8 c. water
  • 1/2 + 1/8 c. sugar
  • 1 small cinnamon stick
  • 1 (2-inch) piece fresh orange peel
Heat the oven to 350 degrees F.
Place the almonds, walnuts, pistachios, and spices into the bowl of a food pro and pulse until finely chopped, but not pasty or powdery, approximately 15 quick pulses. Set aside.
Combine the water and rose water in a small spray bottle bottle and set aside.
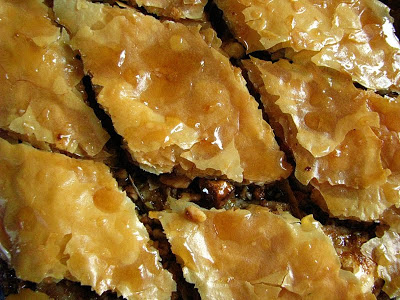
Trim the sheets of phyllo to fit the bottom of the pan (mine was 8x8, glass). Brush the bottom and sides of the pan with butter; lay down a sheet of phyllo and brush with butter. Repeat this step 9 more times for a total of 10 sheets of phyllo. Top with 1/3 of the nut mixture and spread thinly. Spritz thoroughly with the rose water. Layer 6 more sheets of phyllo with butter in between each of them, followed by another third of the nuts and spritz with rose water. Repeat with another 6 sheets of phyllo, butter, remaining nuts, and rose water. Top with 8 sheets of phyllo brushing with butter in between each sheet. Brush the top generously with butter. Place in the oven and bake for 30 minutes. Remove pan from the oven and cut into 28 squares. Return pan to the oven and continue to bake for another 30 minutes. Remove pan from the oven to a cooling rack and cool for 2 hours before adding the syrup.
Make the syrup during the last 30 minutes of cooling. Combine the honey, water, sugar, cinnamon stick and orange peel in a small saucepan and set over high heat. Stir occasionally until the sugar has dissolved. Once boiling, boil for 10 minutes, stirring occasionally. Remove from the heat and discard the peel and cinnamon stick.
After the baklava has cooled for 2 hours, re-cut the entire pan following the same lines as before. Pour the hot syrup evenly over the top of the baklava, allowing it to run into the cuts and around the edges of the pan. Allow the pan to sit, uncovered until completely cool. Alton says to cover and store at room temperature for at least 8 hours and up to overnight before serving and to store, covered at room temperature for up to 5 days, but I like my baklava cold, straight from the fridge, just like they serve it at Greek restaurants.


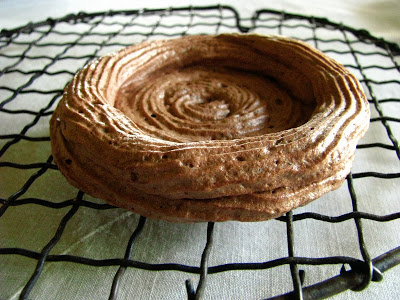
This was a great dessert, that's really all I can say. If you like baklava anyway, this version is likely to become a fast favorite. And as for homemade phyllo dough: I'm all for homemade everything, but some things are just meant to be purchased I think. Machine made phyllo is consistent and thinner than I could ever hope my own to be... I hope one day I can unravel the mystery of Homemade Phyllo Dough, but for now, I'm content with my accomplishments.

Thanks to Erica for choosing a great dessert this month!

Baked Alaska: Daring Baker's Challenge August 2010

The August 2010 Daring Bakers’ challenge was hosted by Elissa of 17 and Baking. For the first time, The Daring Bakers partnered with Sugar High Fridays for a co-event and Elissa was the gracious hostess of both. Using the theme of beurre noisette, or browned butter, Elissa chose to challenge Daring Bakers to make a pound cake to be used in either a Baked Alaska or in Ice Cream Petit Fours. The sources for Elissa’s challenge were Gourmet magazine and David Lebovitz’s “The Perfect Scoop”.


I really enjoyed Elissa's choice of challenge this month. Baked Alaska. I've never eaten it, or really even seen it. It fell into the category of "Floating Islands" or "Turkish Delight", impossibly romantic notions of desserts that I also have neither made or eaten. Their names alone could comfort you during the darkest hours, a nursery tale feast all too easy to conjure when such a beautifully named sweet is involved.

This baking experience was the inaugural event in which I did not use any granulated white sugar when called for. When I was visiting with my Parents a week ago, we shopped at an Amish "Bulk Store". They sell all sorts of nuts, seeds, soap making supplies, flours, any other homesteading staple you could imagine. It's refreshing to shop in a simple environment, the size of one's living room. It kind of reminded me of the little hole-in-the-wall co-ops that used to pop up here and there before the era of "food shopping as art" concept stores emerged. While I can (and like to) be seduced by the best in floor displays, I loved this Amish Bulk Store, and my Mom and I decided to split 50 pounds of raw sugar.

We divided it into 14 quart size canning jars each, and when I returned I weighed a cup to see the difference from granulated sugar. A regular cup of white sugar is about 8 ounces, and the raw sugar was about 6. When we asked various Amish women about the usage, some preferred to use more, and some less than the same amount of white sugar. I still have a lot of practice ahead of me, but I like the flavor so much better, that I'm sure it will be fun experimenting. (When I used the raw sugar recently for canning, I used a weight measure based on the 8 oz. per cup of granulated to keep with the result of the tested recipes.)


The brown butter pound cake recipe we were supposed to use did not work out for me. I made it according to the weight measures, and I don't think the conversion for the flour was proper. I had a rather flavorless, butter soaked cake that was on the leaden side. Since the cake is really just a thin layer on the bottom, I probably could have used it - but since these desserts were for Maeckel's birthday, I decided that I had to make it again. It was the correct choice!


The second time, I used a Cook's Illustrated recipe from my well worn copy of The Best Recipe. I altered it by first browning the butter, then weighing it and adding enough regular butter to bring it back up to 8 ounces. I also let the butter come fully to room temperature. I baked it up in a loaf pan, and it was delicious. I saved all the scraps from cutting out little circles for the bottom of my Alaskas, and on Lo's advice am going to make a peach ice cream (Alton Brown's Burnt Peach Ice Cream... or maybe I'll even give David Lebovitz's Peach Ice Cream a try), and add the bits of cake in.


Meanwhile, David L's salted caramel ice cream is probably the best ice cream I've ever made at home...

Instead of the recommended David Lebovitz vanilla ice cream, I made his salted butter caramel version. Other than a (by comparison) light recipe for vanilla ice cream, I have never made any Lebovitz ice creams in the past. I think by making this one recipe it is completely evident that he sure knows what he is talking about. This ice cream was so smooth and seductive, you could almost believe that it in no way could have a negative impact on your health. If an ice cream could be sexy, this would be the one.


If there could be a downside, it was that the ice cream was so soft that I knew that even a brief baking at 500 degrees was going to cause it to melt quickly into nothingness. I used this excuse to purchase a culinary torch. I got one from Superior Equipment and Supply, a restaurant supply that is actually walking distance from my house (lucky me...). I am now one of the people now getting perhaps a bit too excited that I can wield an 1100 degree flame in my hand! It worked really well, no messy ice cream, and even time to take pictures! I can't hardly wait to see what I can "torch" next...


Prior to torching.

The only thing more fun than taking out little plates of frozen desserts to torch, was eating them. They were delicious. The meringue pipings tasted like toasted marshmallows, the salted caramel ice cream was still firm and just a little melty, browned butter pound cake was a bit hard, but softened up nicely by the time we got to the end of the dessert. Just in time to taste all of the browned butter goodness and pretend that we didn't want to opt for seconds.

I will certainly be making this again! It's a great idea for dinner parties, since they are done up in advance and then only torched slightly before serving. If you use a hard set ice cream, I'd bet you may be able to get away with the namesake "Baked" part of the Alaska as well. A version I'd like to try on my next go would be in the s'mores realm - a base of homemade graham cracker, a bit of dark chocolate ice cream and this meringue toasted deeply: sounds completely addicting to me.


You can find the recipes for this month's challenge at the Daring Kitchen website... and be sure to pop over and take a look at 17 and Baking. Elissa has a beautiful site filled with great photography and delicious baked goods.

After I missed last month's challenge due to being so busy, it felt extra good to be obsessing again about a challenge for August. I'm so glad that I made the time to make this dessert. Thanks again to Elissa for a great challenge!


(Kinda makes you want to curl up and re-read the Chronicles of Narnia, doesn't it?)

Chocolate Pavlovas: June 2010 Daring Bakers Challenge


The June 2010 Daring Bakers’ challenge was hosted by Dawn of Doable and Delicious. Dawn challenged the Daring Bakers’ to make Chocolate Pavlovas and Chocolate Mascarpone Mousse. The challenge recipe is based on a recipe from the book Chocolate Epiphany by Francois Payard.

I was happy with this month's challenge, especially with the similarities to the most delicious dessert on earth: Burp!'s Chocolate Schaum Torte... but somehow I procrastinated until the last second, and then found myself out of town visiting the farm for the past 5 days. I decided to complete my challenge in my Mom's kitchen, and since I have already made mascarpone and other rich pastry creams, I took the liberty of altering this recipe to make it more health conscious.

My Dad has to be careful, as we all should, not to have too much saturated fat in his diet. Meringues, then, are the perfect dessert, since they only contain egg whites. I remembered a chocolate pudding recipe that was in The Healthy Kitchen Cookbook by Dr. Weil and Rosie Daley, and figured that while it wouldn't be mascarpone mousse, at least I could serve it guilt free to my Pop (and me)! I omitted even a trace of heavy cream by topping it all off with my homemade chocolate syrup.


What a view to bake to!

Baking in my Mom's kitchen is a pleasure, since she has a gorgeous and well appointed one with loads of counter space. It is also wonderfully quiet and clean, well - clean until I get busy in it. My Mom is a very neat person, and can cook and bake without making any mess whatsoever. I, on the other hand, seem to make twice as much mess as I do even in my own kitchen... My Mom is among the most gracious people I've ever had pleasure of knowing (and I'm so lucky, since she is also my Mom!), and she never minds that her kitchen needs cleaning after I visit. I try to do my best to clean up after myself, but I suspect she goes behind me, catching what I missed.

Unlike the famed Schaum Torte, these chocolate meringues are baked at 200 degrees f. until they are completely hard - so no soft, squoodgy middles in these guys. I piped the meringue into serving-sized nests:


After 2 1/2 hours in the oven, they were hard and hollow sounding when tapped. They cooled in no time, and I stored them in a lidded 9x13 metal cake tin to stop them from getting sticky in the very humid weather.


My Parents have a small raspberry patch, which was just starting to get a few ripe berries. It appears the jury is still out on if I do indeed have a raspberry allergy. If I do, I can't quite come to grips with it, and eat a couple of berries here and there to test myself. I know, I know, this can be extremely dangerous. But since the reaction I had more than a year ago now was do to the raspberry LEAF extract in some shampoo, I keep pushing the envelope. Chocolate and raspberry are two things that are just not meant to be kept apart, and they were absolutely worth any risk of anaphylactic shock that may have ensued.


Fortunately, the 4 or 5 berries I ate didn't cause me any reaction at all. I have never had a food allergy before, and thinking about avoiding something so wonderful as raspberries for the rest of my life is kind of a downer. As you may have already surmised, I do keep on checking to see if in fact I am allergic. I probably shouldn't do that, so please don't go out and eat things that make you allergic just because you have read about my foolhardy approach to food allergy here.

The truth is, I've never been officially diagnosed with the allergy; a dermatologist just suspected my reaction was to raspberry since when I stopped using the particular product that contained a lot of it, my symptoms improved dramatically. Hence, no more Octomom lips...


I think that my approach to dessert has changed since my interest in raw and vegan foods has been piqued. I'm happier now with some fruit or something lighter than I was a short while ago when I could hardly go a day without a slice of chocolate cake. Proof, I guess, that you can recondition yourself to enjoy a whole lot of things under the guise of dessert. I'm not saying that I don't eat dessert, since I usually do and usually once per day, but I do like lighting up a bit and it's a good feeling to be guilt-free when I do have a bite of something sweet.

As far as chocolate desserts go, this guilt-free version of the Daring Baker Challenge was truly delicious. I'd have to say that I think the raspberries made it perfect, and so did the scoop of vanilla ice cream that we ended up having alongside. If you are counting the calories, this one is probably up there, but saturated fat-wise, it is very low.

Thank you to Dawn for a delicious (and healthy) challenge, and remember to find all of the original recipes either on her site or at the Daring Kitchen website. If you would like to make some pretty tasty and low-fat chocolate pudding for the low-fat version I made, here you go:

Low-Fat Chocolate Pudding (adapted from a pie recipe from Dr. Andrew Weil and Rosie Daley)
  • 1/3 c. cornstarch
  • 1/3 c. sugar
  • 1/3 c. cocoa powder
  • 3 1/2 c. non-fat milk (I did use 2 % to make it a little richer)
  • 1 t. vanilla extract
  • pinch of salt
  • pinch of espresso powder if desired
Sift together cornstarch, sugar and cocoa powder into a medium saucepan. Whisk in milk gradually. Place over medium heat, and cook until mixture thickens and boils, whisking constantly, about 7 minutes. When mixture boils, reduce heat to medium low, and continue to cook for 2 minutes stirring constantly.

Remove from heat. Taste, and add salt and espresso powder if desired, and add vanilla extract. Stir to combine, then pour into a clean, glass bowl. Cover with plastic wrap, and allow the wrap to sit directly on top of the pudding to prevent a skin from forming.

Cool for about 30 minutes, then transfer to refrigerator until cold, about 2 hours.

Footnote:
I am just remembering that Alton Brown made meringue as a pie crust in one of his books. He baked it in a 9 inch pie plate, then let it cool. He suggested filling it with pudding and topping with whipped cream, and I'm figuring that this could be pretty delicious finished off with a few raspberries as well. That Alton, he really is on to something... Next time, I'll try this dessert in Alton Brown Pie Form. Stay Tuned.

MEAT: It's what's for dinner.

After a mostly vegan/vegetarian week, I broke my streak last night when I met Peef and Lo for dinner at Roots. I was so happy they suggested we go there, since I had never been. It dawned on me as I was eating delicious pork nachos, outdoors mind you, that I effortlessly ate no meat for a week until that mouthful. Pork, sustainably raised and melt in your mouth tender is confirmation enough for me that no matter my food obsession, sometimes puerco is just the best think in the whole wide world.

Burp! also posted yesterday about the freezer meals that they like to have, which is exactly how I cook over here as well. I'm never happier than when I can spend the whole day in the kitchen concocting, but then I'm very happy to have a fully stocked freezer at the ready. I am actually getting better at not cooking for a small army. My Husband is not a leftover eater, unless the leftovers appear months into the future, and that's actually a good arrangement for a cooker like myself. I'm as happy doing daily cooking as I am eating a leftover that prevents me from cooking every day until it expires, but when pressed, I would rather cook something new.

So I felt compelled to dig into my frozen wares for supper tonight, partially because I couldn't be bothered to run out to shop and partially because I do like to use up what is on hand. What fun to shop in my own freezer: a portion of frozen Pork and Chile from my Mom - one of our Christmas Eve traditions, some frozen pintos that were from last month, and a half armful of leftovers fruits and vegetables with some cilantro from the fridge side of things made a nice salsa to boot.


My Mom makes the most wonderful flour tortillas. When I first came to live on my own, I tried to mimic them to no avail. I tried and failed so many times that I just settled on corn tortillas made with Maseca. I can make them in my sleep, which makes me feel strangely like a top chef in my small kitchen, cooking for a whopping 2 patrons. I can multitask with the best of them, especially, when all I have to do is make the tortillas when everything else just simmers up to temperature, a few seasonings required. Someday I do want to make nixtamal corn in my kitchen like Alton Brown, my hero, and make them from scratch, but until then, Maseca is my very dear friend.


Pork and Chile is among the easiest Mexican staples I grew up with, the chile ratio gradually increasing with my and both my brothers' years of age. We all enjoy fairly hot food, for which I am supremely grateful. Like I said to Peef last night over conversation, when my eyelids are sweating, that is a good thing. To make it, sear pork (shoulder or leaner meat if you like, cubed and dredged in salted and peppered flour), in hot oil - just a bit. When it is browned sufficiently, remove it, and then brown an equal amount of russet potato, also cubed. Add back the pork, a couple cloves of garlic, halved, and add a quart or two of homemade canned tomatoes and a few or more home canned jalapenos. My Mom cans them in oil and they are usually HOT. They turn a miraculous shade of soft when canned, and since they are whole, they retain the heat magnificently. This combination of tomato and jalapeno, most certainly at Casa Rcakewalk, from my Parents' garden and labors, does transport me, every bite, back to some of my earliest food memories. Those flour tortillas and pork and chile, mountains of pintos that always tasted better at my Gram's since she used pork fat in hers. It was some of my favorite food then as it is now.


Leftovers salsa: mango, red onion, cherry tomato, avocado, cilantro, salt and aleppo pepper and a bit of chili powder.

I love that I can on occasion, and thanks to my freezer, I can cook fast and furiously, without hardly thinking, all the while alone in my kitchen listening in this evening's instance to James Brown, The Gipsy Kings, Los Lobos and the Frida Soundtrack, with a bit of Johnny Cash, Hank Sr., the Cars and the Smiths for good measure. Sometimes that random songs on the iPod does a pretty awesome job. Meanwhile the boys were playing ball in the living room, something that would have never happened with such gusto indoors in my own childhood home... But I continued on, beaming all the while that my boys were having such fun within my earshot.


Boy-O didn't eat one bite for supper, tortilla, bean or even cereal staple. My Husband and I gobbled a couple of tacos each, sides of hot jalapeno for good measure. Easy dinner doesn't get better than this. When I finally commit to perfection of that elusive flour tortilla, I will be truly in culinary ecstasy.

Delicious, not Photogenic...

Sometimes, even the most delicious food can't help but render itself less than desirable when translated to photo form. Be it due to photographer error, or just the subject matter of the food, this is the reason I haven't had many posts this week. The things I've been eating are delicious, just not very photogenic.


These Anaheim chiles translated all right, but the finished dish not so much. Over the weekend, one of my amazing flickr friends was recently on a trip to New Mexico, and posted links to several very interesting articles in the comments to one of my photos. I got so excited thinking about the Southwest, and then remembered that I had an issue of Saveur from Sept./Oct. 2001 that had a cover story of the "Fall Flavors from New Mexico". Unfortunately, there is no link to Jan Ellen Spiegel's well written story of the Arellano family, who live near Embudo, NM - between Taos and Santa Fe. On an ancestrally inherited plot of 2.5 acres, they grow an absolutely astounding array of fruits and vegetables:
In an average year, they will grow ten varieties of tomato, 14 different chiles, ten types of potato and five of eggplant, a half dozen squashes, a dozen lettuces, corn, radishes, cucumbers, beets, onions, leeks, garlic, okra, asparagus, bok choy, mizuna, kale, artichokes, fennel, chives, dill, and edible flowers. They also harvest a dozen varieties of pear, most of them Asian, with names like chojuro, hosui, and korean giant; ten different peaches; five kinds of cherries and three of plums; apricots; grapes for eating and for making wine; several varieties each of blackberries and raspberries; and gooseberries, elderberries, melons, figs, persimmons, quince, hazelnuts, and black walnuts (they pick pine nuts from wild pinon trees).

As I read and reread that paragraph (which didn't include the 25 varieties of apples "hanging and the trees" and "espaliered on trellises"), I tried to visualize these "garden rooms" as Estevan Arellano called them, and tried to grasp the yearly work of a master preserver, his wife, Elena Arellano. This example of eating off the land is almost hard to believe. There were several simply arranged Arellano family recipes accompanying the article, and the one for Green Chile Stew was the one I couldn't pass up. Photographer Laurie Smith was able to capture the stew (though probably in a controlled environment with exceptional lighting!) in an inviting manner, and the ingredient list only confirmed to me that this was going to be a terrific meal.

I opted to take out my new Crock Pot for its 3rd voyage on the Rcakewalk culinary seas, and started with a frozen package of that grass fed beef from my chest freezer Sunday night before bed. It was a round steak, and bright and early at 7:30 a.m. I rubbed it, still mostly frozen, with ample amounts of salt, pepper and cumin. Then I let it warm up in the lowest setting of the wonder that is a Crock Pot for a couple of hours before adding a half jar of home canned tomatoes (the original recipe used fresh, but I'd imagine a 14.5 oz. can would be about what I used), and a couple of quartered garlic cloves. Meanwhile, I roasted 8 Anaheim chiles until they were blackened in spots before resting them in a covered bowl to cool enough to peel, seed and ultimately coarsely chop. When the meat cooked just enough, I removed it and cut it into large chunks and removed what little fat was on it (since it was a round steak, typically very sinewy and tough - not to mention a large round shape). I left the bone in the pot for a bit of extra flavor though, and added a couple of cups of water. Then I added a chopped onion, and let it cook until about 3 pm, when I added 2 medium Yukon Gold potatoes, scrubbed and chopped into 1/8ths and the roasted chiles. After the potatoes cooked, another hour or so, the finished result was complex for the simplicity of ingredients involved. And even more surprising, that round steak was tender and shredded easily with two forks, not to mention tasty! We added a bit of sour cream and Frank's Red Hot, and a slice of Wisconsin mild cheddar to the bowls for good measure. The beauty of this kind of recipe, is that you can add more or less of what you like, and even more or less liquid depending on your tastes. Chalk up another winner for the Art of Crockpottery!


I haven't made a cookie since December, so yesterday I figured it was about time. Since it is our Anniversary this Friday, I asked my Husband what kind of cookie he wanted, and he said "just plain M&M or chocolate chip, you know?". I do know, and also knew that the best chocolate chip cookie recipe I've ever made was thanks to Alton Brown. The recipe, from the episode "Chips for Sister Marsha", is genius. Instead of beginning with softened butter, you go full out and melt it before creaming it together with mostly brown sugar and some granulated sugar.

These are not healthy, but in my exercises in kitchen-related math, if the whole recipe contains 16 Tablespoons of butter and I got 18 total cookies, that's less than 1 T. of butter per indulgence, and I never eat much butter in normal life. Not to mention that the resulting cookie beats any NYTimes perfect chocolate chip recipe, or probably any of the hundreds that show up in Google searches. I used a cup of co-op organic bulk Sunspire "m&m's", and a cup of dark chocolate Ghirardelli chips. A dozen went directly into the freezer, where they can't find me, and the others are staying fairly quiet on the counter. My Husband not only ate one, but two! They are rich too! Hand sized, and non-photogenic at all, but I guarantee you after one bite, you too will be assured that you have found the best chocolate chip cookie recipe as well.

Monday morning, I had to make these little babies: Fudge Babies, which in no way, shape or form can be construed as good looking. A bite, however, and you will be as hooked as I am. I found the recipe via another flickr contact, and many many thanks go to Chocolate Covered Katie for posting them. They are essentially dates and cocoa powder, mixed with ground walnuts, but I had to add just a T. or so of agave syrup to get them to adhere into ball shape. Likened to the Lara Bar, which I confess I've never eaten, these remind me of the "Chunks of Energy" that can be purchased in the bulk bins at Outpost. They are so good, you can see why Katie emphasises making them NOW. My Boy-O and I can't get enough of them, and I'm keeping the few that are left in the icebox to discourage us from gobbling. I am actually finding it harder to resist these than the Alton cookies, and THAT dear readers is saying something.


So today, I had an extra egg white leftover from Alton's cookies. Their supreme chewiness stemming also from the addition of an extra egg yolk. A publication that won't be named (but click the link, and you no doubt will see it) since I actually detest the free subscription I have, had this recipe posted on the Editor's page, and I'm a sucker for any type of nut. These are mixed with quinoa too, which was totally intriguing. In the mammoth site, I could not locate this little gem, so I will type it for you. It's that good, it's crazy.


I made a half batch and used peanuts, cashews, almonds, pecans and hazelnuts. The recipe below is as written, with my notations in parenthesis.

Spiced Nuts and Seeds
  • 3 c. mixed whole nuts
  • 1/4 c. flaxseeds
  • 1/4 c. quinoa
  • 1/4 c. sunflower seeds (I used sesame seeds, since I didn't have sunflower)
  • 2 egg whites
  • 2 T. honey
  • 1 1/2 t. Kosher salt
  • 1/4 t. cayenne pepper
  • 1/4 t. cumin
  • 1/4 t. cinnamon
Mix nuts and seeds in a bowl. Beat egg whites with spices and salt and mix well. Spread nut/seed mixture onto parchment lined sheet pan, and bake at 325 for about 30 minutes or until deeply browned, stirring occasionally.

I never thought of adding raw quinoa to granola or other "nut mix" type recipes, but it's great! The Boy-O was gobbling again, and I actually had to put it out of his reach. I had upped the cayenne quotient too!

It was afternoon when I finished these and got them packed in jars, usually a perfect opportunity to photograph. For some reason, my camera is doing strange things. I consulted my manual, and read almost the whole thing. I also tried to access some live human help on the Canon website, to no avail. I am going to have to schlep myself over to a camera store and throw myself at the mercy of a clerk nearly half my age, I think. I don't think it's a big problem, but it is one rendering my photos a bit less exciting than usual. Hopefully, that won't affect the ability of the food to entice you!