Delicious, not Photogenic...

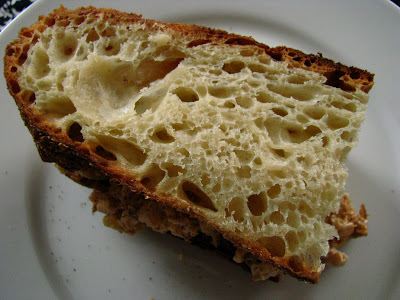
Sometimes, even the most delicious food can't help but render itself less than desirable when translated to photo form. Be it due to photographer error, or just the subject matter of the food, this is the reason I haven't had many posts this week. The things I've been eating are delicious, just not very photogenic.


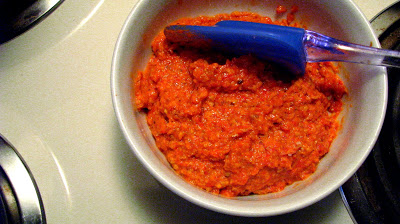
These Anaheim chiles translated all right, but the finished dish not so much. Over the weekend, one of my amazing flickr friends was recently on a trip to New Mexico, and posted links to several very interesting articles in the comments to one of my photos. I got so excited thinking about the Southwest, and then remembered that I had an issue of Saveur from Sept./Oct. 2001 that had a cover story of the "Fall Flavors from New Mexico". Unfortunately, there is no link to Jan Ellen Spiegel's well written story of the Arellano family, who live near Embudo, NM - between Taos and Santa Fe. On an ancestrally inherited plot of 2.5 acres, they grow an absolutely astounding array of fruits and vegetables:
In an average year, they will grow ten varieties of tomato, 14 different chiles, ten types of potato and five of eggplant, a half dozen squashes, a dozen lettuces, corn, radishes, cucumbers, beets, onions, leeks, garlic, okra, asparagus, bok choy, mizuna, kale, artichokes, fennel, chives, dill, and edible flowers. They also harvest a dozen varieties of pear, most of them Asian, with names like chojuro, hosui, and korean giant; ten different peaches; five kinds of cherries and three of plums; apricots; grapes for eating and for making wine; several varieties each of blackberries and raspberries; and gooseberries, elderberries, melons, figs, persimmons, quince, hazelnuts, and black walnuts (they pick pine nuts from wild pinon trees).

As I read and reread that paragraph (which didn't include the 25 varieties of apples "hanging and the trees" and "espaliered on trellises"), I tried to visualize these "garden rooms" as Estevan Arellano called them, and tried to grasp the yearly work of a master preserver, his wife, Elena Arellano. This example of eating off the land is almost hard to believe. There were several simply arranged Arellano family recipes accompanying the article, and the one for Green Chile Stew was the one I couldn't pass up. Photographer Laurie Smith was able to capture the stew (though probably in a controlled environment with exceptional lighting!) in an inviting manner, and the ingredient list only confirmed to me that this was going to be a terrific meal.

I opted to take out my new Crock Pot for its 3rd voyage on the Rcakewalk culinary seas, and started with a frozen package of that grass fed beef from my chest freezer Sunday night before bed. It was a round steak, and bright and early at 7:30 a.m. I rubbed it, still mostly frozen, with ample amounts of salt, pepper and cumin. Then I let it warm up in the lowest setting of the wonder that is a Crock Pot for a couple of hours before adding a half jar of home canned tomatoes (the original recipe used fresh, but I'd imagine a 14.5 oz. can would be about what I used), and a couple of quartered garlic cloves. Meanwhile, I roasted 8 Anaheim chiles until they were blackened in spots before resting them in a covered bowl to cool enough to peel, seed and ultimately coarsely chop. When the meat cooked just enough, I removed it and cut it into large chunks and removed what little fat was on it (since it was a round steak, typically very sinewy and tough - not to mention a large round shape). I left the bone in the pot for a bit of extra flavor though, and added a couple of cups of water. Then I added a chopped onion, and let it cook until about 3 pm, when I added 2 medium Yukon Gold potatoes, scrubbed and chopped into 1/8ths and the roasted chiles. After the potatoes cooked, another hour or so, the finished result was complex for the simplicity of ingredients involved. And even more surprising, that round steak was tender and shredded easily with two forks, not to mention tasty! We added a bit of sour cream and Frank's Red Hot, and a slice of Wisconsin mild cheddar to the bowls for good measure. The beauty of this kind of recipe, is that you can add more or less of what you like, and even more or less liquid depending on your tastes. Chalk up another winner for the Art of Crockpottery!


I haven't made a cookie since December, so yesterday I figured it was about time. Since it is our Anniversary this Friday, I asked my Husband what kind of cookie he wanted, and he said "just plain M&M or chocolate chip, you know?". I do know, and also knew that the best chocolate chip cookie recipe I've ever made was thanks to Alton Brown. The recipe, from the episode "Chips for Sister Marsha", is genius. Instead of beginning with softened butter, you go full out and melt it before creaming it together with mostly brown sugar and some granulated sugar.

These are not healthy, but in my exercises in kitchen-related math, if the whole recipe contains 16 Tablespoons of butter and I got 18 total cookies, that's less than 1 T. of butter per indulgence, and I never eat much butter in normal life. Not to mention that the resulting cookie beats any NYTimes perfect chocolate chip recipe, or probably any of the hundreds that show up in Google searches. I used a cup of co-op organic bulk Sunspire "m&m's", and a cup of dark chocolate Ghirardelli chips. A dozen went directly into the freezer, where they can't find me, and the others are staying fairly quiet on the counter. My Husband not only ate one, but two! They are rich too! Hand sized, and non-photogenic at all, but I guarantee you after one bite, you too will be assured that you have found the best chocolate chip cookie recipe as well.

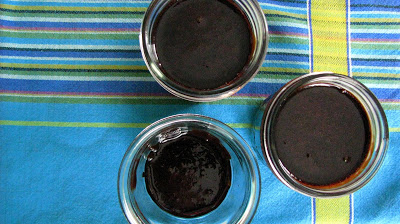
Monday morning, I had to make these little babies: Fudge Babies, which in no way, shape or form can be construed as good looking. A bite, however, and you will be as hooked as I am. I found the recipe via another flickr contact, and many many thanks go to Chocolate Covered Katie for posting them. They are essentially dates and cocoa powder, mixed with ground walnuts, but I had to add just a T. or so of agave syrup to get them to adhere into ball shape. Likened to the Lara Bar, which I confess I've never eaten, these remind me of the "Chunks of Energy" that can be purchased in the bulk bins at Outpost. They are so good, you can see why Katie emphasises making them NOW. My Boy-O and I can't get enough of them, and I'm keeping the few that are left in the icebox to discourage us from gobbling. I am actually finding it harder to resist these than the Alton cookies, and THAT dear readers is saying something.


So today, I had an extra egg white leftover from Alton's cookies. Their supreme chewiness stemming also from the addition of an extra egg yolk. A publication that won't be named (but click the link, and you no doubt will see it) since I actually detest the free subscription I have, had this recipe posted on the Editor's page, and I'm a sucker for any type of nut. These are mixed with quinoa too, which was totally intriguing. In the mammoth site, I could not locate this little gem, so I will type it for you. It's that good, it's crazy.


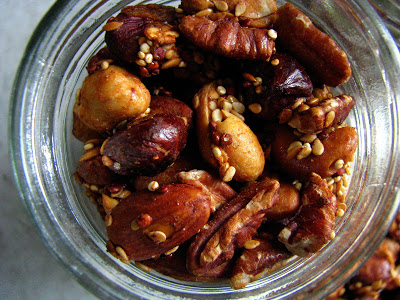
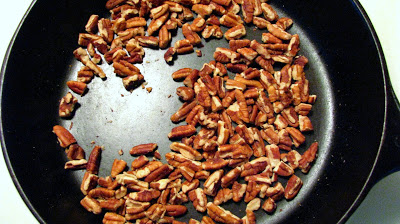
I made a half batch and used peanuts, cashews, almonds, pecans and hazelnuts. The recipe below is as written, with my notations in parenthesis.

Spiced Nuts and Seeds
  • 3 c. mixed whole nuts
  • 1/4 c. flaxseeds
  • 1/4 c. quinoa
  • 1/4 c. sunflower seeds (I used sesame seeds, since I didn't have sunflower)
  • 2 egg whites
  • 2 T. honey
  • 1 1/2 t. Kosher salt
  • 1/4 t. cayenne pepper
  • 1/4 t. cumin
  • 1/4 t. cinnamon
Mix nuts and seeds in a bowl. Beat egg whites with spices and salt and mix well. Spread nut/seed mixture onto parchment lined sheet pan, and bake at 325 for about 30 minutes or until deeply browned, stirring occasionally.

I never thought of adding raw quinoa to granola or other "nut mix" type recipes, but it's great! The Boy-O was gobbling again, and I actually had to put it out of his reach. I had upped the cayenne quotient too!

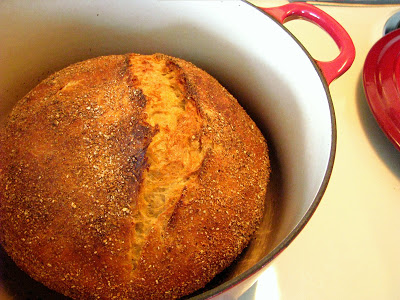
It was afternoon when I finished these and got them packed in jars, usually a perfect opportunity to photograph. For some reason, my camera is doing strange things. I consulted my manual, and read almost the whole thing. I also tried to access some live human help on the Canon website, to no avail. I am going to have to schlep myself over to a camera store and throw myself at the mercy of a clerk nearly half my age, I think. I don't think it's a big problem, but it is one rendering my photos a bit less exciting than usual. Hopefully, that won't affect the ability of the food to entice you!

Chocolate Syrup: Corn Syrup and Plastic-Free...

Friday night before bed, I clicked on the Food Network for a few minutes while I enjoyed the last few bites of my February Daring Baker's Challenge dessert. I actually wanted to veg out in front of a movie, but don't you know 50 channels and a bit of free time (I was trying to rest my hands from knitting...) and not one thing to watch. Fortunately, Alton's episode "The Art of Darkness" was airing. Though I've seen it before, I love cocoa powder, and didn't mind my refresher course. I know Alton uses a tablespoon or so of corn syrup in many boiling sugar recipes, since it prevents crystallization of the sugar... but when he was mixing a saucier of molten black chocolate syrup, a seed of inspiration was planted.

You can see Alton stirring the goods around minute 3:15 on the YouTube video above. I drifted off to sleep thinking about that thick syrup, and about just how long it's been since I've had chocolate syrup. I didn't really even plan on making it, but the next morning, it was complete by 9:30. I can't say that I'm sorry either.

I had forgotten about the pure bliss of chocolate syrup, and probably have overindulged in the 24 hours since its creation, trying it in many ways. My coffee was first off, only since it was still hot and right in front of me. I don't like much in my coffee, just a bit of cream in the first cup, and black for the second, and certainly no sweetener. But chocolate syrup in coffee? Sasa, you're on to something... I could almost make a habit this! I ended my day with a scoop of vanilla ice cream, chocolate syrup and some coarsely chopped peanuts. This morning, I had it mixed into my homemade yogurt, an even better version of the Wallaby Organic chocolate yogurt that I splurge on once in a while.

I thought the corn syrup was probably not a requisite ingredient, especially if a few pesky sugar crystals were all it was going to prevent. I perused the Google results for recipes and found basically Alton's recipe with corn-syrup omission at Fake Plastic Fish. The website is dedicated to the reduction of plastics in everyday life, something I completely agree with. While perusing it for awhile, I'm reminded of how shocking the widespread use of plastic truly is.

With all of this talk about BPA and toxic effects from heating foods in "microwaveable-safe" plastic containers, I genuinely feel no panic. Most of our canned or tinned food, is home canned in glass and I store almost everything in glass. I even use the plastic wrap sparingly. Granted, for some uses like wrapping up a pastry dough, I can't really find a suitable substitute, but more and more I find myself going plastic free as it relates (especially) to food storage. I have a sensitive nose, and just the smell of plastic bags turns me off, not to mention the taste I swear transfers to the foods stored in them.

OK, I'm off my soap box now...

I sterilized the jars by boiling them in water for 10 minutes and soon after was rewarded with "The Art of Darkness" in my very own kitchen: and yet another thing for the list of things I'll never buy again.

Homemade Chocolate Syrup adapted from Alton Brown and Fake Plastic Fish

  • 1 c. granulated sugar
  • 1 c. dark brown sugar
  • 1/4 t. (a pinch) Kosher salt
  • 1 c. cocoa powder (Organic Dutch process)
  • 1 c. water
  • 1 T. vanilla extract

In a large saucepan, combine sugars, salt and cocoa and whisk to combine. Add water, and heat over medium heat until mixture comes to a boil, stirring constantly (to avoid boiling over). Boil several minutes, until the mixture thickens - and remember that it will thicken more as it cools. Remove from heat, stir in vanilla extract, and store in glass jars. Makes 2 8 oz. jars, with just enough left over to take you through a day of experimenting with the ultimate "Art of Darkness".

My syrup cooled into a supreme and inky thickness, and I got the Boy-O seal of approval in a lunchtime chocolate milk. Yes, it has a boatload of sugar, but yes, it is worth it. You can comfort yourself by using all Organic ingredients if you like, and only needing a teaspoon or so for a 8 oz. glass of milk since it's so rich. That was all it took for me, anyway.

Dream(y)fields Pasta and The Enlightened Red Pepper Cream Sauce.

Back when I posted about the miraculous mac recipe that Chef Aimee at Twist of Spaghetti posted from the back of a pasta package, I received a kind email followed by a box of angel hair pasta from the good people of Dreamfields. I still think of it as "Dreamyfields", a pleasant place in my imagination where a rolling field of wheat frolics with animated and slender spaghetti strands...

I actually don't cook much pasta (of the non-homemade variety), I forget about it as I'm lost in the rice and grain
bulk bins at the Outpost. But sometimes, I just get a craving for noodles. I've been waiting for just the perfect thing to test run this gratis box, and resurrected one of my past stand-by favorites - though dramatically lightened - Scallops with Red Bell Pepper Cream Sauce. Not only is my recipe enlightened, the Dreamfields pasta is actually in the healthier spectrum of the packaged pasta world. It's rather short ingredient list contained nothing I couldn't pronounce, and according to the information I received in the box, is safe for many diabetics to consume due to its unique composition.

As it states: "Dreamfields' patent-pending recipe and manufacturing process protects all but 5 grams of the carbohydrates per serving from being digested and therefore lessens post-meal blood glucose rise as compared to regular pasta. Dreamfields contains inulin; a 100% natural prebiotic fiber found in common foods such as Jerusalem artichokes (sunchokes), asparagus, garlic, raisins and chicory root."

I know some people read "cream" in a recipe and think nothing of it, but usually "cream" in a non-dessert format conjures up immediate lightening techniques to me. I've made this recipe in all of it's full-fat glory, and it is wonderful, but for an ordinary Friday night dinner at home it begged for tinkering. My favorite stand in for cream? Evaporated milk. Tinkering it received:


You may wish to make the original and splendid recipe, which is in two parts: The Sauce and The Scallops. Otherwise read on, healthy reader! You may also wish to use evaporated skim milk, rendering this even skinier, but I opt for plain evaporated milk which is certainly richer. Also, depending on the amount of milk added, you could omit the flour for thickening purposes. I'm wagering mine could have done without it, but it was still a good exercise in sauce making.

The red pepper mixture, prior to sauce-dom.

Red Bell Pepper Cream Sauce - adapted from Bon Appetit

  • 3 roasted red peppers (I roast mine and freeze them, you can use jarred, or roast them yourself, click the above link for the Conde Nast method)
  • 1/2 c. pecans, toasted
  • 1/2 c. grated Parmesan-Reggiano
  • 1-2 cloves chopped garlic (optional, since I forgot it tonight!)
  • 2 T. olive oil
  • 1 1/2 T. flour
  • 1 c. evaporated milk

In a food pro, process roasted red peppers, toasted nuts, Parmesan, garlic and salt and pepper to taste. Add a bit of olive oil if it seems too dry, and process until uniformly chopped. Heat a large saucepan over medium heat and add the 2 T. of olive oil. When oil is hot, whisk in flour and continue whisking for about a minute. Slowly add evaporated milk while continuing to whisk - and don't fear if you have noticeable lumps as they will disappear when you add the red pepper mixture. Add the red pepper mixture, and continue to cook until the sauce is thickened - this happens fairly quickly. You can also add a bit more evaporated milk to thin if desired.

I used only about half of this sauce to coat 6 oz (prior to cooking) of angel hair pasta. I froze the rest for a quick dinner in the future. If making the scallops with this, go ahead and make the sauce, then remove from the heat and cover while you cook the scallops.

Seared Scallops (for the Red Pepper Cream Sauce) - adapted from Bon Appetit

  • 2T. (approximately) olive oil - I eyeballed it
  • 2-3 T. vermouth or white wine - again eyeballed
  • 1 t. garlic granules
  • 1 1/2 t. dried oregano
  • 1/2 t. salt
  • 1/2 t. paprika
  • 1/2 t. chili powder
  • 1 t. aleppo pepper
  • ground black pepper
  • 1 lb. sea scallops

Whisk all ingredients except scallops in a medium bowl. Add scallops and stir. I let them marinate less than an hour - but the original recipe said at least 3 hours or overnight is fine. (I have read that scallops should never be marinated in anything longer than 5 minutes due to their high water content, but didn't see much problem having marinated them prior to prepping everything else. Do as you wish!)

Heat a heavy skillet to medium-high, and remove scallops from marinade. Add them to the skillet, being sure not to crowd them (mine took two batches), and cook 3 minutes per side until just opaque in the center. (I poke their bellies to see if they feel done...) Serve with the pasta and a salad and a piece of Lahey bread, and bask in your Friday night supper.

It seems like a while since we had a proper dinner here and I'm not sure why. We have been eating a bit lighter, and not as complicated as of late. I'm really not suggesting that this is a complicated meal, since it isn't except for the dishwashing involved. I am thankful for the oportunity to try the Dreamfields pasta, and think it did have a nice texture and taste. It also came with another good recipe on the box: one for Angel Hair with Shrimp, Tomatoes and Basil. I think I'll cut it out to save for summer...or maybe splurge on some fresh (though not local) basil to try it before then since it currently seems too far off to imagine. I suppose that is just the drain of February, when the days are just slightly seeming longer and the visions of summer herb gardens just start to creep into my thoughts once again. Unfortunately, like all of time, I know it will be here before I know it.

Variations on a Theme: The Ongoing Adventures in Lahey Bread

In my fervor for all things Lahey, I write again on the merits of My Bread. Variety is usually the spice of my life here at Casa Rcakewalk, but lately, I've focused on eating up what has already been made instead of making new - which is a feat in and of itself, since I am never happier than when I have a whole day of cooking or baking under my belt. Since the onset of my blogging life last April, I found myself even more ambitious in creating - obsessed as much with the good food as I was in the process of photographing it and writing about it. This ultimately led to too much waste, since often I'm the only one eating the bulk of my projects...

Everyone makes
resolutions at the end of the year, promising to do things differently going into the new one. My own unpublished (until now) resolution was to focus more on less waste and enjoying each stage of the eating process than to focus on sheer quantity of food produced. So far, I have done quite well, and maybe even lost a couple of pounds. Our grocery budget is slashed, and I am supplementing our shelved and frozen pantries with fresh fruits and veggies, flour (of course), milk and cheese.

Enter Lahey bread method. I really know I could exist fully on bread and cheese, maybe a glass of wine here and there, and coffee, milk and tea. No lie, and I'd be quite happy indefinitely if I could experiment with the components of each. If you would add in some rolled oats for my Boy-O and maybe some eggs, meat and Lucky Charms for my Husband, and we all could exist quite well for pret-ty, pret-ty long time.


Last night, Ash Wednesday, we had another in the Lahey pizza installments: Pizza Funghi. This second pizza was as wonderful as the first, and just as easy to concoct. I didn't wait until I bought or borrowed a mandoline to slice crimini mushrooms to 1/8 inch, and I'm glad. It may have taken a few extra minutes, but it was well worth any effort. This was such a substantial pizza even in the absence of sauce or much cheese. (Lahey does leave these cheese-less, but that just seems wrong given our geographical local, and I again added just a bit of shredded mozzarella and provolone during the last 5 minutes of baking.)

Yesterday, I ordered my Amazon cart at long last with My Bread at the top of the list. I started my second loaf, the Pane Integrale (wheat bread), yesterday and baked it near lunchtime today. I took advantage of the scorching oven to heat some of the leftovers, and they were very close to as good as when they were fresh out the day prior, crispy and earthy tasting.


Since I seem to be working in order, at least with the loaf breads, I'm almost considering making everything in the book in succession. I know each and every recipe is worth my time and (minimal) effort.


I think experimentation is my favorite thing about becoming obsessed with food-related things. The first time I try a new recipe, I usually try to stick close to the as-written, but usually hopelessly alter until it is at least reasonably healthy. That wasn't at all the case with these recipes; I'm following to the gram, and they are turning out perfectly. I am shocked when I remove the lid, and my loaf looks identical to the photographs in the book.

I may have a bit of layman baking experience, but I am convinced that even if you do not, your bread will look and taste like Lahey bread. This, my friends, is the mark of a great teacher, writer and tester. Go ahead and click on the book to the right in my Amazon reading list: you will no doubt be as happy as I am to have this book in your library.

Bread in a Pot, or In Which I am now Fully Obsessed with Lahey's Method.

Yesterday, I finally was able to bake the loaf of bread that dreams are made of. Airy yet substantial, crusty yet soft, Lahey's bread is truly a delicious loaf - and one that even novice bakers can understand and accomplish easily. Really, my baking began 24 hours prior when I mixed up the no-knead dough from the Jim Lahey method outlined in his recent book, My Bread. I had been anticipating this loaf since last year, when I made the library hold. I know there are many Lahey recipes floating around in cyberspace, but for some reason, I wanted his words, in his book, in my brain before I embarked what I knew would become yet another step in bread baking obsession.

But first, I had to make a stop: Bliffert Hardware, adjacent to the Alterra Coffee complex on Humboldt. Sasa and I were right there so she suggested I stop in, and I was so glad I did. It is a nice, manageable hardware that is bright and well organized. I was going to just rig the lid of my LeCreuset oven, since I didn't order a stainless steel handle. When I set foot in the hardware, I had thought I would get a screw the same size as the LeCreuset handle screw only longer, and then screw on a couple of bolts to help assist me in lifting. The kind hardware store man (and his young son) got me set up with a metal cupboard door handle which was even better, and only cost me $3.50. I know that he has saved me frustration and probably burns, so I thank him heartily.

A stainless handle from LeCreuset will run about $10-15, and of course will fit properly, but I like my handle. I poked an awl through a layered piece of aluminum foil and slipped it through before screwing on the handle, just to ensure I'd have a nice tight seal. Even though there is still a bit of play in the actual handle, it is in no danger of falling off.

Handle complete, I moved on to the dough. I only had a little bit of wheat bran left, but oat bran to spare, so I dusted a towel with both before letting the dough accomplish its final rise. On closer inspection of the directions, I should have formed the dough into a more uniform loaf, but I was happy for my first go at it.

Within 2 hours, it was a huge mass of dough - nearly the diameter of the pot it was going into! Next time I will be sure to tuck it into more of a controlled shape. I will not complain, since this was my reward a mere 45 minutes after it took its nap in a 475 degree oven:

Uncannily looking like the examples in the book, I knew the time passing before I could slice into it was going to positively drag. Even though I wasn't hungry in the slightest, good bread has that completely mysterious way of arousing a deep hunger that you didn't know existed. I am absolutely certain that I would never be a participant in any diet that included low-carbs or no-carbs...

I ate, and I'll be honest, 3 good sized slices with some Wisconsin cheddar cheese while standing in front of the stove and examining its custardy interior (in the acidic light that renders close up photography unbefitting). In my opinion, Artisan Bread in Five is still good bread indeed (especially if you want to have it mixed up and waiting in the refrigerator for you to use on a whim...), but this bread has a completely different texture and personality - like an older and wiser cousin. In part, I think, due to the small amount of yeast and the long time spent soaking up the atmosphere before the dough is actually baked.

One problem I always have with homemade bread is how to store it. I know that it should not be put in plastic, and should be stored cut side down on a non-porous surface. I know this, but can't figure out how people either consume enough bread in one day so that storage isn't a problem, or how they enjoy eating that bread when all the air involved inevitably enhances the staling process. While I love a good panzanilla, some fat homemade croutons, or even toast, I can't very well go on eating aged bread every other day - I like a loaf to make it until at least day 4.

Wishing I knew all of the answers, I knew that this loaf was too special to squirrel away into my kitchen cupboard, inappropriately stashed in an open plastic bag - my version of a compromise. I decided to try a new method: I put it back into my lidded cast iron pot, and was beyond excited when I checked it today and it was perfect. The crust was still good (not fresh out of the oven good, but certainly not "I took it out of a plastic bag" good), and the cut edge was not even dried out. I'm excited to check on the progress again tomorrow, but since there is only a half loaf remaining, I'm betting it won't make it through another day. Because I couldn't make toast for breakfast today, I set my sights on lunch.

An accidental lunch at that, since I took a leftover Spiced Roast Chicken Breast, which I finely chopped and added it (Economy Spread style) to a bit of mayonnaise, a generous squeeze of lemon and a handful of walnuts. The best and easiest sandwich filling, and perfectly deserving of such amazing bread. I can't believe I never thought of making it before, most likely because usually there are not many Spiced Roast Chicken leftovers! I cut thick slices of my bread and was happy at the lack of jaw power it takes to enjoy this stuff... it's a really perfect bread, like I said.

You can find Lahey's basic bread recipe here at the NY Times, though the oven temp is higher in the book for the same ingredient list (475 degrees instead of 450 degrees). With my second Lahey success, you certainly know that there are going to be more My Bread experiments showing up here very soon. I'm sure I don't have to relate again how amazed I still am that just 4 or 5 casually thrown together ingredients can result in something so worthwhile and delicious. I'm a sucker for trying crazy complicated things, but on a day-to-day basis, I really enjoy the ability to produce quality homemade things that are simple, tasty and reasonably priced. Lahey fills the bill on all counts, and forever will hold a place in my heart.