Food Obsessions

Vegan Monday: (Vegan) Graham Crackers


I have to admit that I really don't enjoy making cookies that require me to roll them out. Frosted sugar cookies are some of my favorites, but even during my Christmas baking, I seldom make them just due to this small detail. For someone a bit lacking in counter space, roll-out cookies are kind of tedious. They require me to clear a space and devote my full attention to them, and then there is also the "mess factor" for the type of baker like myself that has a hard time keeping the flour from flying.

Graham crackers are my exception. They really don't make much of a mess since the dough is rather sticky, and they include the added guise of being somewhat healthful. I have a couple of favorite recipes, one from Nancy Silverton, that includes a high percentage of butter (I altered it to include wheat flour) and a new favorite from Kim Boyce which is slightly more virtuous in the fats and flours departments. My favorites so far are utterly dependent on butter and honey, two things that I just assumed were what endeared a homemade graham to me - even enough so that I vowed never to buy them again.

While I stick to my vow, I happily add this vegan version to my glass gasket jar: a winning recipe from Isa Chandra Moskowitz and Terry Hope Romero's book Vegan Cookies Invade Your Cookie Jar. They stand with the incomperable butter laden versions as proud substitutes, substitutes that are worthy in every way should you be vegan or not.


Not only is this vegan version butter free, but it includes only whole wheat flour, a staple in my kitchen. I love the slight bitterness of whole wheat, and prefer it most of the time to almost any other flour, save perhaps oat flour. The plain sugar adds to the crispness, as does the oil. I actually was nearly out of canola, so I used about half the amount of olive oil, a savory note that I found extra addicting! Not to mention that the dough can be rolled out right away instead of resting since it is soft and pliable.

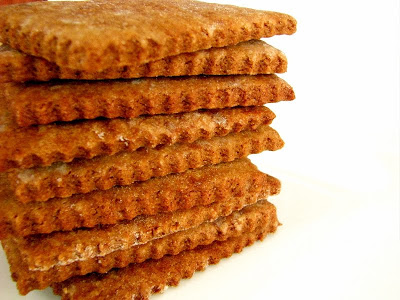
Homemade graham crackers last a freakishly long time. I make sure I bake them until they are very crisp - sometimes I even throw them back in the oven again after they have started to cool and don't appear that they are going to crisp up. The girls do mention that you can leave them a bit on the softer side, if you want to make them into "ice cream" sandwiches. Or, simply spread them with this Chocolate Vegan Frosting... seriously, one of the tastiest frostings I've made, vegan or not (I used Spectrum Organic Shortning in place of Earth Balance).

Vegan Graham Crackers (Isa Chandra Moskowiz & Terry Hope Romero)
  • 1 1/2 c. whole wheat flour
  • 1/3 c. sugar
  • 1/2 t. baking soda
  • 1/2 t. cinnamon
  • scant 1/2 t. salt
  • 1/4 c. oil (I used 2 T. canola and 2 T. olive oil)
  • 2 T. molasses
  • 1 t. pure vanilla extract
  • 1/4 c. non-dairy milk (I used soy milk)
Preheat oven to 350, and line a sheet pan with parchment paper.

In a large bowl, mix together flour, sugar, soda, cinnamon and salt. In a small bowl or measuring cup, whisk the oil, molasses and vanilla. Pour the oil mixture over the flour mixture and mix with a fork until everything is combined well and it appears crumbly.

Drizzle in the non-dairy milk, and mix together gently with your hands until dough sticks together, and it forms a pliable ball of dough.

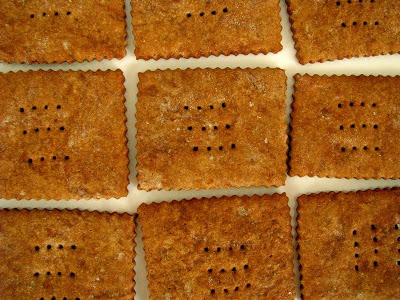
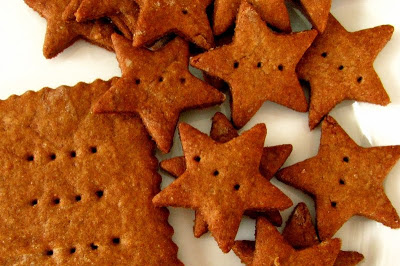
Line a work surface with parchment paper, and roll out the dough between two sheets of paper. You can leave them a little thicker, or go for the recommended 1/8 inch thickness. Cut off the edges (I used a fluted pastry roller), and cut into squares or rectangles. Save the scraps and re-roll them. Transfer completed shapes to sheet pan.

Bake for 12-14 minutes, longer if they don't seem up to your crispness desires. I baked some of mine for almost 20 minutes! The more crisp they are, the better they store long term - if you think that you wouldn't be eating them all straight away, that is. Cool completely, and store in a lidded glass jar.


I also really like that I have zero waste when making graham crackers. The texture seems to change a little (I think, for the better!), but you can re-roll your "scraps". I usually use tiny cutters on the last little bits of rolled dough. It's almost a challenge to myself to fit the stars with nearly no space in between. Their diminutive shape also ensures supreme crispness, so addicting that they are usually eaten first.


There are many, many recipes in this book that I have to try. Even more in their sister book, Vegan Cupcakes Take Over the World. If they continue to prove their tastiness, I'll have to pick up copies of both books for myself, since these were lent to me by Ginny. The Post Punk Kitchen website also has many great recipes. I actually found the best frosting ever recipe here before I read their books.

This Vegan Monday installment marks the 12 consecutive Monday of posting. Three months of more mindful eating have seriously flown by! I didn't realize at the time, what a great side challenge this was to myself for the summer months. I've found myself consciously making more vegetarian and vegan foods, and since I am obviously more excited than the rest of my family about it, it is a perfect fit due to it's ease of preparation. I've never been an overly meat-dependent eater, but this summer of vastly meat-free lunches and dinners has really reminded me about the ways I actually prefer to eat. With all the food politic storms around us, completely affordable, balanced and delicious meals can be a mainstay, and not one worry of "where that came from" needs to cross my mind.

I've talked with Sasa before about becoming a "restaurant vegetarian", which I am most of the time. We are fortunate to live in the Milwaukee area, where more and more restaurants are sourcing locally, and cooking with the mindset of sustainability. Many area establishments actually know the farms their meats come from, and the animal is not reduced to a mindless rite of the progressive, affluent world. This is good news - and news I should remember when I actually do eat out. I tend to squirrel my resources into eating at home - completely enjoyable, but I forget the pleasures of dining out. I'll have to remedy that a little bit!

Meanwhile, I think Vegan Mondays will stick around for awhile longer. Next week, I will be away from a computer on Monday, so if you check back in a week and notice nothing, don't despair! (Not that I actually think that you would...) This is one obsession that is going to continue for a long while.

Oh... Those Obsessions!


It's true, I get obsessed. And easily at that. Last night, I went to a cooking class at the Bay View Community Center taught by Annie Wegner-LeFort on Summer Vegetarian Cooking. I went because I like taking classes, because I like cooking seasonal vegetarian, and because I really wanted to meet Annie. I didn't realize that I kind of already knew and admired her from afar. A huge light bulb lit over my head when I found out that she is the pastry chef at Sheridan's, where I had the most memorable chai shortbread cookie several months ago...

I had read the press release when they opened the restaurant and boutique hotel, and dismissed it to my mental warehouse. Sometimes I feel as if I move in obscure circles around people - ingesting information that is learned and then stored, until I realize I've gleaned so many little bits that they add up to a mostly complete picture, sans actual meeting. That's good, and yet a bit sad that I only know people from a voyeuristic Internet reality...

Annie's class was really great. Some people, are just natural teachers, and I like watching them, as I feel that I am not. I like to think I'm a natural consultant, which is a far less noble profession than teaching. If I've read it, likely it is rolodexed in my mind, and ready to pop out of my mouth at opportune (and inopportune) moments... but good teachers need the tact and gentleness to repeat themselves, the ability to be gracious and generous with themselves to others, and the good ones accomplish this with such ease it fills me with envy.

While I could tell I felt kindred-ly at home with the recipes she provided us in print, this one that really impressed me most was one I actually already had in my possession, and yet never have tried: Cilantro-Raisin Chutney from Sally Fallon's Nourishing Traditions. Before the class started, I read over our handout and politely dismissed this little gem of a recipe, and so wrongfully so. When I had my first taste, obsession quickly set in. Although it was a vegetarian cooking class, she mentioned that it was great on pork, serendipitous since that is what I had already planned for supper tonight. Needless to say, I got some cilantro today (I've left mine to seed, so I can replant), and made up a batch. I will be reveling it it until the weekend, methinks.


I was excited to share my new obsession with my Husband, who is also a cilantro fan. He was briefly excited, until he felt the sting of "licorice-ness" on his tongue. He even went as far as to tell me he thought it was really good, until he discovered that licorice aftertaste. The anise seed is what he tasted, and I love this so much, that I'll leave it out on the next go around to see if it appeals to him more; he is an avid hater of licorice.

To glean the whey needed (which could easily be omitted), I strained some of my yogurt, which came in handy for the taste-testing. I ended up eating my afternoon snack of yogurt mixed with this versatile condiment and a few grains of raw sugar, perfection in my book. I could eat this chutney as a soup, I'm pretty sure - but I now know that it will end up on sandwiches, bread (I'm thinking flat bread of some sort here), lentil burgers (another great recipe Annie provided) as well as just about anything else I can think of. It's really that good.

I found that I didn't need to add any additional water, but you can add it to your preference.

Cilantro-Raisin Chutney (inspired by Annie Wegner-LeFort, by way of Sally Fallon)
  • 1 1/2 c. raisins, soaked in warm water for 1 hour
  • 2 cloves garlic, peeled and chopped
  • 1 small bunch of cilantro, stems removed
  • 10 black peppercorns
  • 1/4 t. red pepper flakes
  • 1 t. powdered coriander
  • 1 t. cumin powder
  • 1 1/2 t. freshly grated ginger
  • 1 t. sea salt
  • 2 T. whey
  • 1/2 c. water
Pulse garlic and cilantro in a food pro until coarsely chopped. Drain raisins, and add to processor along with remaining ingredients, except water. (You can also toast the spices gently in a cast iron skillet, I did this even though I had to use some powdered spices.) Add water judiciously until your desired consistency is reached.

Pack into a clean glass jar, and let sit at room temperature for 2 days before transferring to cold storage.

(Annie also mentioned that this recipe freezes well, not that I'm going to need to find out. ) I have plans for this stuff for the rest of the week, and just thinking about it makes me excited all over again.

Almost as excited as this modified slaw that I've been eating since yesterday:


Cabbage, green pepper, Hungarian wax peppers, jalapeno peppers and a bit of celery seed tossed with salt and a little sugar and left to drain in a colander at room temp for a few hours until some of the moisture has drained out. Tonight, I mixed what wasn't already eaten with rice wine vinegar and olive oil. Still crunchy, still addictive - and really ready for just about anything. I had some on a ham and cheese sandwich for lunch today and why I'd ever need another condiment, I don't know. My Husband did like this one on the side of his pork chop, and what he didn't eat, I happily lapped up off his plate for him. (I feel like planning ahead and soaking some wheat berries to toss with the rest, but I have too much other stuff to eat up! Ahhh, summer.)

I feel somewhat geeky for getting so excited about the condiment side of things. I mean, these are no projects requiring time and attention for days, these are amazements that can be concocted with abandon in mere moments! Their flavors are varied enough to be enjoyed with a host of different cuisine options for days before their welcome wears on, and they really are Obsessions.

I couldn't be happier that I attended this class, and that this recipe is mine to be made for years on into the future. Whenever I taste it, I will happily be transported back to that little Bay View Community Center classroom and Annie's description of it, and that makes it even better. Be sure to go and pay Annie a visit at her blog, The LeFort Urban Homestead, you will be then be full of inspiration and new obsessions of your own. She can have that effect on people.

Excitement: Somehow it always includes Beets.

So in my recent obsessions with all things vegan, I got the book The Conscious Cook by Tal Ronnen from the library last week. It, of course, is now in my Amazon cart. In addition to lovely recipes, it has great photography and great layout, and is full of inspiring fresh recipes. In reading it cover to cover, I discovered that I was so curious about his "cheese" made from cashews, that I could think of nothing else. In his book, Tal makes Cashew Creams (you can find the recipe on his website) and also cheeses made from nuts that are kind of related to the Cashew Creams. His recipe for Beet Ravioli with Balsamic Pickled Figs and Green Garlic Oil was the one to really pique my interest, and a couple of days ago I decided to embark into the world of vegan "cheese".

His approach is to soak cashews overnight, then blend them together with probiotic powder and let them culture at warm room temperature for 12-14 hours. Now, dear readers, you know that I have a serious addiction to obsessions, when I was so curious about this, that I had to drop $26 at Outpost for the New Chapter Probiotic All-Flora capsules that this culturing project required. I wavered in how much I wanted to try this just a little bit, before giving in and just buying it. After all, I feel like I haven't been buying so many groceries lately, and giving $26 extra of my grocery fund to Outpost is not really a bad cause. I wasn't disappointed in my decision.


I am absolutely glad I parted with my USD's, since the result of this cashew "ricotta" as I'm calling it, was wonderful. I used my immersion blender to puree the cashews and water, and was not able to achieve absolute smoothness, but the flavor of plain, soaked and blended cashews was nice enough that the bit of grainy texture didn't bother me at all. In fact, I thought it tasted exactly like the texture of ricotta, and could see the finished product taking on all of the "cheese-ness" of cheese, sans cheese of course.

The state of the plain blended cashews prior to culturing wasn't all that different either, so if you feel that you can't part with $26, I'd say to go ahead and make it (skipping the long culturing time) anyway! Meanwhile, I used my savvy kitchen math to realize that my 6 capsules that went to inoculation purposes cost me $2.60, and that is affordable for the sake of experimentation! If nothing else, I can pop 80 cents worth of probiotics down my gullet every day for the next month and be proud of my healthfulness - but I'm sure I'll use more of my capsules to try some others of Tal's cheeses. I also didn't measure any of the added spices, I added to taste. No wonder why I love vegan cooking so much!

Tal Ronnen's Cashew Ricotta Cheese
  • 2 cups raw cashews
  • 1 t. probiotic powder (from 6 capsules of All-Flora, or another comparable quality powder) dissolved in 1 cup of warm water.
  • 2 T. nutritional yeast flakes
  • 1 1/2 t. onion powder (I used granulated onion)
  • 1 1/2 T. minced chives
  • 2 T. minced parsley
  • 1 t. sea salt
  • black pepper
Put cashews in a bowl, add cold water to cover them, and refrigerate 12-14 hours. Drain and rinse them under warm water.

Place nuts in a blender with the probiotic powder and water mixture (I used an immersion blender), and blend until very smooth. Transfer to a clean, glass bowl, and let sit at warm room temperature (I leave the oven light on in the closed oven) for 14-16 hours to culture.

Transfer to a medium bowl, and stir in remaining ingredients. Cheese will keep for a week under refrigeration.


This morning, after a night of chilling, I took to doctoring up that cultured cashew cheese into a proper "ricotta" filling. Onion granules, nutritional yeast flakes, some fresh chives and parsley from my yard, and a bit of salt and pepper, and I was completely fooled at how delicious the taste of this was, and that it did indeed taste like ricotta cheese. (Before mixing up the savory version, I saved out a cup portion to play around later with some sweet applications... I have it in my mind that I can make a cupcake frosting out of it!)

I departed from Tal's original recipe here, since I did not make the green garlic oil, and forgot to buy figs during the Probiotic Powder shopping trip. But I was glad, since my result was so good, I was nearly jumping up and down. So many times if you spend a lot of time and effort (and those USD's) on something, the result is not up to your expectation. What a happy surprise to know that I will make this again and again!


I still had my borrowed mandoline (that I have to return), so I sliced a peeled beet very thinly. I ate a slice of raw beet, and then got out my steamer. This is no Raw Vegan recipe, now... but I'm so glad I steamed them, since they got tender enough to resemble pasta, and were easy enough to cut with a fork and gobble down. Boy-O and I spent the morning at the library, and because he was so consumed with a book on Stingrays, I got to peruse my cookbook aisle. I fortuitously plucked Eat, Drink & Be Vegan by Dreena Burton from the shelves, and found a dressing that I decided would be good for the top of my creation, a vinaigrette made from balsamic and maple syrup. Dreena's book has many great recipes, and I'm looking forward to looking over it more completely later today. I also noted that she is a blogger at eat, drink & be vegan, so I'll be adding her to my feedly, no doubt!


I have no idea why I never thought of combining balsamic vinegar and maple syrup, but I'm more than excited that I did. I used equal proportions of each, and it was almost candy-like. I made a very small amount, but it is so easy to double or triple that you'll hardly need to use any of your kitchen math!

Balsamic Maple Syrup Vinaigrette (adapted from Drena Burton)
  • 2 T. balsamic vinegar
  • 2 T. maple syrup, preferably dark
  • splash of extra virgin olive oil
  • salt
  • pepper
That's it. Blend it up.

Assemble the little stacks or "raviolis" however you wish, obsessively try to get a good photo, and then eat them up! Next time, I will make this more of a meal and have a pretty green salad underneath, but for my lunch for one, a whole steamed beet, and maybe a healthy 1/4 cup of this ricotta cheese was really satisfying.


I know I shouldn't be surprised at how contented I am eating simple whole foods that have little or no cooking. I guess, it doesn't surprise me at all that I'm so excited about my new vegan obsessions, since I do know that often it only takes a little push in any given food direction to send me off and reading about something different to me.

innBrooklyn is hosting another installment of Veg of the Month Club, due on June 10th, and the veg for this go around is beets. I have more beets in the fridge, and I didn't consider using this recipe for the Club submission, but I just may, since I loved it so much! Nothing says "excitement" to me, like beets, so I'm looking forward to seeing some good inspirations there.

Stecca'n It To You or Why I Continue to Love Jim Lahey


This above photograph is exactly why I could never commit to a raw vegan diet. Near perfect in both simplicity and taste, a fresh from the oven piece of bread with no more than a couple of slices of cheese could be my staple from now until the end of time. It's not boring, I promise you that - especially with Jim Lahey's recipe for amazingly quick and easy Stecca.

"Stecca" is Italian for "stick", and refers the shape of this baguette-style bread. It is just plain perfection how Lahey manages with each recipe in My Bread to give a distinct and unique characteristic to such banal ingredients as flour, water, yeast. A mere 1/2 teaspoon of yeast interacting with the home kitchen environment for 12-18 hours results in more flavor than any bakery purchased baguette I've ever tasted. This bread in particular confirms all the more my need to pilgrimage to NYC and wait on line at Sullivan Street Bakery just to see how in the world a bread could possibly taste any better.

Since I have been reading up lately on vegan and raw vegan diets, I almost feel pangs of guilt posting this baked good, in all of it's non-raw glory. I was even briefly considering (before slicing into this bread, that is) committing to a vegan/raw vegan diet exclusively for a set period of time, but I just don't know now. My head is swimming with information, and all I can think is that my Mantra (Everything in Moderation) needs a good chanting over and over and over again.

I really am fascinated with the various diets that come and go, and certainly there are many merits to vegan and raw vegan diets in particular, but I'm also reminded of one example the complete opposite of raw vegan: The Atkin's Diet. That one ended rather poorly for Dr. Atkins, but I guess the jury is still out on the exact state of his health. While I'd never subject myself willingly to a mostly meat and no carb diet, I may find myself meeting somewhere in the middle with my current eating habits. With so much conflicting information on human diet, I may very soon need to find myself sitting cross-legged in a corner and repeating what I do know to be the truth about most things in life, that really most everything is good for you in moderation.

In general, I do admit I may be a little on the "carb heavy" side of things, but with breads like this, I really just can't help it. It would be quite helpful if I had a neighborhood full of carbohydrate hungry Velociraptors to inhale all this demonic wheat with which I feel such compulsion to bake. But, something as simple as a loaf of bread so instantly elevates any dish it is served with (or sandwich that it turns into), that it almost seems puritanical. In my new raw vegan mind, I am thinking about all of the delicious soaked seed spreads I've been seeing, and thinking that I could make at least a tasty vegan sandwich if not a full raw vegan sandwich with this, and I am sure that very soon, I will be doing just that.

Ordinarily, I am downright pious in my abilities to wait until a bread is fully cool to slice into, but I only let this one cool down a little bit. I figured, I had 3 more to fall back on if the first one got mysteriously "ruined"! I think this bread would be optimum dinner party fodder, since it requires so little in the way of maintenance beforehand. I'd recommend planning 18 hours for the initial rise (less than 5 minutes of prep time), then three hours before eating, commence with the second rise (another less than 5 minute job). By the time you are ready for supper, you will be rewarded with semi-warm and amazingly fresh bread. I have always used the weight measurements in this book, and found them pretty consistent with the volume measurements.

Stecca (by the genius, Jim Lahey)
  • 400 grams (3 cups) bread flour
  • 8 grams (1 1/4 t.) salt
  • 1 gram (1/4 t.) active or instant yeast
  • 300 grams (1 1/2 cups) cool (55-65 degree) water
  • olive oil for pan and drizzling
  • flour for dusting
In a medium bowl, stir together flour, salt and yeast. Then, add water and mix about 30 seconds until you have a wet sticky dough. Cover and let sit at room temperature for 12-18 hours until the dough has at least doubled in size and has little bubbles on it.

After this first rise is complete, generously (GENEROUSLY) dust work surface with flour. Scrape the dough out of the bowl in one piece, and fold it onto itself gently two or three times into a somewhat flattened ball. Brush the surface with olive oil, and sprinkle with 1/4 t. coarse salt.

Generously dust a tea towel (non-lint towel) with flour, and place the dough on it, seam side down. If it is still a bit sticky, dust it with a little flour, cornmeal or wheat bran. (I have a linen kitchen towel that I only use for bread that I never wash - it has a nice build up of flour already in it, which prevents the dough from sticking. If you do this, make sure to hang the towel up to dry thoroughly between uses so it doesn't mold.) Let the dough rise for 1-2 hours (I found it was closer to the 2 hour mark in my cool room-temp) in a draft-free place. About a half an hour before the end of this second rise, preheat the oven to 500 degrees, and oil a half sheet (13x18 inch) sheet pan with olive oil.

Cut the dough into 4 equal quarters, and gently stretch each piece evenly into a stick shape the length of the pan. Place on pan, leaving 1 inch between sticks. Brush with olive oil, and sprinkle each stick with a pinch of coarse salt.

Bake for 15-25 minutes (mine took only 15!) until crust is golden brown. Cool on the pan for 5 minutes, then move them to a rack to cool completely.


If you choose, you can line the length of a Stecca with halves of cherry tomatoes, cloves or garlic or whole olives, (Lahey said not to use the additional sprinkle of salt on the olive bread due to the salt in the olives), but I would recommend really pushing them down into the dough well since mine hovered closer to the top. Lahey also notes that if the breads get a bit soggy from sitting, you can reheat them in a hot oven to revive them - another great tip if you are planning them for a dinner!


If you eat bread, if you think you may ever decide that you want to try making bread, you should add Lahey's book to your "must have in the kitchen library" list. It seems like I'm all about having projects lately, and I know that I could not be disappointed with any recipe in this book. I have decided that I will be keeping track of my progress of working through the book under the Lahey Project tab at the top of the page. I can't promise any time frames, but I can tell you that given enough time and dinner companions, I will make everything Mr. Lahey has to offer me. I know that it will be a fine time for all eaters involved as well.

Bread in a Pot, or In Which I am now Fully Obsessed with Lahey's Method.

Yesterday, I finally was able to bake the loaf of bread that dreams are made of. Airy yet substantial, crusty yet soft, Lahey's bread is truly a delicious loaf - and one that even novice bakers can understand and accomplish easily. Really, my baking began 24 hours prior when I mixed up the no-knead dough from the Jim Lahey method outlined in his recent book, My Bread. I had been anticipating this loaf since last year, when I made the library hold. I know there are many Lahey recipes floating around in cyberspace, but for some reason, I wanted his words, in his book, in my brain before I embarked what I knew would become yet another step in bread baking obsession.

But first, I had to make a stop: Bliffert Hardware, adjacent to the Alterra Coffee complex on Humboldt. Sasa and I were right there so she suggested I stop in, and I was so glad I did. It is a nice, manageable hardware that is bright and well organized. I was going to just rig the lid of my LeCreuset oven, since I didn't order a stainless steel handle. When I set foot in the hardware, I had thought I would get a screw the same size as the LeCreuset handle screw only longer, and then screw on a couple of bolts to help assist me in lifting. The kind hardware store man (and his young son) got me set up with a metal cupboard door handle which was even better, and only cost me $3.50. I know that he has saved me frustration and probably burns, so I thank him heartily.

A stainless handle from LeCreuset will run about $10-15, and of course will fit properly, but I like my handle. I poked an awl through a layered piece of aluminum foil and slipped it through before screwing on the handle, just to ensure I'd have a nice tight seal. Even though there is still a bit of play in the actual handle, it is in no danger of falling off.

Handle complete, I moved on to the dough. I only had a little bit of wheat bran left, but oat bran to spare, so I dusted a towel with both before letting the dough accomplish its final rise. On closer inspection of the directions, I should have formed the dough into a more uniform loaf, but I was happy for my first go at it.

Within 2 hours, it was a huge mass of dough - nearly the diameter of the pot it was going into! Next time I will be sure to tuck it into more of a controlled shape. I will not complain, since this was my reward a mere 45 minutes after it took its nap in a 475 degree oven:

Uncannily looking like the examples in the book, I knew the time passing before I could slice into it was going to positively drag. Even though I wasn't hungry in the slightest, good bread has that completely mysterious way of arousing a deep hunger that you didn't know existed. I am absolutely certain that I would never be a participant in any diet that included low-carbs or no-carbs...

I ate, and I'll be honest, 3 good sized slices with some Wisconsin cheddar cheese while standing in front of the stove and examining its custardy interior (in the acidic light that renders close up photography unbefitting). In my opinion, Artisan Bread in Five is still good bread indeed (especially if you want to have it mixed up and waiting in the refrigerator for you to use on a whim...), but this bread has a completely different texture and personality - like an older and wiser cousin. In part, I think, due to the small amount of yeast and the long time spent soaking up the atmosphere before the dough is actually baked.

One problem I always have with homemade bread is how to store it. I know that it should not be put in plastic, and should be stored cut side down on a non-porous surface. I know this, but can't figure out how people either consume enough bread in one day so that storage isn't a problem, or how they enjoy eating that bread when all the air involved inevitably enhances the staling process. While I love a good panzanilla, some fat homemade croutons, or even toast, I can't very well go on eating aged bread every other day - I like a loaf to make it until at least day 4.

Wishing I knew all of the answers, I knew that this loaf was too special to squirrel away into my kitchen cupboard, inappropriately stashed in an open plastic bag - my version of a compromise. I decided to try a new method: I put it back into my lidded cast iron pot, and was beyond excited when I checked it today and it was perfect. The crust was still good (not fresh out of the oven good, but certainly not "I took it out of a plastic bag" good), and the cut edge was not even dried out. I'm excited to check on the progress again tomorrow, but since there is only a half loaf remaining, I'm betting it won't make it through another day. Because I couldn't make toast for breakfast today, I set my sights on lunch.

An accidental lunch at that, since I took a leftover Spiced Roast Chicken Breast, which I finely chopped and added it (Economy Spread style) to a bit of mayonnaise, a generous squeeze of lemon and a handful of walnuts. The best and easiest sandwich filling, and perfectly deserving of such amazing bread. I can't believe I never thought of making it before, most likely because usually there are not many Spiced Roast Chicken leftovers! I cut thick slices of my bread and was happy at the lack of jaw power it takes to enjoy this stuff... it's a really perfect bread, like I said.

You can find Lahey's basic bread recipe here at the NY Times, though the oven temp is higher in the book for the same ingredient list (475 degrees instead of 450 degrees). With my second Lahey success, you certainly know that there are going to be more My Bread experiments showing up here very soon. I'm sure I don't have to relate again how amazed I still am that just 4 or 5 casually thrown together ingredients can result in something so worthwhile and delicious. I'm a sucker for trying crazy complicated things, but on a day-to-day basis, I really enjoy the ability to produce quality homemade things that are simple, tasty and reasonably priced. Lahey fills the bill on all counts, and forever will hold a place in my heart.