My food journey to Brazil begins with Pao de Queijo.


This amazing little cheese puff is the very beginning of my introduction into the world of Brazilian food. My friend, Solange, is from Brazil. We met at our sons' library story time, and now get together from time to time to let the kids play and have time for adult chatting. She lives fairly close, and the first time I went to her house, she made me pao de queijo - these (gluten free) cheesy puffs of bread that are best eaten straight out of the oven. She explained to me that these are eaten in the afternoon in Brazil, with coffee or tea... and that they are unbelievably addicting.

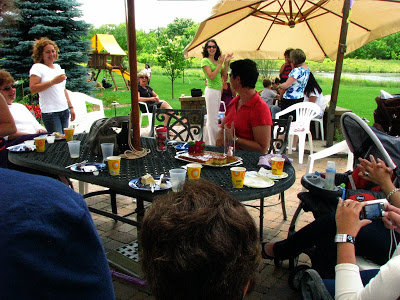
I had such a happy day today, that it's hard to know where to begin. Solange called me on Monday, and asked if I'd like to go with her to a get-together with other Brazilian women who have moved to our area. It was a "breakfast" with Brazilian foods, and a drop off point for donations for children in Brazil, organized by our hostess Angela. Angela heads an effort to provide children in Sao Paolo with clothes and other necessities through Hearts in Action. She worked with children when she lived in Brazil, and still has a passion for helping them through a bit of the wealth and extra that people like me have. I hate to think of my attic full of baby clothes that I can't quite bring myself to donate - but it was easy to find a single bagful to hopefully help someone I will never meet.

After a day of rain yesterday, it was a beautiful day to be outside today. Our drive out a bit west of the city left time to talk about many things, and I grew even more excited to try many new to me Brazilian foods and sweets. Brazilians, from my limited experience, are very warm people. I didn't know a single person there other than Solange, and don't speak any Portuguese, yet I was kiss-hello-ed and welcomed. It was just after ten, and our breakfast began:


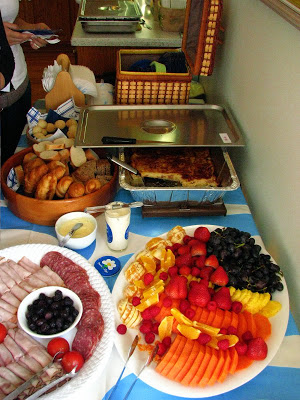
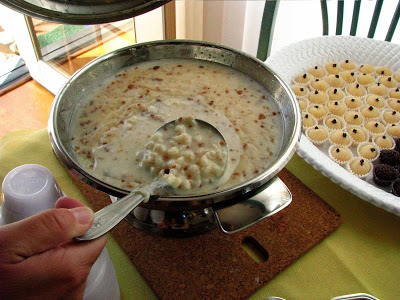
Trays of fruits, and egg strata-type dish and of course, a big bowl of pao de queijo (you can see it nearly empty near the top) were on the savory table. But out numbering the savory options were the sweets:


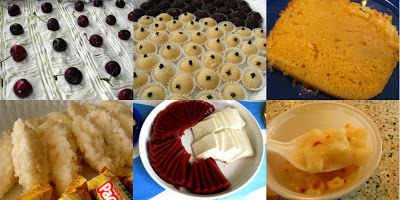
I don't profess by any means to be overly knowledgeable of Latin America's foodstuffs, but having that tinge of Latin blood myself, I think that sugar plays a very important role. From the first row and top left above, there was an exceptional and cloud like Tres Leche cake, the petite yet rotund Brigadeiro and Beijinho - sweetened condensed milk based balls in chocolate and coconut respectively, and Bolo de Fuba - a tube cake that reminded me texturally of a pound cake, but made of corn.

Row two from the left: on a tray of wrapped candy sweets, there was an achingly sweet coconut hard candy called Cocada, an pleasantly gummy guava candy called Goiabada that was served with queso fresco to curb the sweetness (I really loved this), and lastly Canjica, a hominy "rice" pudding with peanuts. Yes, I tried each of these things... and didn't have a stitch of room left to try the last cake, a coconut cake with a caramel frosting, made for Angela's birthday.


Our hostess, Angela, serenaded in Portuguese for her birthday.


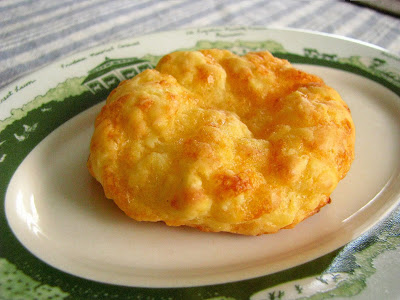
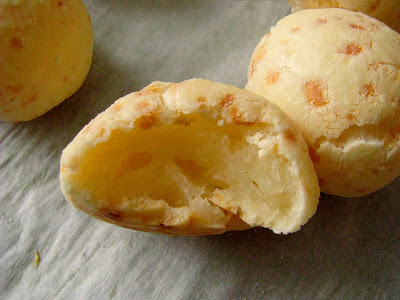
Angela made the pao de queijo from scratch, and used a mixture of cheeses for the "queijo" part, Mexican cotija cheese and Parmesan cheese. Even though they were cold when we ate them, they were still delicious - and highly addictive. The centers of the warm puffs are less bread-like and more cheesy and chewy, and I couldn't really tell you which way I like them the best to be honest. They are just a little bit of a science project to make, and require monk-like diligence not to polish off a whole batch in one sitting.


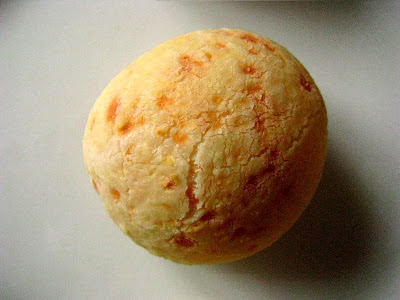
Angela's pao de queijo interior.

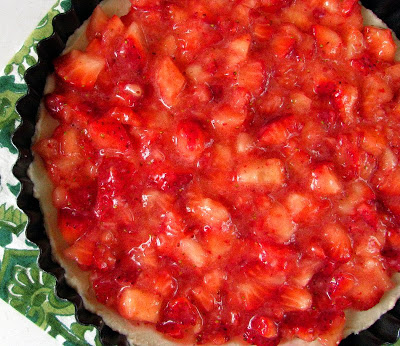
Many months ago, when I first had pao de queijo at Solange's house, she had just returned from a trip down to Brazil and had brought me a bag of pao de queijo mix. She made one of the bags that day, and it was really good for a mix. A few days after, I picked up some tapioca flour, and tried to make a recipe I had seen on Simply Delicioso with Ingrid Hoffman, that I knew had to be related: pan de yuca. Ingrid is from Columbia, and the puffs were bun sized. I made mine smaller like the pao de queijo that Solange had made, but they still turned out like this:


It could have resulted in a flat pancake of a puff instead of an elegant puff due to the inclusion of a Wisconsin Muenster cheese instead of a dryer, harder cheese. They were tasty, and I ate a whole lot of them dipped into some beet soup, but somehow just did not live up to the pao de queijo mix I had tried.


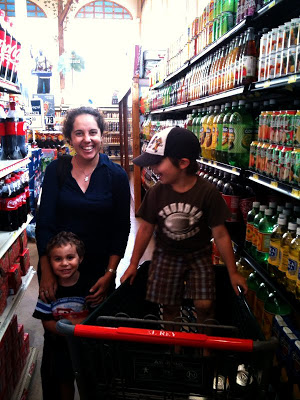
Solange and the boys.

Today after the get-together, we drove back to the city and detoured to El Rey, a Milwaukee based hispanic grocery that also packages their own line of products. Solange told me that they have recently started asking Brazilians what kinds of foods they would like them to carry, and among them was polvilho, a flour made from manioc or cassava - the source of tapioca. When I tried, in vain, to make my first batch of pao de queijo, I used Bob's Red Mill tapioca flour. I'm not sure if the product is exactly the same. It seems that it should be, and it felt about the same, but since I wrongfully substituted the Wisconsin Muenster, I had no base line to compare against. All I know is that my second attempt at pao de queijo, using a recipe from Solange's sister, was a winner, and I used proper Brazilian polvilho.


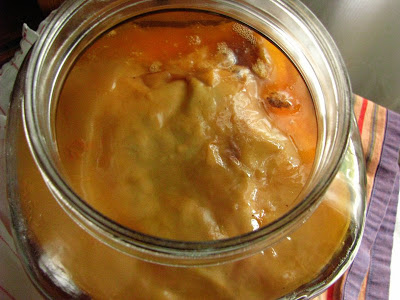
If you have never made, or eaten, pao de queijo, do not be discouraged by this dough as it is coming together, it is a strange, strange thing. (If you ever made a mess with cornstarch and water as a child, you'll know exactly what I'm talking about.) Persevere, and you will be rewarded with addicting, and delicious, puffs! The original recipe is given in weights, and using a "glass size", I used metric weight, and an approximate oz. size given me by Solange for the liquid. It is a "by feel" type recipe, so have fun and give it a go. Just be prepared for a little bit of flying polvilho. Your hands are the best tool for mixing this, just take care when adding the boiling liquid. It does cool off fairly quickly.


I got 70 small balls from the whole batch, but you can freeze them in a single layer and transfer them to a zip top bag. You can take them from the freezer and bake them right away without defrosting, so only make as many as you want to eat. They really are that addicting. Also, they taste best when they are hot from the oven.

Pao de Queijo (adapted from a recipe from Solange's sister)
  • 500 g. polvilho (manioc or tapioca flour)
  • 250 g. cotija cheese
  • 1 glass of cold water (about 7 oz)
  • half glass of boiling oil (I used canola, about 3 1/2 oz.)
  • half glass of boiling milk (about 3 1/2 oz.)
  • 1 egg, beaten
  • pinch salt
Preheat oven to 350 degrees.

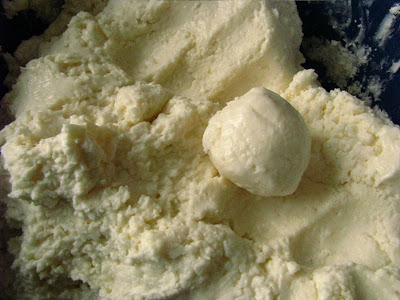
Mix polvilho and water and mix well with your hands. This will seem impossible, but use your fingers to break up the polvilho coated water into pea sized pieces. Try to get everything as uniform as possible.

Add egg and salt, and continue to mix well. The mixture will start to come together, but still not look like a dough.

In a small pot, bring the milk and oil to a boil and take off the heat. Add to the flour mixture, and stir with a spoon then carefully mix by hand until the mixture "melts" into a dough. It will be soft.

Add the cheese, and mix thoroughly. It will feel kind of like a play dough. Form into 2 inch balls, and bake on a parchment or foil lined sheet for about 35-40 minutes until the dough is puffed and lightly browned.


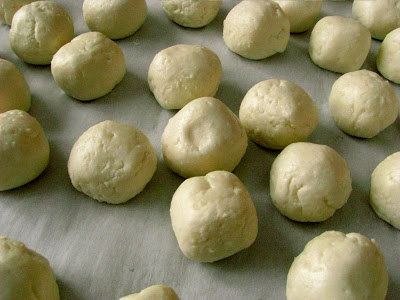
These went into the freezer...


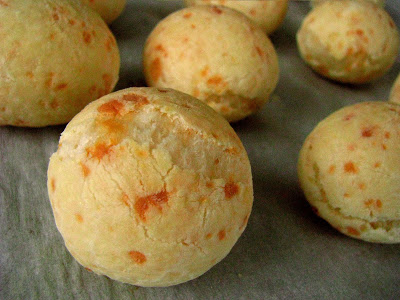
...and these went into my mouth!

I was so happy that these turned out like the ones I have had, as of today, twice. I have about 60 frozen and waiting for whenever company arrives, or afternoon hunger strikes. My Husband loved them too, so it is a good thing I can have some homemade "convenience snack food" in the freezer for him!

I really do not know what it is about these that makes them so completely addicting. You will not be able to eat only one of them. Even when I made the not-so-good Wisconsin Muenster ones, I ate almost all of the them. (If I was going to tell the truth, I'd have to say that I actually had to force myself to throw them away so I would stop eating them.)


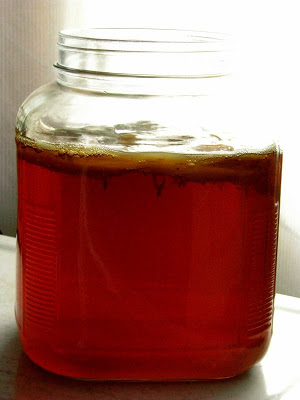
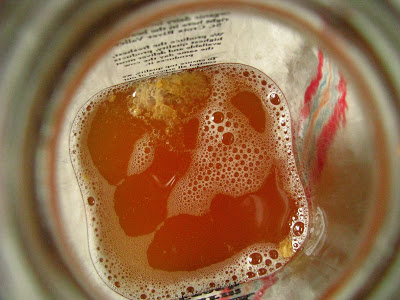
I will no doubt continue learning about the foods of Brazil. One thing I learned already and never knew was that cashews actually come from a fruit. Did you know this? It almost seemed like party trivia. Solange showed me a picture on a package of drink mix she brought back, I couldn't believe that I had never read this anywhere before. Brazilians like the cashew fruit juice, and she mixed the Kool-Aid type packet without sugar into water to give me an idea of it's taste.

It really is exciting to do a bit of traveling without actually leaving home. That is how I felt today when most of the conversation I overheard was in Portuguese. I like this feeling, however, and how it causes me to pay attention to expression and inference. It reminds me how everyone the world over is essentially the same underneath, and has something to say that is worth being heard.

It also confirms how food truly draws people together. It reminds us of where we are from, and how our families migrated, what we prefer, and what we have come to know and love. There are stories everywhere, told over washing dishes and romping children, and for a morning I got to glimpse parts of a place I've never been and may never get to. The US is comprised mostly of immigrants, some of here many generations, and some just one or two. Our food culture can sometimes seem lost in the scheme of world cuisine, and our native cuisine championed by only a few. Yet, we have the opportunity to live side by side with so much diversity, and that makes for many exciting kitchen adventures.

My Bravest Adventure Yet: Kombucha


GT's brand was my first experience with kombucha, a fermented tea beverage, probably about a year ago. Now through the wonders of friendship and Internet, I can say I will probably be GT's free indefinitely. Starter teas and finishing flavors including different juices, can vary, but the hallmark vinegar bite generally does not, and home brewing of kombucha allows the brewer a hand in controlling the amount of tang in the finished drink. This was certainly one thing that a year ago I would never have envisioned myself making in my home kitchen.

Kombucha is another item in the list of "love it or hate it" type things, due to it's unique flavor profile. I think, for me anyway, kombucha could be likened to cilantro; when I first tried cilantro - sometime in the 1990's I think - I hated it. Really, really hated it. Then, a few days later at work, an indescribable craving for cilantro came over me. I had to have cilantro, and from then on I couldn't get enough. That is how kombucha was, one sip and I was kind of amazed, a day or two later, I was full out obsessed.

Prior to my first sip, I had only generally overheard people talking about kombucha, and had seen it sold for exorbitant prices in the co-op, when I decided to purchase a 16 oz. bottle for about $4.50. I didn't know what to expect, so I didn't know that opening a freshly shaken bottle, in the car mind you, was going to be a really bad idea. About a third of my expensive trial run ended up stickily coating the interior of the Olds, and I learned firsthand about the natural effervescence of kombucha.

While the price of bottled kombucha appears to be going down (I assume in part due to increased competition from other brands), it is by far less expensive to make it yourself. And if you have a need for kitchen projects, as I do, the attraction to this one is purely irresistible. For some reason, I used to think that this was something best left to the controlled environment of a commercial kitchen laboratory, but now that I have been living with a SCOBY for a bit more than a week, any fears I had about home brewing tea from a living organism have evaporated. It is interesting to cohabitate with a culture of this nature, who goes through daily changes, and can perpetuate many generations. It could be the stuff of science fiction, or it could be age old wisdom in the new-fangled guise of popularity. Whatever it is, it is delicious, and it's worth giving a try!

Ok. If you are squeamish, this may be where you want to depart for the day. The kombucha brewing process begins with a SCOBY:


SCOBY, circa day 3 of first batch brewing.

SCOBY stands for Symbotic Colony Of Bacteria and Yeast. So this little guy above, a baby SCOBY given to me by my friends Peef and Lo at the Burp! Blog, is an actual living organism. He feeds off sugar, growing and fermenting the liquid he is in until the tea is ready and full of healthful strains of vitamins, enzymes and acids, usually 7-10 days but as long as 30 days depending on your fondness for vinegar and your sensitivity to sugar. The longer the SCOBY resides in the tea, the more sugar it eats. The final elixir is slightly alcoholic, but contains far less than 1% alcohol, and the SCOBY produces multiple beneficial organic acids during the process.

It seems there is no real medical fact to back up any of the health claims, of which there are many. Even the Mayo Clinic notes that there is no human trial on record to back up any such heath claims. Most fascinating to me, however, are the claims by numerous people of the beneficial effect of glucuronic acid produced by the SCOBY.

Glucuronic acid is touted as having superior detoxifying abilities, and cleans the liver. Cancer and other vicious afflictions such as rheumatism appear to have drastic positive reactions to glucuronic acid, and to the host of other beneficial acids contained in kombucha. It appears the glucuronic acid is best produced in tea stored at a constant 74-84 degrees farenheit, and not as well at cooler temperatures. I'd say my kitchen has been a little cooler than that, but it seems that I've been doing ok so far. There is no shortage of information to be Googled, if you are interested. I found some great overviews here at the Happy Herbalist and here at Food Renegade for starters.

But more important to me than unsubstantiated health benefits, kombucha is adventurous. The name, obviously, sounds very Japanese, and is thought to originate in the far east. According to Seeds of Health, around 415 AD a Korean physician named "Kombu or Kambu" treated the Japanese Emperor Inyko with "cha"(tea), and the result evidently was positive as the tea then took the name Kombucha. Kombucha then migrated to Russia and on to Eastern Europe. (The Seeds of Health link above also outlines the numerous beneficial acids contained in kombucha.) Traveling tea, made from living organisms that, I'm guessing substantiated or not, are pretty darn healthy? Sign me up!

In our food geekery talks, Lo told me of her aunt who had multiple SCOBY's and kombucha batches going. Different teas, green or black, lead to different flavors, and Lo's aunt sounds like she has an awesome "laboratory" to choose from. The culture that Lo chose was from an Earl Grey tea, a tea that generally is considered a poor choice for growing a SCOBY. We both have had good luck so far, Lo in her 3rd or greater batch, and me in my 2nd, using a high-grade Earl Grey tea from Rishi. Burp! Blog will no doubt also be posting on their kombucha adventures, so be sure to check in on their site! Peef and Lo graciously gave me my SCOBY, and a nicely typed and articulated way of brewing my first batch of kombucha. I started a week ago Sunday, and in 7 days, had a batch of tea ready to be bottled.

In the interim, I read (and still am reading) tons of information on kombucha, SCOBY's, and the health benefits of both, and also more than once have been sucked into reading disaster stories of how natural things can be bad for you. It does appear, however, that "bad kombucha" will only lead to nausea and vomiting, so it's a risk I'm willing to take. It also serves any adventurous kitchen warrior to take extra precautions when handling a SCOBY: clean, non-latex gloved hands, and a clean environment just make good sense. Another rule of thumb for kitchen experimenters is if it looks funny, smells funny or grows fuzzy mold, best not to chance it and throw it away. Also, I went a step further and after reading about PH levels, decided that I should test for my acid content prior to bottling.


To purchase snazzy swing-top bottles, I visited Northen Brewer. I had never heard of Northern Brewer, and was glad I could not (even with iPhone's help) locate my original destination and had to call my home-brewing friend, Mr. Mork - R1's husband. I have never considered brewing beer myself or even getting that excited about brewing/fermenting, but I guess in the course of culturing buttermilk, yogurt, vegan cashew cheese and sour creams the seeds were planted. This shop was so infinitely inspiring. They had a whole "Grain Room" and refrigerated liquid yeasts from Europe! I got a class sheet, and their catalog to peruse wort chillers and glass lab equipment like a crazy person over my breakfast.

Beer is just fine, but I don't go out of my way to drink it most of the time, and here I am daydreaming over descriptions of hops! I called up Mr. Mork, and asked when his next brewing session would be since now I just have to learn more (without becoming totally committed to home-brew craft all by myself). We set a date for next week, and I am going in like a sponge to soak up all the hands-on information I can on beer brewing, and I hope to have a series of posts on my observations!

The Northern Brewer employee that helped me was completely knowledgeable and the perfect person to continue inspiring me. He was interested not only in fermenting beer, but in lacto-fermentation of pickles and ginger beer plant. I didn't realize at the time we were talking that the Ginger Beer uses the exact same process to ferment as kombucha! He convinced me, easily by the way, to invest in a product called StarSan to sterilize my jars. I did the math, and for a half gallon of water, I only need a single teaspoon of this sanitizer as a rinse for my bottles. I went ahead and sterilized everything I used in a half gallon bowl of sanitizing rinse: funnel, ladle and finally my clean and ready to be refilled 1 gallon glass tea jar.

The next day, I returned to purchase PH testing strips and while waiting to consult with him, overheard him assisting a new home-brewer. He told him it isn't the end result that home-brewing exists for, that it is the whole process of brewing that leads up to the end result. "A Machiavellian approach to life" is how he put it, which put a smile on my face to know that I am not alone in my gusto for reading more into the culinary world than meets the common eye.

He also said that testing my acid levels probably wasn't "necessary", but would be fun to know - exactly what I thought. An article I read said to prohibit the growth of bad bacterias, the acid levels should be between 2.5 and 4.6, mine checked in at 3.2 on day 7, and tasted fizzy and light without being overwhelmingly vinegary, so I decided to bottle. In two of the bottles, I added a little bit of pure ginger juice, since I read that the inclusion of juices can improve the natural carbonation. In the back of my mind, I wonder what the American Dental Association would think of my consumption of kombucha given it's rather high acid levels, but since I am not a soda drinker, I'm not going to let a daily glass of tea worry me.


I even dipped the bowl that temporarily held my SCOBY in sanitizer...

I got 4 16 oz. bottles, and about 3/4 of a quart jar of bottled tea, saving out at least 1/2 c. of tea and the SCOBY for the next batch. I was impressed at how thick the SCOBY got in just 7 days. I had almost no trouble separating it, but it did tear just a little. Aready, it appears to be mending itself.


Second batch, day 2: the baby SCOBY.

I was also reading that if you want to start your own kombucha and are not fortunate as I was to know someone with an extra SCOBY to get you started, you can take a bottle of purchased kombucha and let a culture begin on it's own. I was a little skeptical that this could work, until I did my own bottling. My quart jar has been out on the counter for two days (I moved it to the refrigerator today), and you can begin to see the growth of a new SCOBY near the top of the photo:


I imagine if you take a bottle of purchased kombucha, pour it into a sterilized glass bottle, and leave it at room temperature, you may discover that it can produce a baby SCOBY. If not, do a bit of research and I'm sure you will be able to find someone willing to share. The keys to any successful project of this sort are research, first person "wisdom of the ages", as the Northern Brewer employee put it, Internet/book knowledge, and old-fashioned common sense.

It's always a pleasure to run into other curious minds, and ones that are gonzo experimenters. For that and so many other reasons, blogging has enriched my life. I am lucky to be able to compare notes on this fascinating process with Lo, and as we both continue to gain knowledge and understanding of our little science projects, I'm sure there will be many posts to come. I will leave it to Lo to come up with some killer flavors, since she towers over me in that department... so you can be sure I'll be checking out the Burp! Blog anxiously to see what experimenting they are up to.

I'm also excited to see where my own blog takes me, now that my culturing obsession is moving forward slowly into fermentation. I have a copy of Wild Fermentation on hold from my library, and I'm sure that will only serve to add fuel to the fire. Just when I think there is nothing new on the food horizon for me, something steps in, confirming to me all the more that I am doing exactly what I should be doing at this point in my life... experimenting, reading, testing and writing about food from the standpoint of my small kitchen.

Vegan Monday: Adventures in Lemon Poppyseed Bread


Looks pretty good, so far...

You may notice that I dropped the "raw" from the vegan post title this week. This was intentional, since I fully intended to branch out into vegan bakery. I found a base recipe and of course, altered it to use up more of the almond "pulp" as I like to call it, my homemade by-product of almond milk making. My end result was less than stellar I must say, but for a little sweet something for just myself, I'm reasonably happy.

Well, maybe more than reasonably happy, since two of my most favorite flavors are lemon and almond. So many recipes for poppyseed anything contain only lemon, which is fine, but I absolutely crave almond extract - the King of All Extracts in my book. True to my assumptions, the base recipe, one from Robin Robertson's Vegan Planet, uses the zest and juice of a whole lemon. I stayed fairly faithful to her recipe, but accidentally forgot to add the 2 tablespoons of oil, and added in 1/2 c. of my almond pulp. I had high hopes when I tasted the batter; it was perfectly lemony and suspiciously like a traditional quick bread. I just knew that adding my almond extract glaze (which I could practically mainline, mind you) would make it perfect. I baked it for 60 minutes, let it cool in the pan for ten, then waited patiently until it was completely cool to cut into it:


Dense, gummy, and appears to be overworked, not good characteristics for a quick bread. I tasted it. Hmmmm. It was actually pretty good! Especially after I added a little glaze of confectioner's sugar, almond extract and almond milk... it actually improved it so much that I even considered writing down the recipe here for non-discerning and non-judgmental vegan bakers... but I think I better try again and work towards perfection.


Vegan bakery does have the guilt-free aspect working for it. While the recipe does use white flour, it only had 1/2 cup of sugar, half the amount of most traditional quick bread recipes, and no eggs or butter to clog up my arteries. Gummy or not, I wrapped my sad loaf in foil, and tucked it into the fridge for eating alongside my coffee for the rest of the week.

It is always a little sad when something turns out less than your expectations of it, but it becomes almost a blessing to still be able to consume it! It also serves to knock me down a few notches in my experimentation modes, since sometimes, I feel like I could add flour to water and produce something so amazing that no one would suspect otherwise. Egotism has no place in the the kitchen and Venerable Kitchen Wisdom does usually know what is best for you. Lessons can be learned in everything, provided my eyes are open wide enough to see them.

Getting to know Veganism in all it's forms is really fun for me, and a little flop here or there isn't going to deter me! We'll see what happens for next week, Raw Vegan or just plain Vegan Monday will be around to challenge me a little bit longer. I MUST find another use for almond pulp! I refuse to believe that I can't make it into something delicious and worthwhile! Any ideas? Be sure to send them my way...

To Borrow a Phrase: Greek Hippie Salad


I consider the humble wheat berry. It is wholesome, toothsome, versatile, and completely underused in my kitchen due to it's incredibly long cooking nature. I never remember in advance that it should soak for 8 hours prior to it's 1 hour stove-top simmer, and frankly, since I don't know what I'm going to eat from day to day, planning for such ingredient usage is usually out the window unless a dinner party is involved. I do usually have a quart jar stashed under my cupboard, just in case inspiration and planning strike me.

In the past week, I have taken note of 3 separate salads: one with wheat berries, one with crunchy radish and lettuce leaves, and the last one a genre of salads given a great name - Hippie Salads. Starting in reverse order, Marisa at Food in Jars noted somewhere (and I don't remember which post) that her husband isn't always so fond of her hippie salads, salads that are comprised of whole grain and leftover and miscellaneous healthy things. I'd have to say, that my Husband is even pickier than hers, so the concept of Hippie Salad at my house is usually tailored just to suit me for lunches, light dinners, and snacks. I rather like this arrangement, since I determined a while back to no longer make enough salad to feed Guam, and successfully scaled down to accommodate only myself.

As for the crunchy radish and lettuce leaves? Just look here at the beauty that is Veggie Le Crunch! Sprouted Kitchen is really a beautiful, photo driven food blog, but she has some killer recipes as well. I actually fully intended to make a generally the same version of this salad (since I truly am incapable of following proportion and direction), but veered from my course when I stopped by the Outpost today. They had beautiful red and green romaine lettuces on sale, and I for some reason I just had to have a Greek style salad right then and there. I got a cucumber (knowing the leftovers will be tossed in some homemade sour cream that I just made and need to use), and some imported French sheep's milk feta. The bones were laid.

Mid week, Boy-O and I visited R1's place, and I was perusing a magazine and saw the picture for this salad on an olive oil advertisement. I perceived the edamame to be bright green peas, and thought immediately of a pea type version of a wheat berry salad that would be worthy of the new innBrooklyn Virtual Veg of the Month Club. This month's selection is peas and/or pea shoots, and while I haven't scored any fresh from the Wisconsin earth peas yet, the hippie salad I concocted used a healthy amount of the frozen variety.


A couple of thinly sliced and quartered radishes that I had to buy earlier in the week after drooling over Sprouted Kitchen's Veggie Le Crunch.

When I have inspiration, it's easy to concoct, but I still had the pesky problem of the soaking and cooking of the wheat berries. I didn't remember last night that I wanted to cook some today, but I did know that I did around noon. I figured since I love my pressure cooker for pinto beans (and had used it yesterday and still had beans leftover), I would use it for the wheat berries. Thanks to this site, I found charts for pressure cooking everything! I soaked a half cup of rock hard berries in 3 times their water, and went to a birthday party across the street. When we got home around 4, I put them in the pressure pot with plenty of water to cover them by at least 2 inches, and cooked them on medium for 30 minutes. I quick-released the pressure by running the pot under cool water, and was rewarded by perfect, fat berries ready for a Greek Hippie Salad!


As with all hippie salads, you can omit, add or augment however you see fit. My half cup of raw wheat berries yielded a bit more than a cup of cooked berries. All told, my salad was a bit over 2 1/2 cups. Instantly veganize your salad by omitting the feta.

Greek Hippie Wheatberry Salad (inspired by the sources above)
  • 1/2 raw wheat berries, cooked using whatever method you prefer
  • 2/3 c. frozen peas, cooked in boiling water until done - 3 to 4 minutes
  • 1/2 cooked beans, I used pinto
  • 1/3 cucumber, peeled, seeded and finely chopped
  • 2-3 radishes, thinly sliced and quartered
  • 1 1/2 oz feta cheese, imported sheep's milk is strongest
  • 2-3 T. chopped red onion
  • 1/2 lemon, juiced (about 1 1/2 T.)
  • 2 T. extra virgin olive oil
  • 1/2-1 clove garlic, minced or grated on a microplane
  • 1/4 t. oregano
  • salt and pepper to taste
  • romaine lettuce leaves for serving
In a small bowl, combine lemon juice, olive oil, garlic, oregano and a little salt and pepper. Whisk to emulsify into a dressing. In a larger bowl, combine all other ingredients and toss gently with dressing. That's it! Serve it on the lettuce and add a little more black pepper if you like.


I tasted it and loved it, of course, since I made it to suit exactly what I had a taste for. I didn't originally add red onion, because I didn't think I had one - but luckily I found one that was in desperate need of using, so I added it after the photos. It was the the missing link. I then thought I could have gone and added red and green pepper, and even some other colorful and hotter peppers, but I'll save that for next time.


The missing component.

Hippie salad, or not, my Husband thought he'd even try a bite, though he hasn't yet. I ate mine rolled up in a lettuce leaf like a taco, and then had to have another big scoop on the side. I'd bet the avocado dressing that Sprouted Kitchen made would be good as a wheat berry salad dressing... but then I'd bet that each and every reader could add or subtract one thing that would improve upon the Greek foundation that I was craving this chilly June day.

How many salads have you seen that just call your name and have to be made? I know I'm not alone, when it is a numberless amount for me. They are probably one of my favorite things to make and eat, which is a lucky predicament to be in indeed. I find, that any kind of salad of this nature, stuffed into a tortilla (homemade of beans or corn masa), garnished with cheese and hot sauce is pretty much foolproof.

Not sure how this Greek version would fare in my my old standby, but I have a feeling I'll be making some flat breads after church tomorrow...

Raw Vegan Monday: Strawberry Cheesecake

It would seem that I can not help myself with my self-imposed Raw Vegan Mondays. I didn't really think I would do it this week, but I guess I changed my mind last night when I was looking for more dessert options...


Because I wanted to keep it raw, I thought I would search for a nut-free raw crust. If you know of any recipes out there, please let me know! I searched high and low on the Internet, and couldn't find one. I'd imagine this would pose a problem to someone with a nut allergy wishing to eat this way, but really I was thinking about myself.

Most raw vegan desserts I've been seeing are very nut heavy. In fact, this cheesecake is based entirely on a creamy cashew center. Of course, I could just opt for a bowl of fruit, but what fun would that be? Last week's Chocolate Pudding Pie was so good (and lasted very well, by the way, we had the last slices after our Beet Gnocchi dinner Saturday night), that I thought it would be hard to beat. Certainly, it is if you love chocolate... but if you love cheesecake, let me introduce you to this raw vegan version.

I found a base recipe at Gone Raw, but then proceeded to cut some nuts and sweetener from it to result in a not quite as nut-heavy endeavor. My cheesecake is light and refreshing, and can be stored in the freezer - a total plus for a daily dessert indulger such as myself.


I happened to have a lot of preserved lemon and no fresh lemon, so I used it. You could also use grated lemon peel, or add a touch of lemon juice if you have fresh to work with.

Raw Vegan Strawberry Cheesecake (adapted from Bees Knees Kitchen via Gone Raw)

Makes one 8 inch springform pan (I used my tart tin, since I don't have a little springform)


Crust:
  • 1/2 c. walnuts, ground to a "flour" in a spice mill
  • 16 dates
  • 1 T. water
  • pinch of salt
  • flax meal, to achieve proper consistency
Process the dates in a food pro until they are well chopped. Add the walnut flour and pinch of salt and pulse to combine. Test the consistency - I added 1 T. of water, then added a bit of flax meal to achieve my ideal. Press into an 8 inch tin, I left mine mostly on the bottom and not up the sides. It is a very thin base.

Cheese Filling:
  • 1 1/2 c. cashews, soaked in plenty of filtered water overnight
  • 1/4 of a preserved lemon (rinsed thoroughly and flesh removed, peel sliced thinly)
  • 2 T. coconut concentrate
  • 1 T. raw agave nectar
  • 1 T. brown sugar
  • pinch of salt
  • 1/2 t. vanilla extract (not raw, so you could use vanilla seeds scraped from a pod)
Blend all ingredients in a blender or food pro (or VitaMix for the creamiest result). I got pretty smooth by using my hand held immersion blender on the cashews first, with about a tablespoon of water to get them going. Then I transferred them to the food pro and continued with the blending and adding of the other ingredients. Taste and adjust the sweetness level to your liking. Spread over the crust in the 8 inch tin.

Strawberry Top:
  • 1 heaping cup chopped strawberries
  • 1 t. agave nectar
Pulse in a blender (I used my kitchen shears to cut up the strawberries, and that worked fine) until coarsely chopped and releasing some juice. Spread over the top, to within a half inch of the sides.


I put my cheesecake right into the freezer, and then took it out after lunchtime to slice it. It cut into nice neat slices and tasted delicious! Light, slightly lemony, and not at all too rich like a conventional cheesecake. I think if you like icy cold things as I do, it's perfect right from the freezer, but I am also going to try letting some defrost in the fridge for a few hours before eating to test it at another temperature. I cut my whole tart into slices (I got 9 plus the one I ate...) and froze them in a container between sheets of waxed paper, so I can be assured of dessert for at least a week to come. I may try a balsamic reduction one day too, but then it would involve cooking...

I really think that raw vegan desserts are so attractive to me in part because I really do feel less guilty about eating some every day. I tend to eat them slower and savor them more than traditional desserts, I don't know if that is because I'm trying to read into the flavors more or what. While again, I can't promise yet another week of Raw Vegan Monday, I know that this is one diet and foods experiment that is going to linger on for some time!