raw

(Raw) Vegan Fig Bars.

There is a gentle hum in my house. For a whole week now. I hear it if the radio happens to be off, and when if I'm drifting off to sleep. It's the relaxing white noise belonging to my dehydrator, that in my mid-century home I can hear perfectly well even though I've given it a proper set-up and privacy in the basement.

On the heels of recent wheat sprouting, I rented a new raw food cookbook from the library: Living Raw Food by Sarma Melngailis. I read the whole thing nearly immediately, and even though I am not raw or vegan (or both simultaneously), I took particular delight in the array of foods presented, and the quality of the desserts and snacks and their lack of refined sugars.

Raw "cooking" is just plain fascinating to me. Not only does it require a few technical, specialty appliances that I actually now have, it is thought provoked, true slow food that begs days of waiting, monitoring, peeking and tasting. It is all about the end products that taste better than you hoped for, and are worth each moment of anticipation - and it's pure excitement in the knowing that what came from the long wait is probably at least a little healthier for you in the long run.

raw vegan fig bars

Part of my obsessing with grain-spouting lately is the Kiddo. I know I'm a food person and concentrate on such things, but I worry about his diet. He likes fruit, but not many vegetables, he prefers all starchy carbohydrates and snacky-type foods to proper meals if given the choice, and sometimes stubbornly just refuses to eat dinner if it contains something he doesn't like. I guess I figure that I have time in this bleak part of the year to do such things as sprout wheat, dehydrate it, and then grind it fresh before using it. It tastes better, and the Kiddo's digestion is probably helped out a little bit too.

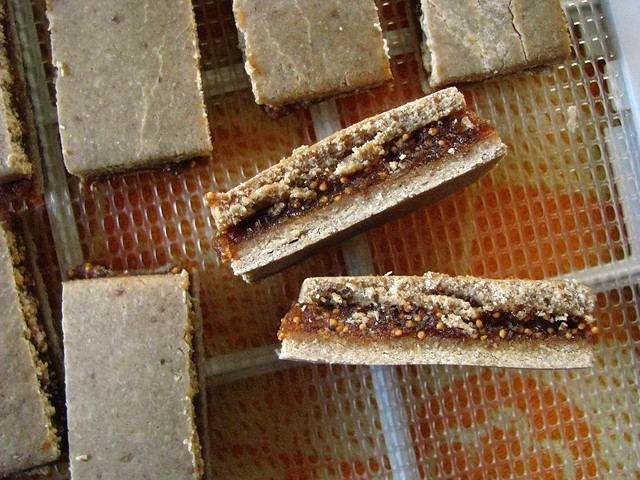
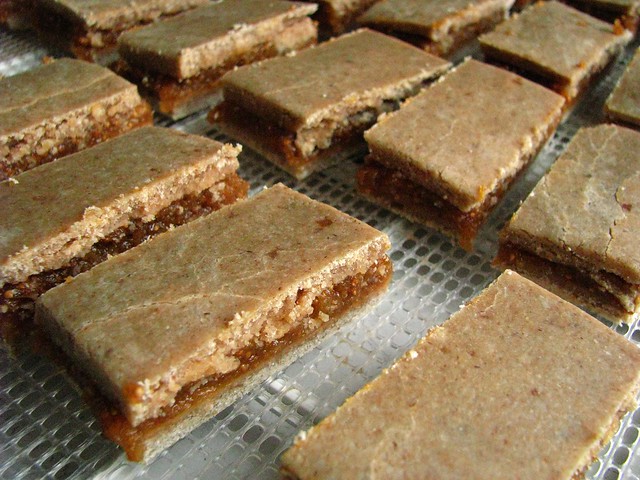
When I came to the fig bars in Sarma's book, I immediately set out to sprout some oats - not realizing that most oats are not sproutable since the outer hulls are usually removed. I was attempting it on co-op bulk bin oats groats, so I gave them three days of monitoring and rinsing before I gave in and just dehydrated them. (Sarma instructs to just soak them for 6 hours or longer at room temp before dehydrating them and grinding them into flour.) That turned these little Fig Newton-type bars into a 5 or 6 day process from start to finish.

These beauty bars are sweetened only with date and fig pastes easily made by soaking dried fruit in water to fatten it up, and then sending it on a trip through the food pro with enough soaking water to approximate jam consistency. I also learned something about figs, that they are essentially inverted flowers and they have the highest mineral content of all common fruits. According to Sarma, they are high in potassium, calcium and iron, as well as having a good amount of vitamin C and fiber. More good reasons to hope my Kiddo liked them!

figs

Now, when it came time to assemble these, I won't lie that my kitchen did not erupt into a mess of godzillic proportion, but that definitely would not stop me from making these again. I did half the recipe too since I was unsure of what I was doing and if it would be appreciated - but next time I'll make the full amount. These are dried out after all, and when storing them air-tight, I think they'll have a fairly long shelf life.

Sarma also calls for an ingredient I've never used before, maple syrup powder. I think it would be possible to dehydrate maple syrup and arrive at a usable result, but frankly I didn't have time for all of that. (Maple syrup is arguably not raw either if you are keeping track.) I substituted it with a little actual maple syrup, and everything turned out just fine. This was the first dehydrated adventure of such proportion for me, and I just went ahead and substituted as if I've been raw "baking" forever. It worked for me.

raw vegan fig bars.

Before I started these, I read through quite a few message boards concerning raw vegan desserts and discovered that most people feel that these types of desserts are on the sweet side. I took that into consideration when reducing the amounts of dried fruit that I used for the filling. The amounts listed are for 32 bars, double everything for 64 bars. Have all of the ingredients ready before beginning. Soaking the dried fruits and turning them into pastes can be done a day or two in advance, and the oats soaked, dehydrated and turned to flour at your convenience. Trust me, all the advance work is worth it.

Raw Vegan Fig Bars (adapted from Sarma Melngailis)
  • 4 c. oat flour (see note below)
  • 1/2 t. RealSalt (fine salt)
  • 1/4 c. coconut oil, warmed to soften
  • 1/2 c. maple syrup
  • 1 T. vanilla
  • 3/4 c. date paste (see note below), divided
  • 2 c. fig paste (see note below) (use the recommended 3 c. of fig paste for figgier bars)

To make the dough, mix oat flour and salt in a large bowl. Mix the coconut oil, maple syrup, vanilla, and 1/2 c. of the date paste together, and add to the flour/salt mixture. Mix thoroughly, it will feel like a soft dough, like a pie dough. If it is too dry, add water to correct.

To make filling, in a separate bowl, mix remaining date paste with fig paste. (Sarma calls to add 1/4 c. of agave to the filling, but I found the consistency to be ok with just a little water, and I didn't want to add any additional sweetener since I feel dates and figs are both pretty sweet. You can add some honey or agave if you like - and include a pinch of salt to taste.) It should have a jam-like consistency, not liquidy at all.

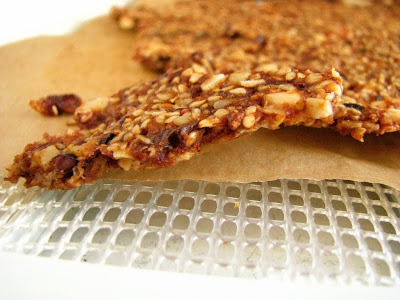
Cut two pieces of parchment paper that are about the size of your dehydrator screens. Divide the dough into 2 pieces, and press/roll each into an even layer. Make each sheet as close to the same size as possible. With a knife, cut one of the dough layers into 4 uniform rectangles. (This will be the top layer, cutting makes it easier to pick up without breaking.) Sarma says to freeze for 10 minutes to make it easier to handle, but I had no trouble using it right away.

Spread the fig mixture evenly over the dough layer that is not cut. Carefully place the 4 rectangles you cut from the top piece of dough over the top. Place the whole thing, on the parchment paper, on a dehydrator screen and dehydrate at 115 or less for 6 hours.

Remove from dehydrator, carefully flip the whole thing onto another piece of parchment-lined screen and peel off the bottom layer of parchment. Put it back into the dehydrator and keep dehydrating for another 6 hours.

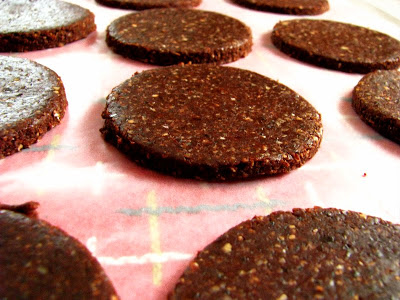
Remove from the dehydrator, (move the parchment off of the dehydrator screen), and cut the dough into bars. Cut each quarter into 8 bars, to equal the 32 bars. Carefully transfer the bars individually to the dehydrator screens, and dehydrate for 10-12 hours longer until done.

NOTES:

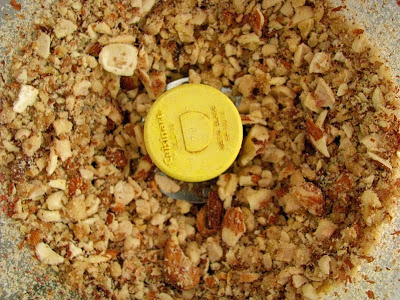
To make oat flour, soak oat groats in water for at least 6 hours, drain and rinse well, dehydrate and grind in a VitaMix or grain mill.

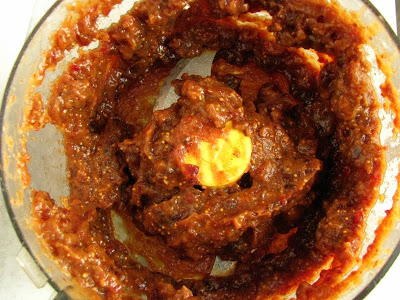
To make date and fig pastes, soak the dried fruits for at least 2 hours in water at room temperature. (Separately, of course.) In the case of the figs, first cut off the hard stems. Drain and reserve the soaking water. Transfer to a food processor and mix, adding back the soaking liquid 1 T. at a time until it is the consistency of thick jam or butter.

raw vegan fig bars..

This was the type of project that had more than one opportunity for me to wake up in the night and attend to it. I didn't choose to do this. I just let the bars sit until I woke up naturally to continue attending to them. You can of course, plan ahead to adjust for timing - but I don't think it's crucial. The fig bars are really done when you are happy with the texture, since all of the ingredients are able to be eaten in their raw states. You can't mess them up!

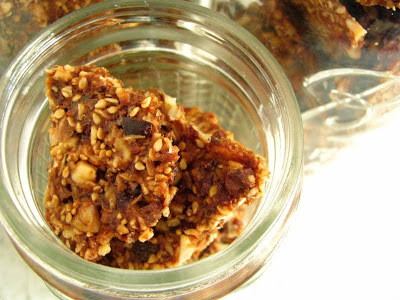
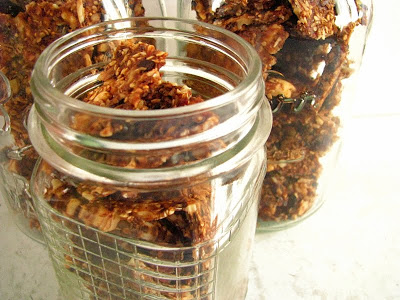
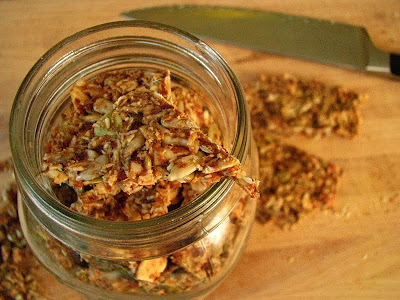
We loved these bars. My picky kid loved these bars! He was lobbying eating his whole dinner to have one for dessert afterwards, so I think they more than fit the criteria I was hoping for. They taste better than Fig Newtons, and better than the butter laden homemade versions of fig bars I've made in the past. I was so excited, I bought a couple pounds of buckwheat, sprouted and dehydrated it, to get started immediately on my next raw vegan dessert.

sprouted buckwheat

As I write on this cold, sunny, Saturday afternoon, the gentle hum of the dehydrator keeps me company as a wholesome buckwheat Rice Krispie variation makes its way to done. I had never had a buckwheat berry before, let alone a sprouted and dehydrated one. It is better than a Krispie for sure, and so is the marshmallow-reminiscent binder of young Thai coconuts, coconut oil and other things that I tweaked so much I'm glad I wrote them down. I could have just eaten it by the bowlful, but I'm glad I formed them into bars and have the patience to wait until another day. I'll have the fig bars as company until they are ready.

buckwheat <span class=

Apologies to Sarma for substituting up her awesome recipes. Great Big Thanks to the Milwaukee Public Library for their continual purchase of stellar cookbooks. This is a book that I'll have to purchase, if only for the desserts alone. Not that I won't be trying many other things in the savory veins. I'll stop myself from immediately running out to look for oyster mushrooms, but probably not for long. Then a long-planned dinner may be arriving on my table, at home in the din of dehydrating grains, percolating sourdough starter, and all the other things that somehow easily become obsessions to me.

Dehydrated Granola.

Last week, I happened to notice a bookmark and comment I left on a recipe more than a year ago. It's shouldn't be so surprising when time passes so quickly, but it always is. Little glimpses into my thought patterns from a while back are kind of strange. Who was that person who commented then? What was I eating and obsessing over? When the comment is left on a staple like granola, it isn't too hard to remember the reason why I bookmarked it - but it is easy to see why I forgot about it, since I only inherited a dehydrator somewhat recently.


Now a granola recipe from a blog entitled Roasting Rambler has to be great, right? And, it is - that's for sure. I actually made it without tweaking (the last photo on this post), well, I barely tweaked it, for the first time last week, all those months after I had forgotten that the idea of drying out a paste granola was absolutely brilliant. I wasn't disappointed either. It was super crunchy and delicious, my hand and both of my Kiddo's hands both made swift work of the rather small batch over the course of the week.

Yesterday after breakfast, I was hit by the urge to organize my spice cupboard. It's actually one of my favorite things about my kitchen, and contains a lot more than just spices. The top shelf appropriately holds my modest liquor cabinet. The next down, canning jars of bulk grains, nuts and seeds. Then, my shelves of spices: one shelf holds jars contained in a wooden filing box I found at a rummage, and another two baskets of miscellaneous must haves from Spice House wanderings (and things that I use in close proximity like extracts, brown sugar, cocoa powder, cornstarch. The bottom shelf is for oils, molasses, honey, sugar jar.

In the late 40's when my house was built, I assume that having such a convenient nook for cooking and baking essentials was still prerequisite for the modern housewife. I like considering myself a modern housewife who appreciates it still. I do not like that it frequently needs going through, as I tend to toss things in there despite my constantly renewed vows that I will keep it organized and faced, beautiful to look at when the shuttered door swings open.


With the success of dehydrated granola still implanted, I consolidated my jars. I discovered dried dates that were almost brittle with age, dried figs that were surprisingly soft enough to tear in two, several cranberries that were past their eating-out-of-hand prime. Using the same proportions as the Roasting Rambler's original recipe, I concocted another dehydrated granola - excited that the possibilities for this were endless.


The base of the granola is dried fruit mixed with lemon juice and enough water to make it run easily through the food processor blade. I found both times I've made it that I didn't need the full amount of water, just add it until the mixture is homogeneous and moves freely. I also found that the double batch amount that I've listed below has no trouble being mixed in the food processor. If you would double my amounts listed, it's possibly you may run into some blending trouble depending on the age of your dried fruits...

Dehydrated Granola (original recipe from the Roasting Rambler, adapted)
  • 12 mixed dried fruit (I used about half dates, then figs and cranberries)
  • 14 oz. total nuts and/or seeds (I used a 12 oz. mixture of crispy almonds, walnuts and peanuts, and 2 oz. sesame seed)
  • 1 lemon, juiced
  • 1 t. salt (you may wish to use a tad less)
  • 1 t. cinnamon
  • 1 t. vanilla
  • 1 c. water
  • 2 oz. unsweetened coconut (I use a brand like this)
  • 1 oz. cacao nibs
In a food pro, pulse the nuts (I leave the sesame seeds out, since they are so small anyway) until they are a uniform consistency that you would prefer in your granola, about 15 one second pulses. Empty them into a large bowl.

Add dried fruit to food pro, and pulse to chop. Add the lemon juice, salt, cinnamon and vanilla, and run the processor to blend the mixture well. With the motor running, add the water through the top until the mixture is like a runny paste. (I'm imagining I will add cocoa powder to the mixture at this point sometime...)

Scrape the dried fruit paste into the bowl with the nuts and add in the sesame seeds (if you didn't add them to the nut mixture), the coconut and the cacao nibs. Stir well to combine.

Spread the mixture on two dehydrator trays lined with parchment paper. Try to spread it as thin and as even as possible, without worrying about it too much. Dehydrate (I used 147 degrees) for 8-12 hours, longer if it still isn't brittle when you check it.

Break into pieces and store in glass jars. I like to keep excess of all granola in the freezer if I have the space, since I feel that it stays crunchier - but it's not necessary I'm sure.


fruit paste.


the granola mixture prior to dehydration.


spread as thin as possible.


after dehydrating.

I got 2 1/2 quart jars full of dehydrated granola. I keep my dehydrator in the basement, and when I ran busily up and downstairs, trekking clean laundry to the clotheslines I kept peeking in to look at it. Laundry complete, I then forgot all about it until this morning, when the machine had turned itself off, and it was done: crunchy, brittle shards just waiting to be broken in my hands.


I want to more fully embrace my dehydrator this year. Since it came to live with me, I don't feel I've given it the usage it deserves. I have quite a lot of tart cherries on the way, and think I'll enter the world of fruit leathers as well as dried fruit. We made fruit leathers when I was a kid, but I don't think I've had one since. I'm fairly excited to puree something cherry and apricotish in the VitaMix to try out. Come Fall, I may even try candying my own cranberries, if I can get past the tradition of just making and then eating a whole batch of these instead.


It seems like I'm starting to feel like I can barely keep up. I remember often my Mom telling me that it felt like her 30's came in "clumps", the time just flew with the business of child raising, food prep and preservation, gardening and yard work. I like to think that I have unending stamina, that I can work until my hands positively bleed, sleep 3 hours and then get up and work some more. But today I'm tired. I slept on the couch this afternoon in full sight of a basket of unfolded laundry. I didn't do the lunch dishes until after 7 pm, after a nighttime library nature program where my son was transformed into the cutest ant ever. I refuse to admit that I need sleep, and I do - though now it's getting late and that nap is beginning to make me feel like I could go all night. I probably should since I have 4 pounds of dilly beans to pickle...

I suppose they will still be there in the morning, when a handful of this new granola makes itself my breakfast with a few tart cherries that I had to buy from a favorite orchard owner today. It could be disheartening to think of all the things I've forgotten out there that are likely as great as this granola. It's disheartening to think that my memory isn't quite as sharp as it used to be. For now, I remember what I need when I need it I guess.

Raw Vegan Monday: Macadamia Caprese


I had to make another raw vegan recipe from The Conscious Cook this week: Macadamia Caprese. While the author of The Conscious Cook, Tal Ronnen, is not strictly raw, he invited a guest raw vegan, chef Chad Sarno, to contribute this recipe. It is visually stunning; at a glance you would never know that it was vegan, and it really is easy to prepare..

The "cheese" is made by culturing macadamia nuts with probiotic culture, much the same way as the cashew cheese I made earlier this summer. I can't say that the flavor was all that different using the macadamia nuts than it was with cashews (and cashews are far less expensive), but the cheese was much more firm due to the way I cultured it.


I weighted it down with my sophisticate pie weights (white beans in a canning jar) and left it in my oven overnight with the light on. That trick keeps your oven mildly warm without using too much electricity, and when my a/c (even with the house set at like 75 f...) has barely stopped running for the past week, I needed to be sure it was warmish and draft free. You may also recall I use this trick for culturing buttermilk and sour cream, and it always yields great results.

The cheese firmed up nicely, and had the same base flavor as the cashew cheese that was cultured the same way, but lacked a little of cashew's sweetness. Vegan cheese is strange, because you kind of want to believe that it will taste like cheve or whatever varietal it appears it should approximate, and it just does not. It is it's own thing. I believe that I can appreciate it for what it is, while also noting that it is nothing like actual dairy cheese. This one was rolled in crushed black pepper, tarragon and chives from my garden, and I did think that it was beautiful to look at, probably why my Husband even tried a slice with a spicy tomato, and thought it was all right, I noted however that he did not ask for seconds...


It's funny, too, that I'm posting this cheese directly after a grilled cheese post!

I would have to say that the star of this appetizer had to be the tomato. They are semi-dried, and spicy with Cajun seasoning. Since raw vegan cooking prohibits the use of boiling water, very hot water is used to cover the tomatoes (bottoms pierced in an "x") for 10 minutes, stems in tact. Then, remove them to an ice water bath for 5 minutes or so, and carefully peel them. I didn't think that it was going to work, but it did! Sprinkled with Cajun spice (I used Penzey's Hot Cajun) and a bit of sea salt, they rest on a screen at room temp for several hours - I left them for about 8. They form a little bit of a dried crust on the outside, and retain all of their lovely tomato-ness inside.


I really do love The Conscious Cook cookbook. It's well designed and executed, and offers many interesting things for the adventurous vegan cook. Since I was unable to find the macadamia cheese anywhere else online, and Chad Sarno was gracious in publishing his recipe through another chef's book, I will suggest that you find a copy! I first saw and became acquainted with the book at my library, and it is now in my ever-bottomless Amazon cart for future purchasing. Meanwhile, if you'd like to try another of his similarly styled vegan cheeses, you can have a look here at the rawchef website.


It is so true that the stipulations of being raw and vegan do so much to spark kitchen creativity. It's not just raw carrot sticks and a handful of nuts to these pioneering chefs. While personally I enjoy a wide range of foods, I continue to gain a deeper appreciation for those with strict diets - for either social or food allergy reasons.

I am frequently reminded of a fortune cookie I once opened: "One hundred people, One hundred minds". It's easy to read that and dismiss it, but it is so true. Every one of us feels and thinks passionately about something, and it may or may not be the same opinion as our closest friend, a parent, or even a spouse. I'm not saying that there aren't things that are inherently right or wrong, but that surface opinion varies from person to person - and doesn't that make for the spice of life!

I like to think "food people" tend to be kindred spirits, exploratory folk who will try anything at least once, but that is not always the case. 100 minds... If you have never thought about eating or preparing something vegan, I'd urge you to give it a go. You may just find that you can't stop! See you next week on Vegan Monday!


Raw Vegan Monday: Banana "Ice Cream" Sandwiches


It started last week when I bought bananas that were not green enough, and bought too many of them. The whole lot of them ripened before I could get around to eating them, which meant they would meet their demise in the freezer. Bananas are tricky things, and most people have a short window of opportunity in which they prefer to enjoy one. Some, like my Mother, like them nearly green and some like them even more deeply spotted than the specimens above. I am rather picky about them when not adding them to a baked good (which then, I insist upon deep-speckledness), I dislike the green banana taste since it tends to remind me of the artificially flavored banana candies that I despise, like Runts, but I also dislike soft, mushy centered fruit the texture of pudding. Pure banana enjoyment is rather limited for me, though I can blend anything with homemade buttermilk or yogurt and drink it down without much trouble.

Fortunately, another banana bread or banana muffin was not in my future. As tasty as both of these options are, even in baked form, they tend to take up my freezer space as I forget that I've made them. Freshly made baked goods are fine, but due to my current personal situation including picky eating boys, I have to utilize my freezer to keep from growing my current size proportionally due to uneaten foods...


I remembered in my raw vegan readings that I have seen many many recipes for banana "ice creams", made simply by blending up frozen bananas into luxurious soft-serve. Sickly sweet overripe (at least overripe in my opinion) bananas lose that some of that velvety soft-serve mouthfeel in the freezer, but they also lose their cloying edge. For any fan of crystalline ice creams, frozen bananas offer a no-fat, no-dairy alternative wonderland, yet banana ice cream wasn't good enough for me. I found and adapted a more portable result - and one that I certainly won't forget is waiting for me in the freezer: Raw Vegan Banana "Ice Cream" Sandwiches.


The original recipe is from Veggie Wedgie, a very nice vegan site with great photography. I had to adapt it just a bit, due to my nature of adaptation, and ingredients at hand. I will also say that if you are looking to make photo-worthy sandwiches, work quickly and transfer each sandwich to the freezer as soon as it is assembled. Banana ice cream melts unbelievably quick.

Raw Vegan Banana "Ice Cream" Sandwiches (adapted from Veggie Wedgie)

Cookies:
  • 200 g/7 oz. dates (I used 8 oz.)
  • 1/2 c. cocoa powder
  • 1 1/2 c. rolled oats ground into oat flour (I measure the oats, then grind)
  • 3 T. coconut concentrate
  • 2 T. agave syrup
  • 1/4 c. water (add this 1 tablespoon at a time, until the dough sticks together)
"Ice Cream":
  • 5 bananas, peeled, sliced and frozen (in the future I will mash and freeze them, to facilitate blending in inferior blending equipment...)
  • vanilla seeds, scraped from a vanilla pod - or extract if you aren't fully raw (about 1 t.)
To make the cookies, combine all the ingredients in a food processor, and blend until a dough is starting to come together. I think I had more oats than the original recipe called for, and I added a full 1/4 cup of water to get it to stick together. You want to be able to roll it out on a sheet pan lined with parchment or waxed paper, so go by feel. Cut shapes, I used 2 1/4 inch circles, and freeze in a single layer on a sheet pan for at least an hour to harden them up.

When ready to assemble, blend the bananas and vanilla in a blender, food pro, immersion blender or by hand. I used a combination of food pro and blender, and still had trouble getting the larger chunks of banana to break down. I do have a VitaMix jar filling with cold hard cash to remedy this unfortunate situation. I used the 2 1/4 cutter to stand in as a sandwich mold, and spooned in a small amount of banana on top of a round of cookie. Then, I pressed the center with a toothpick to help it release and added the top cookie after it was unmolded. They looked gorgeous coming out of the molds, but within minutes, were melting like crazy. I transferred them to the freezer, and they firmed up again in about 20 minutes. I got about 14 sandwiches, but the leftover "cookie dough" is good eaten on it's own. Even the picky Boy-O thought so!


This ice cream sandwich is light, and does taste like bananas - but in the best, non-artificial way possible. I love icy ice cream, and this was deliciously icy, too. I like that they are keeping well in the freezer: I wrapped them individually in waxed paper, and laid them in an airtight container for precautionary freezer-burn measures, but I doubt they are going to last long enough to have to contend with that.


Raw Vegan Monday: Strawberry Cheesecake

It would seem that I can not help myself with my self-imposed Raw Vegan Mondays. I didn't really think I would do it this week, but I guess I changed my mind last night when I was looking for more dessert options...


Because I wanted to keep it raw, I thought I would search for a nut-free raw crust. If you know of any recipes out there, please let me know! I searched high and low on the Internet, and couldn't find one. I'd imagine this would pose a problem to someone with a nut allergy wishing to eat this way, but really I was thinking about myself.

Most raw vegan desserts I've been seeing are very nut heavy. In fact, this cheesecake is based entirely on a creamy cashew center. Of course, I could just opt for a bowl of fruit, but what fun would that be? Last week's Chocolate Pudding Pie was so good (and lasted very well, by the way, we had the last slices after our Beet Gnocchi dinner Saturday night), that I thought it would be hard to beat. Certainly, it is if you love chocolate... but if you love cheesecake, let me introduce you to this raw vegan version.

I found a base recipe at Gone Raw, but then proceeded to cut some nuts and sweetener from it to result in a not quite as nut-heavy endeavor. My cheesecake is light and refreshing, and can be stored in the freezer - a total plus for a daily dessert indulger such as myself.


I happened to have a lot of preserved lemon and no fresh lemon, so I used it. You could also use grated lemon peel, or add a touch of lemon juice if you have fresh to work with.

Raw Vegan Strawberry Cheesecake (adapted from Bees Knees Kitchen via Gone Raw)

Makes one 8 inch springform pan (I used my tart tin, since I don't have a little springform)


Crust:
  • 1/2 c. walnuts, ground to a "flour" in a spice mill
  • 16 dates
  • 1 T. water
  • pinch of salt
  • flax meal, to achieve proper consistency
Process the dates in a food pro until they are well chopped. Add the walnut flour and pinch of salt and pulse to combine. Test the consistency - I added 1 T. of water, then added a bit of flax meal to achieve my ideal. Press into an 8 inch tin, I left mine mostly on the bottom and not up the sides. It is a very thin base.

Cheese Filling:
  • 1 1/2 c. cashews, soaked in plenty of filtered water overnight
  • 1/4 of a preserved lemon (rinsed thoroughly and flesh removed, peel sliced thinly)
  • 2 T. coconut concentrate
  • 1 T. raw agave nectar
  • 1 T. brown sugar
  • pinch of salt
  • 1/2 t. vanilla extract (not raw, so you could use vanilla seeds scraped from a pod)
Blend all ingredients in a blender or food pro (or VitaMix for the creamiest result). I got pretty smooth by using my hand held immersion blender on the cashews first, with about a tablespoon of water to get them going. Then I transferred them to the food pro and continued with the blending and adding of the other ingredients. Taste and adjust the sweetness level to your liking. Spread over the crust in the 8 inch tin.

Strawberry Top:
  • 1 heaping cup chopped strawberries
  • 1 t. agave nectar
Pulse in a blender (I used my kitchen shears to cut up the strawberries, and that worked fine) until coarsely chopped and releasing some juice. Spread over the top, to within a half inch of the sides.


I put my cheesecake right into the freezer, and then took it out after lunchtime to slice it. It cut into nice neat slices and tasted delicious! Light, slightly lemony, and not at all too rich like a conventional cheesecake. I think if you like icy cold things as I do, it's perfect right from the freezer, but I am also going to try letting some defrost in the fridge for a few hours before eating to test it at another temperature. I cut my whole tart into slices (I got 9 plus the one I ate...) and froze them in a container between sheets of waxed paper, so I can be assured of dessert for at least a week to come. I may try a balsamic reduction one day too, but then it would involve cooking...

I really think that raw vegan desserts are so attractive to me in part because I really do feel less guilty about eating some every day. I tend to eat them slower and savor them more than traditional desserts, I don't know if that is because I'm trying to read into the flavors more or what. While again, I can't promise yet another week of Raw Vegan Monday, I know that this is one diet and foods experiment that is going to linger on for some time!