Of Heat, Dog Days, and Cucumber Gazpacho.


I never think it will happen, yet every single year it does. I always think that it will be different, yet strangely it never is. I usually make a solemn vow that I will appreciate it and soak it up, but come August, that vow goes the way of the New Year's Resolution come February. What am I talking about, you ask? The heat of summer - that brutal, crushing, lung-filling heat that in my area of the world comes with unprecedented humidity.

"First of all, I hate wearing white. Even when I give white a chance, I'm not fooling anyone — I've always been a Rizzo, not a Sandy..." says Diablo Cody, in perhaps the finest piece of summer journalistic op/ed ever crafted. (Really, go read it, I'll wait.) I go further, since I really detest such warm weather favorites such as shorts or *gasp* dresses/skirts, so as the dog days of summer wear on, I find myself wanting to hole up in my a/c inspired house, happily jean-clad, and baking like it's 20 below zero.

Part of my disdain is that despite the humongous bounty of the garden, market, and this year my CSA, I have absolutely no appetite. Even a brisk walk (resulting in the dripping dampness of said non-shorts and non-dresses) can not conjure the slightest hint of hunger, yet due to my self-imposed job of kitchen cohabitation, I feel that I must keep up with my three squares per day. I know other food-people know what I'm talking about. I have to find excuses to make all of the interesting stuff I read about, and like I've said before, I'm the one firmly rooted in the Live To Eat column of human beings.


Enter cold soup. Before the oppressive heat of summer, and for the second installment of my Vegan Mondays, I made a cold Avocado Cucumber Soup. While I've eaten all manners of cold soups in restaurants, I tend not to ever indulge in them at home... and I cannot tell you there is a good reason for it. The Avocado Cucumber Soup was excellent, and now that my state has turned into a sauna, I can even better appreciate it. While that version of soup was vegan, today I made a vegetarian version gifted to me by my friend, Ann.

Though it's been more than a decade since we've worked together, and she moved to California (my envy green and thriving, as you know), we continue to keep in touch. While chatting at Alterra when she was in town recently, she mentioned this soup that has it's origins in the L.A. Times. I had 2 cucumbers firmly residing in my fridge, one in each of my last two CSA boxes. I really love cucumber, but sometimes, I think there is only so much cuke a person can eat - especially since my chosen method of ingestion is sliced and mixed with mayo or sour cream, huge amounts of dill and salt and pepper.

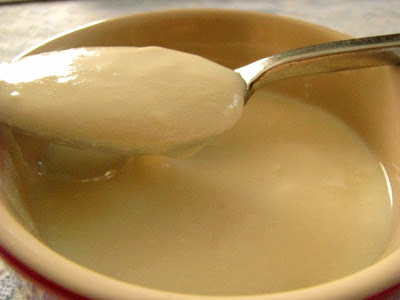
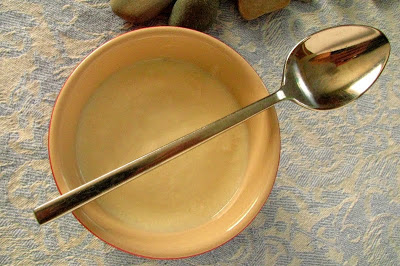
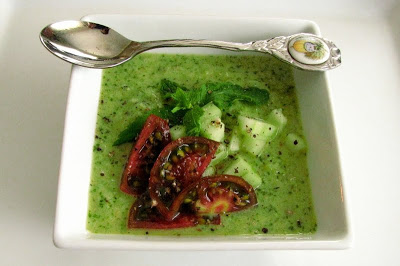
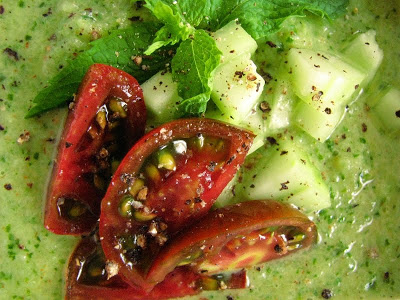
Really my favorite thing about cold soup recipes is that you can go on blending, mixing and tasting until you come up with something you are downright proud of eating. That is exactly how this soup is. And when I finally felt like eating lunch around 2 o'clock this afternoon, nothing could have hit the spot harder than this spicy hot, cold soup garnished with heirloom sweet tomato.


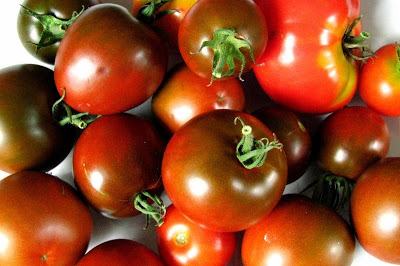
Heirlooms. Just as precious as jewels, in my opinion - and worth the heat of Summer in and of themselves.

I will give you what Ann emailed me, and annotate in {parenthesis} what I actually did. I had to bring the recipe down to about a cucumber and a half's worth of volume.... but you know how to make soup - right? Throw in what makes you happy! (Direction applications are from Ann.) You can easily Veganize this soup by substituting avocado for the yogurt.

Cucumber Gazpacho (via Ann Martens, via the Los Angeles Times)
  • 4 1/2 cucumbers (about 2 1/2 lbs.), divided {I used 1 1/2 cukes}
  • 1 c. plain yogurt {I used a heaping 1/4 c. of my strained Greek style yogurt}
  • 1 t. Thai red curry paste {I used a heaping tablespoon of Spice House red curry powder}
  • 1/3 c. lime juice (Ann's husband, Dave, uses 3 limes and never measures) {I used 1 lime, juiced}
  • 1/2 jalapeno pepper (Dave uses up to three) {I used 2 small ones, from my garden}
  • 1 1/4 t. salt, to taste
  • 1/4 t. pepper, to taste
  • 30 cilantro leaves (Dave uses a big handful, sans stems) {I used a big handful}
  • 20 fresh mint leaves (Dave uses a big handful) {being intrepid still of mint, I used the leaves of 3 good sized stalks}
  • fresh rosemary (this addition is a Dave original!) {I used the needles from one longish stalk of rosemary...}
  • 1/2 c. olive oil {I glugged in about 3 Tablespoons}
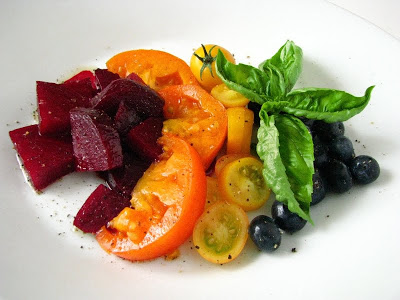
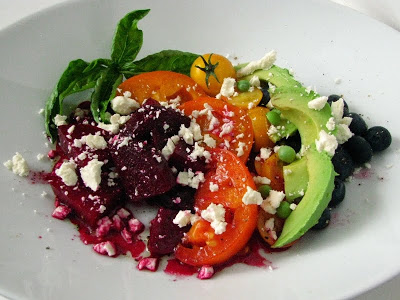
  • 1/2 medium tomato for garnish {I used a few of my Black Prince heirlooms, sliced}
"Peel, seed, and cut 4 cucumbers into quarters. Cut the remaining one fourth cucumber in small dice and set aside for garnish.

Place half the quartered cucumbers in a blender jar (I used my food pro, due to the sad state of my blender) and add the yogurt, curry paste, lime juice, jalapeno, salt, & pepper. Puree. While the blender is running, add the remaining cucumber, cilantro, mint, and rosemary (if using). This is a fun stage for kids because it turns green suddenly!

Adjust the seasonings, then while the blender is on, and gradually pour in one-half cup olive oil to emulsify. Chill until ready to serve.

In a small bowl, make the garnish by combining the diced cucumber, 1/2 tsp lime juice, a pinch of salt & pepper, the diced tomato, 1 tsp. olive oil, and a little chopped mint & cilantro.

To serve: Spoon the gazpacho into bowls and sprinkle each with garnish.
We have never made the garnish because we are too impatient. We just pour the soup into big mugs and drink it right away :) Yum!"


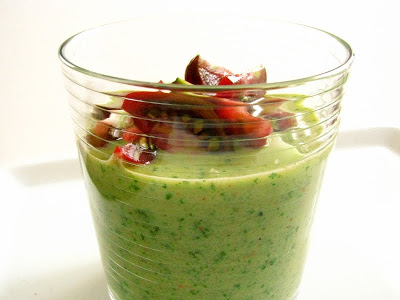
I ate about half of my amount for my late lunch today, and plan on eating the leftover glassful tomorrow, as the heat does not promise to give way any time soon. On the brink of each new season, I tend to long for the polar opposite. When Spring was at hand, I longed for fall, a cool reprise, and rainy, damp afternoons. Why do I always want what I can't have, instead of basking in the moment, weather-wise, I mean.

Maybe I'm not so much for the heat, as I am for the cool, a Northerner by birth and genetics (except for that Mexican side...). Layers of clothing and walks without breaking a sweat certainly do sound appealing at this point in the year. Perhaps it's the warm-weathered Mexican part of me that creates these feelings of indecision when it comes to Summer, or maybe it's just that I'm not so hungry. Either way, I am sure I'll be enjoying this cold Cucumber Gazpacho as long as I'm able to get fresh Wisconsin cucumbers. It's certainly one thing that is a perk in these long and hot, dog days of Summer.

Vegan Monday: (Vegan) Graham Crackers


I have to admit that I really don't enjoy making cookies that require me to roll them out. Frosted sugar cookies are some of my favorites, but even during my Christmas baking, I seldom make them just due to this small detail. For someone a bit lacking in counter space, roll-out cookies are kind of tedious. They require me to clear a space and devote my full attention to them, and then there is also the "mess factor" for the type of baker like myself that has a hard time keeping the flour from flying.

Graham crackers are my exception. They really don't make much of a mess since the dough is rather sticky, and they include the added guise of being somewhat healthful. I have a couple of favorite recipes, one from Nancy Silverton, that includes a high percentage of butter (I altered it to include wheat flour) and a new favorite from Kim Boyce which is slightly more virtuous in the fats and flours departments. My favorites so far are utterly dependent on butter and honey, two things that I just assumed were what endeared a homemade graham to me - even enough so that I vowed never to buy them again.

While I stick to my vow, I happily add this vegan version to my glass gasket jar: a winning recipe from Isa Chandra Moskowitz and Terry Hope Romero's book Vegan Cookies Invade Your Cookie Jar. They stand with the incomperable butter laden versions as proud substitutes, substitutes that are worthy in every way should you be vegan or not.


Not only is this vegan version butter free, but it includes only whole wheat flour, a staple in my kitchen. I love the slight bitterness of whole wheat, and prefer it most of the time to almost any other flour, save perhaps oat flour. The plain sugar adds to the crispness, as does the oil. I actually was nearly out of canola, so I used about half the amount of olive oil, a savory note that I found extra addicting! Not to mention that the dough can be rolled out right away instead of resting since it is soft and pliable.

Homemade graham crackers last a freakishly long time. I make sure I bake them until they are very crisp - sometimes I even throw them back in the oven again after they have started to cool and don't appear that they are going to crisp up. The girls do mention that you can leave them a bit on the softer side, if you want to make them into "ice cream" sandwiches. Or, simply spread them with this Chocolate Vegan Frosting... seriously, one of the tastiest frostings I've made, vegan or not (I used Spectrum Organic Shortning in place of Earth Balance).

Vegan Graham Crackers (Isa Chandra Moskowiz & Terry Hope Romero)
  • 1 1/2 c. whole wheat flour
  • 1/3 c. sugar
  • 1/2 t. baking soda
  • 1/2 t. cinnamon
  • scant 1/2 t. salt
  • 1/4 c. oil (I used 2 T. canola and 2 T. olive oil)
  • 2 T. molasses
  • 1 t. pure vanilla extract
  • 1/4 c. non-dairy milk (I used soy milk)
Preheat oven to 350, and line a sheet pan with parchment paper.

In a large bowl, mix together flour, sugar, soda, cinnamon and salt. In a small bowl or measuring cup, whisk the oil, molasses and vanilla. Pour the oil mixture over the flour mixture and mix with a fork until everything is combined well and it appears crumbly.

Drizzle in the non-dairy milk, and mix together gently with your hands until dough sticks together, and it forms a pliable ball of dough.

Line a work surface with parchment paper, and roll out the dough between two sheets of paper. You can leave them a little thicker, or go for the recommended 1/8 inch thickness. Cut off the edges (I used a fluted pastry roller), and cut into squares or rectangles. Save the scraps and re-roll them. Transfer completed shapes to sheet pan.

Bake for 12-14 minutes, longer if they don't seem up to your crispness desires. I baked some of mine for almost 20 minutes! The more crisp they are, the better they store long term - if you think that you wouldn't be eating them all straight away, that is. Cool completely, and store in a lidded glass jar.


I also really like that I have zero waste when making graham crackers. The texture seems to change a little (I think, for the better!), but you can re-roll your "scraps". I usually use tiny cutters on the last little bits of rolled dough. It's almost a challenge to myself to fit the stars with nearly no space in between. Their diminutive shape also ensures supreme crispness, so addicting that they are usually eaten first.


There are many, many recipes in this book that I have to try. Even more in their sister book, Vegan Cupcakes Take Over the World. If they continue to prove their tastiness, I'll have to pick up copies of both books for myself, since these were lent to me by Ginny. The Post Punk Kitchen website also has many great recipes. I actually found the best frosting ever recipe here before I read their books.

This Vegan Monday installment marks the 12 consecutive Monday of posting. Three months of more mindful eating have seriously flown by! I didn't realize at the time, what a great side challenge this was to myself for the summer months. I've found myself consciously making more vegetarian and vegan foods, and since I am obviously more excited than the rest of my family about it, it is a perfect fit due to it's ease of preparation. I've never been an overly meat-dependent eater, but this summer of vastly meat-free lunches and dinners has really reminded me about the ways I actually prefer to eat. With all the food politic storms around us, completely affordable, balanced and delicious meals can be a mainstay, and not one worry of "where that came from" needs to cross my mind.

I've talked with Sasa before about becoming a "restaurant vegetarian", which I am most of the time. We are fortunate to live in the Milwaukee area, where more and more restaurants are sourcing locally, and cooking with the mindset of sustainability. Many area establishments actually know the farms their meats come from, and the animal is not reduced to a mindless rite of the progressive, affluent world. This is good news - and news I should remember when I actually do eat out. I tend to squirrel my resources into eating at home - completely enjoyable, but I forget the pleasures of dining out. I'll have to remedy that a little bit!

Meanwhile, I think Vegan Mondays will stick around for awhile longer. Next week, I will be away from a computer on Monday, so if you check back in a week and notice nothing, don't despair! (Not that I actually think that you would...) This is one obsession that is going to continue for a long while.

Canning Mexican Pickled Vegetables (without the wreck of my heart.)

"I was driven to canning by the wreck of my heart." Debby Bull wrote this in her book called Blue Jelly, and these are the opening lines, the ones that I've remembered since I first read it, soon after it was published in 1998.

I remember not really knowing much about canning, or being interested it in at the time I first read that book. I grew up in a preserving household, both my Mom and Gram were avid canners before me. I suppose the deep roots of self-preservation were planted when I was young, but as I stood in the bookstore reading the first chapter of Blue Jelly while trying to escape the wreck of my own young heart, I could feel the first pangs of the desire to preserve something myself.


I was probably half way through the book when I realized that Debby must be from Wisconsin, and she is. She wrote with the West Coast wanderlust that I knew could only come from a Midwesterner. I was able to escape for that afternoon (after I bought it and went back home to read it), but it was such a short tome that it didn't seem to last me nearly long enough. A few more years needed to pass before my brokenheartedness was fully repaired, and this book did nothing to really help it along - but it did emphasize the virtues of canning, and making due with what you have, heartache or no.

In each chapter, she focuses on one canning project. The one that stood out most to me was this one with Mexican Pickled Vegetables. I think she called it Mexican Relish, but since my Mom cans relish and it does not resemble this at all (this is more in the giardinara realm of accompaniments), I took the liberty of renaming. Not too long after I read this book, I canned tomatoes in my small apartment. I did it wearing an apron adorned with blue Ball canning jars that my Mom had got me that said "Yes, I Can" in bold letters across the front. I also called her a few times during the process.

I still remember those lonesome days in that apartment, more than a decade ago, where I felt a lot of the time like I was waiting for my life to begin and where I first canned tomatoes and then jam. My working life got much busier in the future, and I had a several year hiatus from canning of any sort until I blissfully slipped into stay-at-home-motherhood. In the past 2 years, I have canned all sorts of new things, but I actually have never canned tomatoes since then. My Mom cans them for me, and we work out trades. I know I'll be giving her a jar or two of this Mexican Veg, and likely several pounds of Alterra coffee over the next few months...


While I usually always alter recipes, it is important when canning to follow directions exactly. Measure accurately, and don't skimp on the hygienic practices. Be sure your jars are fully sterilized and that you never eat anything that looks or smells strange after it's been on the shelf for a few months. Most importantly, acquaint yourself with canning basics, you can do this through websites such as the National Center for Home Food Preservation (or one of my favorites, Food in Jars), through local classes taught by master preservers, or through your county extension office. A quick Google search will put you quickly on your way to home preserving!

Mexican Pickled Vegetables (Debby Bull, from Blue Jelly)
  • pint jars (my batch made 5 pints)
  • 1 cauliflower, broken into florets
  • 1 red sweet pepper, cut into strips
  • 2 or 3 c. baby carrots, or sliced adult carrots (I used 2 cups)
  • 2 c. celery, cut into 1 inch slices
  • 2 c. small whole onions, or 2 medium onions, quartered (I used the medium onions)
  • pickling salt (do not use table salt)
Pickling Solution:
  • 5 c. distilled white vinegar, 5% acidity
  • 1 c. water
  • 1/2 c. sugar
For Packing in Jars:
  • garlic cloves, peeled (I used 1 per jar)
  • chile peppers, dried or fresh (I used 2 dried chiles de arbol per jar)
Put all the cut up vegetables into a large glass, stainless, or stoneware bowl and cover with cold water and 1/4 c. pickling salt. Stir the salt into a little water before adding it to the big bowl to dissolve it. Cover the bowl with a plate or another bowl that presses down on the veg to keep it submerged. Let it sit for at least one hour.

(Debby Bull tells a story here, in the midst of her recipe, about a country music singer she dated, someone famous - who I wouldn't have been able to Google in 1998 to find out who he was. I was holding my breath it wasn't Dwight Yokam... since she assured me that he turned out to be a louse. I found out that it was Marty Stuart - who'd of thought? I always thought he looked like a nice guy...)

Drain the veg.

Wash the jars in hot, soapy water, then sterilize in boiling water for 10 minutes. (I use my canning pot for this, then keep the water boiling when I fill.) Bring some water to boil over the lids in a small pan, then turn off the heat and leave them to sit in the warm water.

For the pickling solution, combine ingredients in a non-reactive pot and bring to a boil. Simmer for 15 minutes. (I kept the cover on to minimize evaporation.)

To each jar, add some garlic and chiles. Pack hot jars with veg, making sure to get an assortment of everything in there. (Be sure to really pack the vegetables as tightly as you can in there, otherwise after you finish boiling them, they won't be too full.) Fill with boiling hot pickling solution to the top, leaving 1/2 inch headspace. Wipe rims with a clean, lint free towel dipped in hot water (my Mom taught me to use the water that is still hot from boiling the lids).

Place hot lids on the jars, then screw the rings on. Process in boiling water bath (water should cover the jars by at least 1 inch) for 15 minutes. Start timing from when the water comes back to a full rolling boil.

Remove to a draft free place, and let sit for at least 24 hours before moving. When you hear the gentle *ping* of the lids, remember to say "thank you" (like my Mom also taught me). Transfer to a cool, dark place and let sit at least 6 weeks before opening.


I have an addiction to canning once I get going. Then, I run out of jars, or realize that I can't make everything that looks and sounds interesting, since there would be no way for me to eat it all in the next year of it's shelf life, so I try and curb myself a bit. These jars came out of the hot water bath just after 11 last night, and while cleaning up the kitchen I realized that I could just keep going and can up a batch of salsa that I had started preparing. Then I remembered the laundry, and spent a couple hours of quality time washing, drying and folding before turning in just after 1 a.m. Where the time goes in a day, I just don't know. Sometimes I think if I can just elude sleep, I can keep track of more of it, but it is a precious commodity, and it still does slip from my hands just the same.

Canning reminds me of time, I guess. When a jar is pulled from the shelf and is cracked open, I remember the day I made it and what was going on. That is why I've taken to dating the jars with the exact date, rather than just the month and year - which would be totally acceptable. I like to think back to the day it went in, where I got the produce or fruits, and what the state of my household was.

It also brings me back to my Mom and Gram, I remember their pantries and how they looked when they were fully stocked with jars. My Mom was taught and taught me to clean the jars if they got a little sticky from processing before stocking them on the shelf, and to even face and line them up nice and neat: to take pride in the work that you have accomplished. I even think of my Dad, and how he built the shelves for my Mom's hard work... she even made little curtains for them, and they still stand full, though not quite as full as when the family all lived at home.

I like to can for preservation, but just as much, I like to can for nostalgic reasons. Not to forget, that things that come from home canning taste far superior to anything you can buy, organic or not. It is a pleasure to be able to provide for yourself and your family, and it is a pride that comes with the generations for me. Even if I'll be the only one in my house to actually enjoy these hot pickled vegetables! I think with a bit of coaxing, I'll get my Husband to try them, and if they don't turn out too spicy, even the Boy-O, since he does love pickles after all.

Vegan Monday: Soy Yogurt and The Silver Lining

It's not often that I truly dislike something food or beverage related. I like to (proudly) think my palate is sophisticated and varied, but every once in a while I run across something and I think to myself "I really never, EVER, want to try this again". The first time (well, the only time) I had cuttlefish at a pretty nice sushi establishment, I looked across the table at my Husband who had already devoured his slice, and he knew that I was in trouble. This was a cloth napkin type place, not a place in sight for an uncultured Midwestern girl to politely spit a wad of partially chewed fish.

Of course there are foods I prefer not to eat due to processing, but when I run across something I know to be reasonably good for me but I find just in no way palatable, I feel kind of sad. Enter Soy Yogurt: I have never eaten soy yogurt before, but last week mentioned that I would try making it. So I did.


It looks like creamy, tasty yogurt...

I decided to buy and not make the soy milk from scratch. There are plenty of easy instructions out there, and frankly I've just been too busy lately. I enjoy soy milk, but not as much as almond or rice milks, so I pick my battles according to what I love.

I also bought a cultured soy yogurt to use as a starter. The proportions and procedure for making soy yogurt are exactly the same as that for regular dairy yogurt. Milk is heated to 180 degrees, and cooled to 100-110 and inoculated with a culture, 1 tablespoon of culture for a quart of milk. This left the better part of a little soy yogurt for me to taste during the 7 or 8 hour time the soy yogurt was incubating.


Granted, this first sample of soy yogurt was plain, unsweetened and unadulterated by fruit which may have been able to sway me in my harsh opinions. My first bite was awful; It was flabby, waxy and tasted of intensified soy - like an essence of soy. I could not get past the fact that it tasted exactly like a crayon, or at least like the way a crayon smells to me. I thought that maybe it just needed some doctoring, so I added some sweetener. Then granola. I then audibly whispered "this stuff is just vile". And it was! I looked over the ingredient list on the label again, and it did have such things as guar gum and tapioca starch, natural stabilizers that I knew my homemade version would not have so I held out hope that my finished product would knock the socks off it's prepackaged brother.

The soy yogurt took longer to culture than dairy yogurt, about 10 hours. I patiently (actually, I was in no great hurry to try it...) let it sit under refrigeration overnight, to try it for breakfast the next day. It seemed to separate, presumably due to the lack of thickeners, and did taste slightly better than my first experience. The texture was good, and I did manage to eat a small amount of it mixed with fruit into a unattractive smoothie - the soy somehow turned vibrantly colored blueberries into a muddy blue brown color.

While I hate wasting food, this experiment may not get eaten. My Mom has taught me to "let things go back to the earth" and not to feel bad about it if I don't like something, or it gets forgotten about in the fridge. I somehow feel better if I have it laying around for a couple of weeks, it begins to decompose and looks like a shadow of it's original splendor, and then tossing it doesn't make me feel so wasteful. I do have a thorough refrigerator cleaning on the list of things to do today, so maybe I'll be inspired to let it go sooner.

As disappointed as I was with soy yogurt, E told me about a salad that she's been kind of addicted to lately. It is based on marinated beets, and couldn't be simpler. Roasted beets are tossed with equal amounts of olive oil, balsamic vinegar and maple syrup and seasoned with salt and pepper. E has been eating her version with avocados, tomatoes, goat cheese and pine nuts, but I made a nice vegan version in all the colors of the rainbow:


The orange tomatoes were from my CSA, and while the outer appearance wasn't quite blemish free, it was probably the most delicious tomato I have ever eaten! I have reminded myself to never just judge on first appearances...

Full disclosure urges me to let you know that for supper last night (after my vegan photo shoot), I added feta cheese since I had some I needed to use up. I remembered about the avocado, and added some more of the marinade, and really was surprised at how filling and satisfying a rainbow of veg is for dinner!


I'm not sure I would try soy yogurt again. As I'm not staunchly vegan, I guess I don't have reason to. My dairy yogurt is so satisfying and great, and I've taken to straining it and performing more experiments with the whey.


I soaked some yellow mustard seed last night, and made a yellow mustard that even has a couple of tablespoons of whey in it. Apparently, the whey adds to the shelf life, and also most likely makes a common condiment like mustard more of a whole food. I can't wait for the Tongue Splitter Ale to be finished, and I'd substitute the water in the recipe for home brewed beer - then I'd be truly excited! Meanwhile, I need to now find a use for 12 oz. of yellow mustard - any ideas, send them my way...

The ways of experimenting always lead to places I don't expect. I have a new appreciation for my Husband, who just does not like beets. I always think how it is impossible not to love a beet, but after tasting this yogurt, I can not imagine liking it. After all, he goes on eating cuttlefish and last time we ate at Polonez, he ordered (and loved) the tripe soup - for someone I tend to think is picky, these are brave accomplishments. I made this Rainbow Salad for myself, and another green salad and a piece of fish for him, and we were both happy and eating together at the same time, and isn't this what I should be thankful for?

It's easier with a small family to become a short order cook, which is essentially what I have become. Even though not much could make me happier than mimicking the fast pace of a restaurant in my little galley kitchen, I'm trying not to do this so much, since the Boy-O is picky and I need to make him stop being picky. Little by little, it is coming along. For the past week, he devours peas that I planted late in the back yard, ripping open the little "zippers" and popping them in his mouth as fast as he can. Generally, if I can get him to take just one bite of something, he concedes into enjoyment of a new food.

An adventurous-eater-friend of mine (*wink, wink*) told me that while she doesn't always love everything she tries, she would never tell her husband who tends to be a little more reserved in his eating habits. I doubt I could have held back and insisted my family try the yogurt, but I see her point. I often think that if I can just be a good example, that I will seep into the pores of my family - and I daily hope that this is the case. Sometimes I feel daunted in the tasks at hand, but usually persevere, always offering a taste of something new even though I'm most often met with a "no thanks". One day, I know things will change, and then I'll look back on these days of sometime frustration and smile.

Homebrewing With Mr. Mork: Part 2 - Bottling.

So here we are at the second stage of the homebrewing process: bottling. Yesterday afternoon, I drove over to assist and learn as Mr. Mork transferred the progressing fermentation from carboy to bottle. It does not seem like more than a month, indeed most of the summer, has passed since I witnessed the birth of this Tounge Splitter Ale.

About a week after I was there, Mr. Mork transferred the original ferment to a new carboy stoppered with an airlock, a one-way valve that allows pressure from within the carboy out without letting air in. The second fermentation was then underway.


The bottles were already washed and sterilized when I arrived. You can reuse any beer bottle that does not use a screw off cap. Some of his bottles are as old as his first batch of beer! As I am kind of a glass jar/bottle fanatic, I loved the look of many mismatched bottles. Mr. Mork used to painstakingly remove the labels, but now doesn't bother... the bottles are all labeled with marker on their caps when the bottling is complete.


Airlock.

About a week ago, he added additional hops to the carboy. This is called dry-hopping, and adds an additional dimension to the hoppiness that already exists.


The only thing left to do before transferring this liquid to the bottles is to add the priming sugar. Priming sugar is made from corn and activates the yeast in the beer, stimulating them to create carbonation in the bottle. We tasted the priming sugar, which I thought was exactly like a Pixi Stix, sans artificial colorants and crazy artificial flavor. The flat beer was actually tasty, too. All of the metallic hop flavors that I witnessed last month were surprisingly mellowed, the barley flavors toned down. I know that in a couple of weeks, this is going to really be an excellent beverage.


The priming sugar needs to be dissolved in boiling water, and meanwhile, the bottle caps are sanitized by boiling as well.


This process of siphoning the beer from the carboy into the bottling bucket was easy, but for some reason, I could not figure out how it was going to work until I saw it. (It reminded me of when I learned to knit in the round, and used a place marker. I couldn't visualize how the marker wouldn't be stuck on the needle as I knit... That is ridiculous to me now! Sometimes the simplest things are the things that throw me the most.) In Wild Fermentation, Sandor uses a more archaic process of just sucking on the end of plain tubing, but this more sophisticated aid called a racking cane is filled with water, and the water provides the suction. A more sanitary solution to the mouth siphoning process, I'd imagine...


The bottling bucket is equipped on the bottom with a spigot that is inserted in the bottle, and fills when pressure is applied. Mr. Mork filled the bottles, and R1 demonstrates the capping process:


Easy, and addicting! I'm considering getting a bottle capper for my kombucha bottling... but I'm a little worried about the insane carbonation issues I've been having... I took over from R1, and capped the rest of the bottles, about 46 in all. They are now labeled and resting in boxes at the edge of the Mork dining room, where it is a bit warmer than the basement. After two weeks, the bottle fermentation will be mostly complete (give or take a few days), and phase 3 can begin: Drinking.


It is amazing that so little effort can produce spectacular results. I guess that is how I feel about most kitchen experiments - that if you just have a bit of time and can reasonably follow instructions, you can make almost anything! The longer you do something, the easier it becomes, it's just the learning curve that can seem to throw me.

Beer is something that humans have brewed for an extremely long time, and yet, the process is unknown to so many people. I guess it is like anything, and you can demand better beer just as you can demand better fruits and vegetables and better meats and poultry - or better yet, you can grow or brew them yourself.

Another aspect of the whole home fermentation process that I really like, is the waiting. Our society is so full of instant gratification and "bigger, better and more". Waiting 6 -8 weeks to drink something so full of quality is really a pleasure. My own small ferments like the ginger beer, rhubarb liqueur, and kombucha take far less than a month (except for the aging of the liqueur), but still require a week or two of timing, and drinking something off my counter that I've been patient enough to wait awhile for is infinitely more rewarding than getting in my car and driving to a shop and buying something to drink this instant. I hope you will agree, and be able to learn a process like beer brewing from someone who also enjoys the waiting, like Mr. Mork!