Daring Baker Challenge September 2010: Sugar Cookies.

The September 2010 Daring Bakers’ challenge was hosted by Mandy of “What the Fruitcake?!” Mandy challenged everyone to make Decorated Sugar Cookies based on recipes from Peggy Porschen and The Joy of Baking.

I guess to be honest, I wasn't overly excited about making sugar cookies for this month's challenge. And also, to be honest, I've never made properly thick and decorated ones. Never having made something is one of the best reasons to become a Daring Baker, but I still wasn't excited. For our challenge, we were to make cookies using Peggy Porschen's recipe and to decorate them with Royal Icing in the theme of "September".

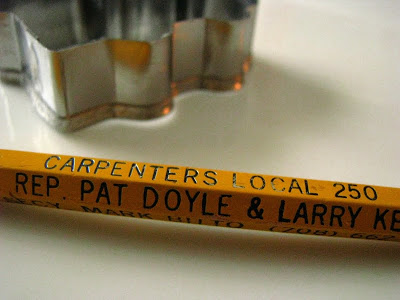
September. I kind of consider the whole month my birthday, and my son started school, and the great Midwestern humidity usually subsides, breathing into us the idea of Fall. What theme could I choose? Pencils or apples for school? A birthday cake or candle? Pretty little Autumn leaves in shades of orange and yellow? Well, I guess it's time to confess I only truly completed half of my challenge this month.


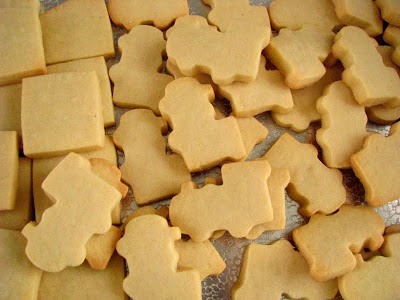
Since my little Boy-O is completely fascinated by sea life right now, we went to the local restaurant supply last Thursday and looked hopefully for a whale cookie cutter. There were no whales, or sharks, or any other sea creature. There was a little train, so that is what he picked. I imagined that I could maybe eliminate use of food coloring by just piping white accents on them, because ever since I read this article, I can not bring myself to knowingly purchase or make anything with artificial color. It actually makes me mad that so many things have fake color, and also that I have a tiny little 4 color box in my pantry for emergency egg colorant needs.

I originally thought that if we found a whale, I could tint the icing the palest shade of blue imaginable, and use an inedible dried black bean for an eye... but since we got a train, I didn't know what I would end up with.


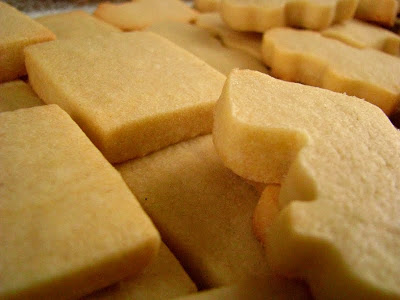
This sugar cookie dough recipe is the last one you will ever need. It is simple to work with because it is so soft. Instead of chilling the dough and then trying to roll, it is rolled out to almost a half inch (!) thickness and then chilled. No refrigerator hard butter to try and subdue into a workable sheet of dough. Since it was soft, I used the flat edge of my chef's knife to 'knock' in into a square and then eased it into the thickest sugar cookie I've ever made. My family traditionally has sugar cookies at Christmas and Valentine's Day, and my Mom always rolled them on the thin side. When I've made them myself, I've rolled them impossibly thin as well, so much so that they tend to brown unevenly, yet be delightfully crisp.

I rolled mine so thick that they bordered on shortbread. I was happy that we chose such a small cookie cutter, since they are so rich, but I'm happy I made them so formidable. I still had no idea, even as they baked, what I was going to do to decorate them. I was remembering the painstakingly painted sugar cookies I saw at Dean & Deluca the first time E and I went to New York. They were $10 a piece. I remember thinking as I stared at a mountain of cookies in every conceivable color that someone would likely come in and purchase a dozen. They were impressive, and obviously left an imprint on my mind - a vision that I still have no real desire to attack personally.

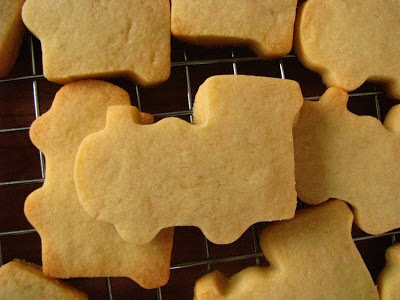
As I began pulling the cookies out of the oven, a strange thing happened. The trains turned into something else. For the life of me, I could only see Pachucos. My mind raced to see how in the world I could come up with natural black food colorant so I could ink in fedoras and faint mustaches, suit coats and white ties.


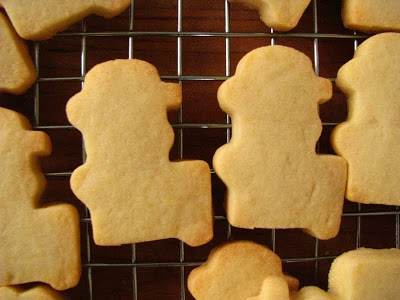
There he is: El Pachuco

Then I realized, that I do have a theme, and it is school related. In college, I was fortunate to have one really great drawing teacher. I'm not so into drawing really, but as it turns out, I have a gift for talking my way into being a good artist of sorts. I found that at our critique sessions that followed each assignment, I could wiggle my way into having a passable piece of art, and it's funny that I ended up liking whatever it was that I concocted a whole lot more after the fact. I had no idea what I was going to say going in to it, but I was able to defend myself and my work with tenacious, lawyer like prowess.

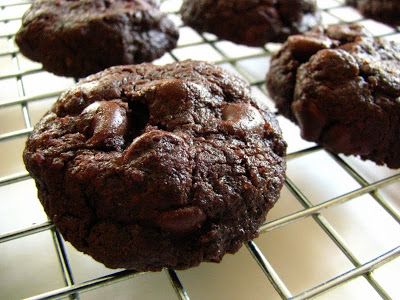
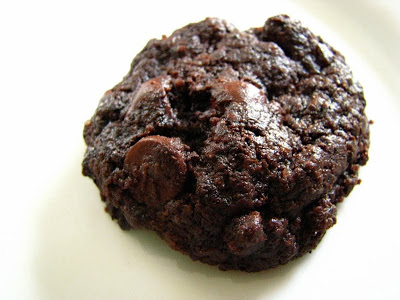
So, peering over my cooling cookies, my head filling up with drawings of zoot suits and baggy trousers, I figured that in my own way, I did accomplish my Daring Baker Challenge - even without putting icing on the cookie. These cookies last without frosting for a good 30 days, and I have a fridge with 3 kinds of leftover frostings and a good amount of Dorie Greenspan's chocolate pastry cream. Dorie's pastry cream on top of these cookies is probably the most decadent and butter/egg laden thing you could consume, but it would also be one of the most opulent cookies ever to make the journey down to your belly. Fully worthy in my book of $10 each, even if not beautiful drawn upon.

I realized this month that I wish I could have a bakeshop where I could draw pachucos on cookies for hours at a time if I felt like it. Maybe I wouldn't feel guilty about colarants and I could make them any color I wanted. I ask you, where have you ever seen a lucha libre pachuco cookie? And, one that tastes as good as this one did? I can promise you if CakeWalk ever opens it's doors, this cookie will be on the shelves:


This dough would be easily adaptable to many flavor variations. Since it was my first time with it, I stayed the normal, vanilla extract route. When I make them again I'm looking forward to playing around, lime zest comes immediately to mind. The baking time does vary depending on the thickness and shape of your cookie, and also the pan. I baked some on a perforated pizza pan, and they were done much quicker than the ones baked on a regular sheet pan. You can also decide to bake them soft or a little on the crispy side.

This recipe was also dead on in the weight measurements. I measured by standard means, and for fun checked the grams and ounces. It was on in every instance.

Basic Sugar Cookies: (The Daring Kitchen, via Mandy Mortimer and Peggy Porschen)
Makes Approximately 36x 10cm / 4" Cookies

  • 200g / 7oz / ½ cup + 6 Tbsp Unsalted Butter, at room temperature
  • 400g / 14oz / 3 cups + 3 Tbsp All Purpose / Plain Flour
  • 200g / 7oz / 1 cup Caster Sugar / Superfine Sugar (I spun my regular sugar in a coffee grinder/spice mill)
  • 1 Large Egg, lightly beaten
  • 5ml / 1 tsp Vanilla Extract / Or seeds from 1 vanilla bean

Cream together the butter, sugar and any flavorings you’re using. Beat until just becoming creamy in texture. (Tip: Don’t over mix otherwise you’ll incorporate too much air and the cookies will spread during baking, losing their shape.) (I mixed it on the lowest setting of my stand mixer using the paddle attachment.)

Beat in the egg until well combined, make sure to scrape down the sides of the bowl.

Add the sifted flour and mix on low until a non sticky dough forms.

Knead into a ball and divide into 2 or 3 pieces.

Roll out each portion between parchment paper to a thickness of about 5mm/1/5 inch (0.2 inch)

Refrigerate for a minimum of 30 minutes. (I left mine at least an hour or more.) (Tip: Recipes commonly just wrap the whole ball of dough in cling wrap and then refrigerate it for an hour or overnight, but by rolling the dough between parchment, this shortens the chilling time and then it’s also been rolled out while still soft making it easier and quicker.)

Once chilled, peel off parchment and place dough on a lightly floured surface. (I just left in on the parchment that I rolled it out on and rolled it out between two sheets of parchment. Then, I recycled the parchment by using it on the baking sheets...)

Cut out shapes with cookie cutters or a sharp knife.

Arrange shapes on parchment lined baking sheets and refrigerate for another 30mins to an hour. (Tip: It’s very important you chill them again otherwise they’ll spread while baking.)

Re-roll scraps and follow the above process until all scraps are used up.

Preheat oven to 180°C (160°C Fan Assisted) / 350°F / Gas Mark 4.

Bake until golden around the edges, about 8-15mins depending on the size of the cookies. (Tip: Bake same sized cookies together otherwise mixing smaller with larger cookies could result in
some cookies being baked before others are done.
) (Tip: Rotate baking sheets half way through baking if your oven bakes unevenly.)

Leave to cool on cooling racks.

Once completely cooled, decorate as desired.

(Tip: If wrapped in tinfoil/cling wrap or kept in airtight containers in a cool place, un-decorated cookies can last up to a month.)

Since it is such a good combination, you must have the chocolate pastry cream recipe firmly at hand as well... It makes quite a lot, but you will eat it all, trust me.

Dorie's Chocolate Pastry Cream (Dorie Greenspan, Baking From My Home to Yours)

  • 2 c. whole milk
  • 4 large egg yolks
  • 6 T. sugar
  • 3 T. cornstarch
  • 1/4 t. salt
  • 7 oz. bittersweet chocolate, melted
  • 2 1/2 T. unsalted butter, cut into 5 pieces, at room temperature
Bring the milk to a boil.

Meanwhile, whisk the egg yolks with the sugar, cornstarch and salt in a large heavy bottomed saucepan. (I used my 5 1/5 qt. dutch oven, and I wasn't sorry I did.) Whisking without stopping, drizzle in about 1/4 c. hot milk - this tempers the yolks so they don't curdle. Still whisking, add the remainder of the milk in a stady stream. Put the pan over medium heat and, whisking vigorously, constantly and thoroughly (make sure to get the edges of the pan), bring the mixture to a boil. Keep at a boil, still whisking, for 1-2 minutes. Remove from the heat.

Whisk in the melted chocolate, and let stand for 5 minutes. Then whisk in the pieces of butter, stirring until they are are fully incorporated and the cream is smooth and silky. Press a piece of chocolate wrap on the surface of the cream, and refrigerate until chilled. (I like to transfer it to a clean bowl after all that mixing, and before putting it in the fridge.)

Dorie says that it lasts 3 days, but I think you can let it go a little longer. She used this particular cream as a cake filling, and also recommends it as a dip for madeleines or sables...


And so I make my case for icing-less sugar cookies. Dip them in what you like: coffee, tea, chocolate, or dare I say melted cheese... leftover frostings cluttering up your fridge. And when you go through the process of rolling and chilling and baking, maybe your cookie cutters will morph on you and something you haven't thought about in a long time will emerge, ready for story telling time.

A very big thank you to Mandy at What the Fruitcake? - and you must go and check out her site. She is amazing!!! Also remember to check in at the Daring Kitchen website to find links to other Daring Bakers and their takes on the humble sugar cookie.

Nancy Silverton and the Wildness of Bread


The beginning of bread.

I confess that I have probably read the book Nancy Silverton's Breads from the LaBrea Bakery at least ten times. I have habitually rented it from the library several times a year, long before I ever baked any bread on a regular basis. I feel like I actually know this book like I would know a person, like it has become part of my general knowledge. I even feel like I know Nancy, like I can hear her voice on the page, working through her processes in an authoritative conversational way. Thanks to a woman I met at Annie's class who was paring down her cooking library, I received a copy of my very own, and busily re-read most of it yet again in July.

I actually know whole passages by heart, including the foreword written by Ruth Reichl. In it, she describes Silverton one Thanksgiving as she arrived as her guest with an ice cream maker to accompany the pie she brought. She set it up on the floor, the only surface not being used, and nearly tripped hostess Reichl as she carried the turkey into the dining room. Why? Because ice cream tastes so much better when it's fresh, and apparently she didn't dream of making it anywhere but on the spot of it's imminent consumption.

Obviously, then, I knew that if I were to attempt catching my own wild yeast and making it into something palatable, I would follow Silverton and in all of her exacting madness. Obsessed people usually make the best teachers and the writings that follow them tend to be as detailed and true as instructions can be. I collected my grapes from my Parents Farm, not only because I wanted to have organic fruit that I didn't need to worry about washing, but also because I wanted a deep Wisconsiness to my bread... a bread that has yet to be baked.


Silverton's method of starting a starter from wild roots is a 14 day process beginning with immersion of a pound of grapes in a bit more than a pound of bread flour and 2 pounds of water. I followed the weight instructions to a tee, including the temperature of the water she suggested. I didn't panic when the Concord grapes turned my contents suspiciously purple, and I did note the changes in its scent as the days progressed. Grapey-ness turned to a slightly alcoholic sour smell within several days, until by day 14 a fairly mild and uniform bread-like aroma ensued.


Day 1


Day 2


Day 3


Day 4 (sorry for the blurriness on this one...)

The grapes actually stay in the mixture a whole 10 days. I didn't have any mold appear, but it is normal if it would have. After day 10, I carefully began to feed my baby 3 times a day. According to Silverton, we humans can survive on one meal a day, but really it's not advisable, so if 3 meals is better for us and our metabolisms, it is also better for our living breads. Again, I followed her methods exactly, feeding about 6 hours apart, and with increasing amounts of flour and water on each successive feeding in the day. Every new morning, I dutifully poured off all but a pound and 2 oz. of starter and started the process over again until on day 15, this past Monday, I tried to bake.


Around day 10...

It is completely obvious to me that my sourdough starter is active and alive. After each feeding, it takes awhile to bubble up, it smells sweet and good, and towards the time of the next feeding, it begins to separate - a layer of clearish yellow liquid on the top that is easily mixed in to what reminds me of a sticky crepe batter consistency. Every time I feed it, the same thing happens all over again.

But, when I tried Monday morning to make actual bread, it did not work. It felt like bread as I worked with with the dough, but it lacked any strength to leaven the dough during the first rise. After about 8 hours, and still no change in bulk, I figured I'd just pat it out onto an olive oiled baking sheet and bake it into a "focaccia" after emailing with Lo. It still didn't rise in the oven, not that I expected it to - a leaden thing that tasted surprisingly delicious with sour tang and well complemented with generously sprinkled rosemary and Parmesan cheese...


Late yesterday afternoon, I began my research elsewhere. I have no idea how to bake with my starter - especially when all seems well and living and tasty, if not proper. Meanwhile, I've decided to take my starter down to 100 grams and add 50 grams each of flour and water at each feeding for the next few days (after preliminary research here). I also need to talk to someone who has baked with sourdough I think, since no matter how much I think I know Nancy Silverton, I can not channel the wealth of knowledge that could otherwise be learned firsthand or hands on by a non-book dwelling human being. If anyone in my area (or any not-so-close reader) has any tips for me, please let me know!! Lo has already been a really great resource, but her starter is probably at least 100 years old, or even 250 - if it came from King Arthur Flour. She got it from a friend, and it always seems to work for her.

Since I have had nearly a half gallon of starter by the end of each day, until today when I decided to maintain a smaller amount, I had planned to make one of Peef and Lo's recipes: Sourdough Waffles. This morning, after I weighed out my saved starter to feed, I used a cup of what was destined as waste to make a sweet version of their delicious waffles. No bacon or cheese in here, but they were delicious when served with bananas and newly made peach butter. They were substantial, like bread, the telltale tang of sourdough that I know is alive and active beneath my uncertainty of this newborn.


I have to be out of town this weekend, so I hope I can safely tuck my little baby into the fridge where active fermentation can slow into dormancy until I get back and can resume hovering over it like a mother hen. I want to believe that it is just too young to be productive, after all he's only on day 17 of life. I like to remember that I am dealing with a living thing here, and just like my Boy-O, he's not going to do what I ask him to until he's good and ready - or is explained to that good behavior is something that is going to be expected. But maybe good behavior does have something to do with 3 good squares a day, and plenty of "cot" time. Three squares and a cot. That's what I'll try and remember as I feed for a few more weeks before trying to bake bread again...

The Lahey Project: Irish Brown Bread (and the Giveaway Winner!)

This morning, I assigned numbers to all of the commenters who desired to win the Blazing Hot Candied Jalapenos, and according to the Random Number Generator, the lucky winner was Neil F.! I met Neil at a dinner a few weeks ago at La Merenda in support of the Eat Local Milwaukee restaurant challenge. He is also an intern at Wellspring Farms, and blogs about his experiences at stream of consciousness, so hop over and check it out!

This giveaway had 18 entrants, which is vastly more than my first giveaway, and I'm very excited to see if these peppers are hot enough for Neil! I'm going to to prematurely say: yes they are!, after sampling the first of my newly canned batch last night.


I must confess that I'm really not a party girl. I enjoy get-togethers, but not feeling awkward and stranger-in-a-strange-landish. I don't attend many parties, preferring to have just one or two people over for dinner now and then. That works pretty well for me, and for my house which is on the smallish side.

I also have never thrown myself a party, which I kind of did last night, when I invited 8 friends to my house for a "Small Ferments Get-Together". We enjoyed an evening of sampling different kitchen experiments: Mr. Mork's Toungesplitter Ale (renamed The Bernadette Peters), Kir and "fermented" chocolate covered cherries (and kombucha) from Peef and Lo at Burp!, and of course an array of lacto-fermented veg and bread. (A particular highlight is that my Husband actually tried Kombucha for the first time! I was shocked! And, he didn't even hate it!)

I used the excuse of company to knock out another of my Lahey Project breads: the Irish Brown Bread. The recipe is actually exactly the same as the Pane Integral bread, but instead of including water, the liquids are Guinness and buttermilk (in my case, homemade whole milk buttermilk). The result was a tangy bread with a tighter crumb than the other breads in his book, and a peculiar rye flavor even though there was not even a trace of rye flour in it.


I must admit, it wasn't my favorite of the Lahey breads I've tried so far, but Peef was on to something when he suggested a grilled sandwich made with some kind of ruben-ish ingredients! I have only 1 piece of that bread left, so I may need an excuse to make it again to try that. I also think it is largely a matter of personal preference, since a few of my guests really loved it.


I feel like I stand on the cusp of bread season. All summer, I make bread here and there, but seldom get hungry for it until the coolness of September and October hit. Nearly two weeks ago, I embarked on a new bread project, a sourdough grown from wild yeast as suggested by Nancy Silverton. If all goes as planned, I should be able to knock out the first of the loaves of Wisconsin Sourdough on Monday - and a more detailed post will certainly follow.

No matter what, Lahey bread is still near and dear to me - a perfectly wonderful addition to any dinner or party, and a fairly labor-free endeavor as well. My rule of thumb is to mix up the dough(s) 24 hours before I plan to bake. I haven't had any trouble with that method yet, but still feel like I have volumes to learn about fermentation as it pertains to bread.

Stay tuned, since Nancy Silverton is probably the best guide on the subject for an obsessive type such as myself!

More on the Lacto-Fermenting Addiction.


I am a little perplexed as I begin this post. First off, try as I might, I just can not understand food chemistry. A product of small town America, where the sciences were not stressed (except in farming matters), I just did not pay well-enough attention in my little 3rd floor high school science class... and even if I did, I'm not sure that at the time I would have found it very interesting. It's too bad, since I read this description of lactic acid fermentation over and over again, even out loud, in hope that the chemical breakdowns would make sense to me. Though I'm painfully visual, even Alton Brown's comical yet scientifically accurate approach to educating viewers on the "why" and not just the "how" of cooking leaves me smiling but still bewildered.

Obviously, then, I'm no expert then to teach anyone about the "why" of lacto-fermented vegetables. I mean, I can read recipes and see why they would taste good, but can not make out why they won't spoil in many months of cold-storage after lactic fermentation has taken place. I can tell you that the health benefits, cost efficiency and certainly the flavor involved in such experimentations are all the reasons I need to be hooked! Throw in the minimal time effort, and you have the stuff obsessions are made of.

First off, it seems to me, that pretty much anything can be fermented. A clean, quart jar (glass, of course) serves as an airtight local for the vegetable to take up residence in, and salt is added to preserve the vegetable until the lacto-fermentation kicks in. So far, I've been roughly following recipes in Sally Fallon's Nourishing Traditions. A concise excerpt she has written explains a great deal about the process and multiple benefits of this live food process.

If you are vegan and do not use whey, most of her recipes involving vegetables up the salt content to preserve the vegetable. I am hoping a science-minded reader will let me know why it is that salt can stimulate the lacto-fermentation process without the inclusion of pro-biotic rich whey, since I can't seem to make any sense of that part!


The above photos are of Sally's kimchi recipe. So far, this is the only lacto-ferment recipe that I opened after 3 days at room temperature and the jar bubbled over with excitement onto my counter. Even after the lid was off for a couple of minutes, tiny bubbles were still making their way to the surface, evidence that this is a living food. It's packed with garlic and ginger, and tell-tale heat of hot red jalapeno, an addition I just had to make. It is gorgeously orange due to the shredded carrots, a jar that just plain looks like Fall to me.

After that project matured and went into the basement refrigerator for cold-storage, I made her spiced beets which were really only flavored with the seeds of a couple cardamom pods and salt:


The liquid level should come up to over the top of these...

I opened them yesterday to check on them, but as I'm reading more I realize that I should probably curb my curiosity to checking after the 3 day mark, since oxygen interferes with the fermentation process. I even read an article by someone who was considering using an airlock method for her lacto-ferment veg. Hmmmmm. I wonder if I can retro-fit one into a canning jar lid...

But by far, my favorite experiment so far is the "Tomato Pepper Relish" or salsa. I brought back some tomatoes from my last visit back to "the Farm", and I intended to can salsa with all of them. I did can 7 pints of hot wax pepper salsa (a recipe adapted from The Complete Chile Pepper Book), that has a vinegary base and great flavor. But then I did save out enough peeled and chopped tomatoes to get a couple of different jars of this lacto-ferment salsa:


Unlike it's canned brother, it is vibrantly dark red and packed with a whole bunch of cilantro. The flavors are so fresh and explosive since it doesn't cook at all - it just hangs out on the counter for 3 days and then goes to sleep in the fridge. I used lime juice in my second jar, and did not use any water in either of her salsa type recipes. I had quite a bit of liquid from the tomatoes, and my vegetables were fully submerged, so I omitted it. The recipe below is Sally Fallon's, and I noted any changes. For my second jar, I added the juice of one lime.

Lacto-Fermented Salsa (Sally Fallon, Nourishing Traditions)
makes 1 quart
  • 4 ripe tomatoes, peeled, seeded and chopped
  • 1 bunch green onions, chopped
  • 1 green pepper, seeded and chopped
  • 1-2 jalapenos, seeded and chopped
  • 1 bunch cilantro, chopped
  • 2 cloves of garlic, mashed
  • 1/4 c. whey
  • 1 T. sea salt
  • 1/2 filtered water (I omitted)
Mix all vegetables in a bowl, and pound lightly with a wooden spoon. Place in a quart size wide mouth mason jar, and press down until liquid completely covers the tomato mixture. Leave at least 1 inch headspace in the jar. Cover tightly, and keep at room temperature (70-75 degrees) for about 2 days before transferring to cold storage (about 40 degrees).

As I quoted Fallon in my first lacto-fermentation experimentation post, your nose is your guide to how long these jars will be good in cold storage. I think several months is a given, but the few jars I've made will likely be fully consumed long before that. I hope to make time to get several more jars packed away with the last of Summer's wealth of fresh and local vegetables, and let them hang out for a while before eating them. I will say that it does take some re-tweaking of my brainwaves to remember that this food preservation method pre-dates any home-canning method and is a viable home-preservation method. I love this quote from Sandor Ellix Katz in his book Wild Fermentation, and find myself using it more all the time: "Cleanliness, not sterility". If you keep a clean home and a modicum of common sense, lacto-fermentation is probably the easiest form of home preservation you could experiment with!

One extra benefit is that you don't need to understand the science to know that it works, and that the results are delicious - good thing for me!

A Vegan Return: Chocolate Mint Cookies (and A Giveaway!)


So, I ran into Lindy yesterday at the library. Boy-O and I stopped there as we were walking back from school. It's funny, how a 2 1/2 hour difference in my day's "schedule" (or really, lack thereof) has really thrown us all for a spin. Suddenly, I'm only able to sleep for about 6 hours a day, since my body can't go to bed early, yet insists on waking up at exactly 6:15 a.m - a good hour before it actually is now "required" to be awake.

I haven't seen Lindy since January - an amount of time that seems impossibly passed but was thoroughly confirmed by the growth of her baby, who was born on Christmas Eve last year. I actually first met her at the Library playground about 2 years ago, where she asked me if I ever went to the story time for the kids. It so happened, that I started going regularly - and I used to see her fairly regularly as well. We liked to chat about foodstuffs and I eventually told her about my blog... and then soon after, I had my first reader giveaway.

Ever since, I've been a little leary of having another giveaway. My online popularity may have grown a tiny little bit since those earlier days, but my first giveaway was truly kind of funny. I had made a jelly out of POM pomegranate juice that I received to experiment with, and I was certain that commenters would come out of the woodwork to be gifted a jar. My ego was knocked right into place when my ever-popular self witnessed exactly 2 people threw their hats into the ring... and one was my best friend, Sasa. But, Lindy won, and I was happy that she did, and that she liked my POM Jelly, and that we have continued to chat about foodstuffs when I run into her at random.

Yesterday, she asked if I was still going to do my Vegan Monday postings. While I do like to have purpose and focus to my kitchen experimenting, I've just felt so busy lately that I hate committing to anything! Most of it is self-created work, but I think that with the newness of school, the coolness of early Autumn, and that year older I suddenly got, time is making me feel exceptionally harried. That said, her little comment yesterday made me pause to think when I turned on the oven in the afternoon to make some cookies... while I was at it, I figured I may as well make them vegan.

Vegan baking in particular always brings a smile to my face. I somehow feel positively guiltless, which is a perfectly wonderful thing to be when dealing in dessert.

I'm newly experimenting with both coconut oil and raw sugar, so I figured both would be happy partners in some chocolate mint cookies. I was right, since the raw sugar leaves addicting crunch in those deeply chocolate bites. If you are looking for a baked good that you could mail across country, these are not your variety. They are fragile and a bit crumbly, and they also cause a fair amount of paranoia, since you will find yourself glancing over your shoulder to see if anyone could be offended that you are literally shoveling bite sized chocolate cookies into your mouth.

I'm fairly sure the leftover half-bag of mint chocolate chips I had were vegan (I couldn't quite see all of the ingredient list since I had cut the bag open), but you could easily substitute any other vegan chips you like. I also technically made half a batch, since I only had about 5 oz. of chips left. My yield was 22 cookies, but you could easily double this recipe.

Vegan Chocolate Mint Cookies (adapted from the back of the Hershey's Mint Chocolate Chip package)
  • 1/3 c. coconut oil (not melted, but room temperature)
  • scant 1/2 c. raw sugar
  • 1 flax egg (1 T. flax meal mixed with 3 T. water)
  • 1/2 c. flour
  • 1/4 c. cocoa powder
  • 1/4 t. baking soda
  • pinch of salt
  • 5 oz. mint chocolate chips
Preheat oven to 350.

Beat the coconut oil with sugar until well blended, then blend in flax egg until well combined.

Sift together flour, cocoa, baking soda and salt and mix into wet ingredients. If the mixture is too dry, add a tablespoon or so of water to help it hold together. Stir in mint chips.

Form into disc shaped cookies, (about 1 1/2 T. per cookie), and bake for 8-10 minutes. Let cookies cool completely on sheet before removing them for storage. Or better yet, eat them whilst they are still hot, perhaps with a scoop of rice dream ice cream...


Seeing Lindy yesterday also reminded me that in the spirit of sharing, of Autumn and extremely hot jalapeno peppers, I did want to try my hand at another CakeWalk giveaway. This time, I will not be disappointed if I don't get many commenters, since if you comment to win this pint jar of Candied Jalapeno Peppers, you had better absolutely *LOVE* hot foods. When I was visiting my Parents last weekend, my Mom and I talked briefly with an Amish woman who mentioned that the more overgrown the peppers are, the hotter they are. "Oh, really?", I said. That would explain why I have the hottest candied jalapeno peppers on earth! It's not going to stop me from eating them, however, even if it means that I have to use up most of them in cooking. (Like my Mom said, most Mexican food can stand up to a little sweetness.)

Since technically this is a vegan post, I should also mention that it seems the jury is out on whether or not sugar is vegan. The brand of raw sugar I use is Golden Barrel, and I did not see it listed in the products on their website. I bought it at the Amish Bulk Store, in the middle of the country, Southwestern Wisconsin. So, if you are vegan, but not too picky, I encourage you to try and win these hot babies! They will no doubt put an extra kick in whatever you are up to, vegan or not.

I will choose a winner using the Random Number Generator on September 18th, so please leave a comment before midnight on Friday, September 17th 2010 to win your very own jar of supremely hot Candied Jalapenos! You can check back at my recent jalapeno post to see just how they were made, and also find the recipe should you want to make some yourself. I'd like to also include a batch of Vegan Chocolate Mint Cookies, but I know they'd never make it to you. Besides, I'd probably eat them all before I had time to box them up...

Good Luck!