Sourdough Pancake Experiment

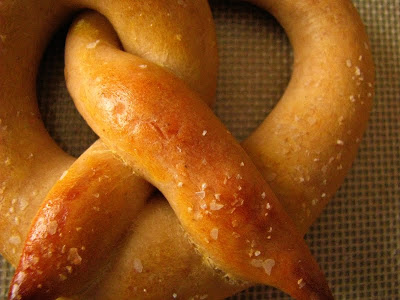
Because I was so excited with the success of my pretzels the other day, and because I'm certain that my sourdough starter is starting to have the good behavior of a properly maturing adolescent starter, I had to try making another quickbread. Though lately I was passionately in love with the waffle, pancakes are really where it's at for this Midwestern lass. So, branching gingerly out, I chose a sourdough pancake with a long rise - indeed you can leave it up to 24 hours if you wish - and couldn't be more pleased with the result!


I received an encouraging email back from the bakers at King Arthur Flour yesterday. I contacted them wondering if they had any tips for the sourdough starter I've been working on. I am a devoted KAF flour user, and even though I don't typically splurge on their organic flours, I use their AP flour, bread flour and whole wheat flours exclusively. I get my specialty flours from the Outpost bulk bins, since I can get them in small amounts and they are always fresh.

According to a recent catalogue article I read, King Arthur does purchase wheat solely from US farmers who also have good sustainability practices in place. Aside from being the oldest flour company (1790!), they also have demanding standards which ensure that even from crop to crop and year to year, their flours are consistent in composition. I love that they are an enormous company, yet answer every individual question - and have painstaking amazing recipes. I was so happy to hear from Frank, who assured me that sourdoughs are unique to their environments, and that mine probably just needs a bit of rye flour here and there to thrive and do his best.

For about a week now, I've been feeding my starter with one feeding of rye every 4 or 5 feedings (I feed twice a day), depending on if it starts looking sluggish or not. I can't believe how it grows between feedings now, and is deflated when I stir it. I also can't believe how light it makes baked goods.

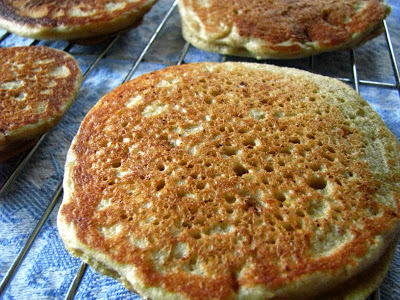
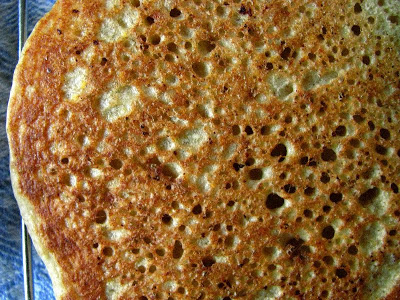
These pancakes are entirely whole grain, yet they were extremely light. I usually eat 2 (4 inch) pancakes when I make them using AP flour, but ate 4 of these without even blinking. The Boy-O had me beat, he ate 5 for breakfast this morning, and I actually had to tell him that he couldn't eat any more. I also think they were so delicious since I fried them in a cast iron skillet brushed with ghee. I made ghee yesterday for the first time, and am hooked. It's slightly nutty flavor was so great, especially baked onto the outside of a healthy pancake!


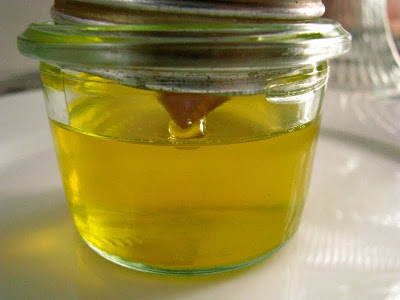
I finally found that straining the ghee after 10 minutes of rest through a coffee filter was the best way to strain it...

I found the original recipe for sourdough pancakes at The Nourishing Gourmet. Kimi Harris has a great site, full of great recipes for whole foods, and quite a lot of information on healthy eating. I cut her recipe in half, and even at that, had 8 leftover pancakes. I'm sure they will toast up well tomorrow. I also think these would be excellent as little blini pancakes, topped with caviar or smoked salmon and creme fraiche even cream cheese topped with slices of cucumber, radish and dill. They are pretty amazing just plain with maple syrup, too.


Mix up the starter portion at least 3-4 hours before you want to eat pancakes, or really anywhere between 3-24 hours. I started mine last night before bed, and it was ready to go by 7 this morning, even in a pretty chilly kitchen, since I forgot to close the window last night...

Sourdough Pancakes (adapted from Kimi Harris, The Nourishing Gourmet)
makes 18-20 4 inch pancakes

For the starter:
  • 1/2 c. starter
  • 1 c. water
  • 1 3/4 c. multi grain flour (I used 1/2 c. whole wheat, 1/2 c. barley, 3/8 c. (6T.) cornmeal, and 3/8 c. rye flour)
To make the pancakes:
  • 2 eggs
  • 2 T. maple syrup
  • 2 T. olive oil
  • 1/2 t. baking soda
  • 1/2 t. salt
3-24 hours before you want pancakes, mix the ingredients for the starter in a large bowl. Make sure it's big enough to accommodate some rising action. When pancake making time comes, add the rest of the ingredients, and stir until just mixed. You can adjust the consistency of the batter if you like by adding a bit of water or milk.

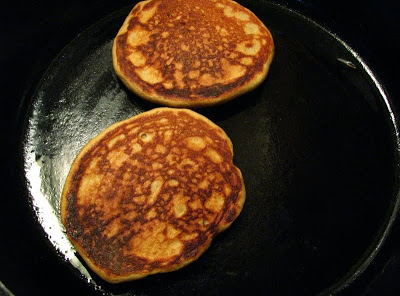
Fry in a hot pan, preferably cast iron, as you do with pancakes. Try not to eat them all at once.


Armed with new confidence in my starter, I think I'm going to keep feeding it as I have been for the past week: watching for sluggishness and fortifying with rye for about a month before starting to work on another bread. I think my starter needs to acclimate to me and my kitchen, and gain his own confidence in his rising capabilities. And I hate to say it, but I think that my next loaf of bread may come from a King Arthur Flour recipe and not one from Nancy Silverton. I hope she'll forgive me.

Sourdough Experiment: Pretzels (or In Which My Confidence Grows Exponentially)

Here it is: the first truly edible (Non-Waffle) thing I've made with my wild yeast starter.


I feel like I've been struggling in my kitchen lately. A full blown skirmish, if not an all out war. I have a family of picky eaters, except for myself, and then I had this new baby of a starter I was trying desperately to conjure up out of the wildness of Wisconsin. I was patient, feeding my struggling starter 3 times daily. After 2 weeks of fairly consistent results (bubbly starter culture with no rising capabilities), I decided to punctuate my white flour starter with rye.


Rye starter on the left, AP flour starter on the right.

Rye flour naturally contains more yeast than white, so I figured it couldn't hurt. But since I didn't want to lose any of my stalwart white starter progress, I portioned the white starter into two one morning, and then began feeding half of it 50 grams each of rye flour and water at every feeding. I also knocked back my feeding to twice daily, since I am usually always home between 7 and 9 both a.m. and p.m. (Every morning, I begin anew with 100 grams of starter, leaving plenty of excess to make delicious waffles with!) Within two days of my new schedule, rye starter (left above - makes THE best waffles, by the way) was more than doubling between feedings. When I stirred it, it actually deflated - signs that it isn't just my wishful thinking, it is indeed up to the task of reproducing! So straight away yesterday morning, I began my first experiment: sourdough pretzels.

The dough is impossibly dry by design. My KitchenAid actually had a hard time keeping up - but since I followed Nancy Silverton's direction, I let it knead only until it hit the proper temperature: 75-76 degrees f. On my Professional 600 model, that was about 3 minutes.


This dough is actually very similar to bagel dough. While Silverton states that you could actually knead it by hand, I don't know if it would be so advisable. I actually felt like I was doing aerobic exercise just rolling out my "snakes" of dough to about 20 inches. The elasticity of the dough scared me, and in spite of my intrepidity with my starter, I wasn't even sure that my project was going to work despite it's handsome first appearance:


Like the bagels, these pretzels hang out in the refrigerator for 18-24 hours prior to actual baking. Plenty of time for me to obsess over whether or not my pretzels were going to be worthy of my expectations of them. Nancy has high expectations... I love that she is so specific in her pretzel love, that she needs fat and thin parts to prevent boredom. She includes direction about making a "belly" 3 inches in the center of the snakes when you roll them, so that there are noticeable fat and thin parts. She also dips them in lye, an experiment that I opted to leave for another time. I could just see myself at Walgreen's asking for food grade lye... they'd probably make me sign a waver.

Brushing the tops with egg wash was just fine for me. I sprinkled with Kosher salt, and slid them into the oven immediately, as directed, so that it wouldn't melt. It stayed pleasantly crunchy, and the pretzels themselves are chewy yet cake-like and certainly reminiscent of the sourness of the starter.

These are infinitely better than mall-staple pretzels (that I only know the taste of since my Husband has to eat them whenever the rare occasion that we actually frequent a Mall...). The Boy-O ate a whole one after school, too - and immediately wanted a second. So, happily, they have the picky eater seal of approval even at room temperature.


Sourdough Pretzels (adapted from Nancy Silverton)
  • 6 oz. (about 1/4 c.) cool water - 70 degrees f.
  • 9 oz. (about 1 c.) starter (I used half rye starter and half white)
  • 1 lb. 4 oz. (about 5 c.) AP flour
  • 1 T. barley malt syrup (don't omit this)
  • 2 teaspoons sea salt
Place all the above ingredients in a stand mixer fitted with a dough hook. Mix on low speed for 1-2 minutes to combine. Turn up mixer to medium, and mix until the dough is smooth, elastic and firm, and reaches the 75-76 degree mark on an instant read thermometer.

Turn the dough out onto an unfloured work surface, and cut dough to divide it into 3 oz. portions. (Nancy's recipe states it yields 18, but I got exactly 12 3 oz. pretzels.) Tuck the ends of the dough under (form rough balls), cover with a cloth and let rest for 45 minutes.

Working with one piece of dough at a time and keeping the rest covered, roll a snake (or a rope if you prefer) about 10 inches long. (I'm going to quote Nancy here, since she is succinct: "Avoid using flour. If there is not enough friction between the dough and the work surface, spritz the work surface lightly with water from a spray bottle. As the rope begins to stretch, uncross your hands and continue rolling with light, even pressure, moving your hands slowly to the ends of the rope without tapering the ends. leaving a center belly 3 inches long, place the palms of your hands on each side of the belly, and roll and stretch again to elongate the cylinder to about 20 inches. Lay your hands on top of each end and taper the ends by alternately rolling each one toward and away from you (think of the arm motions of a cross-country skier).")

Form into pretzel shape, leaving a 1/4 inch overhang with the tapered tails. Transfer to a parchment lined baking sheet, cover with a cloth, and let sit at room temp " just until they show signs of movement", about 1 hour.

Place each baking sheet into a plastic trash can liner and refrigerate for 12-24 hours.

One hour before baking, preheat oven to 400 degrees. Remove the trays of pretzels from the fridge, and brush with an egg yolk mixed with a splash of water. Sprinkle them with salt, and immediately transfer to oven. Bake 20-25 (or a little longer) until they are a deep golden brown, rotating the sheets if necessary. (I suspect the mahogany brown she calls for comes from the lye dip prior to baking.)


These pretzels are not for those who prefer not to chew. They have resistance and good flavor; they would be equally good with cream cheese and honey or cinnamon or with cheese or mustard.

Meanwhile, my excitement is limited, since I'm intrepid to begin another loaf of bread - one that relies on the lifting power of natural yeast and not on dense chewiness to satisfy me. I feel like I have gained some confidence, and I do have some emails in to King Arthur Flour and another Chef source to see if I can glean any one-on-one knowledge.

Sometimes the Internet is overwhelming. Sometimes people on the Internet say or state things that aren't quite the truth, or better, want you to pay to get information from them. Not that I'm calling sourdough cultivators thieves or anything, lest you think I have become embittered of the Brave New World of Internet relationships... But sometimes, I wish the World Book encyclopedia salesman would still be hawking door to door, and that outside of my library, I'd need to go talk to a baker somewhere to get the answers I need to be content. Outside of attending a Baking and Patisserie school, which I don't feel is in the cards for me right now, I'm not sure what else to do. If you have ever grown, baked or obsessed about a sourdough culture, and feel like talking about your experiences, please let me know!

Adventures in Cup Tasting...

Yesterday, I tried my best when I competed in the inaugural City Wide Cup Taster's event held by Alterra. The object of the contest was simple: of each trio of brewed coffee, the contestant chooses the cup that is not like the others. The face off was made a bit more challenging by competing head to head with another taster, tasting 4 sets (of 3 cups each), and doing it accurately while being timed. Though a 5 minute cap was given, most tasters were able to nail down their choices within 2 to 3, with some snappy tongues nailing them all spot on in under a minute.


Alterra Prospect's new patio

The coffees were also brewed meticulously to the same strength, and the same coffees were used in all of the brackets. Then, all 24 tasting cups per set of contestants were wheeled to the tasting area, given time to cool a bit and sucked up (noisily, or not) by the competitors.

I didn't really know what to expect when trying to identify the odd cup, but I don't think I was expecting them to be as similar as they were. And, I didn't anticipate myself feeling quite as nervous as I was... like I knew I was about to fail a test that I had studied weeks for. I didn't actually do any preliminary studying so to speak, I just tried not to eat any wicked hot peppers on anything for a few days. (That's actually kinda hard to do.)

The staging area.

As I watched the left hand side of the brackets, the mostly Alterra employees seemed professional to me in their slurping styles: bent at the waist and hovering closely over the cups, tasting spoons in hand. I did expect them all to pretty much nail every set, but some did and some did not. It was explained that the differences in coffee are easier to taste as the liquid reaches body temperature - which I did find to be true personally. I won my first bracket, but perhaps because the coffee was easier to taste due to a cooler temperature on my next round, I felt like I tasted them faster and more confidently, and then was promptly eliminated.


I didn't feel too bad, since I did have a great time and was finally able to put a name on so many familiar Alterran faces that I've seen over the years. And, just before I took off, I got a stack of lightly used green coffee cups - since I was feeling kind of crafty. Occasionally, I have too much time on my hands and make recycled scenes out of coffee cups. Yep. Pretty labor intensive. Especially since I tend to be a perfectionist with this sort of thing. If you fancy having a recycled box of Alterra art for your very own, keep an eye on my flickr photostream, and when I complete my next one, I will be giving it away to a flickr commenter!


It was a Wonka-like Christmas, looking under the cups to see if that little red dot was under my choices, funny also that I could remember which cups I knew full well were frustrated guesses and which ones I believed heart and soul to be correct. That's the luck of the draw in cup tasting, especially under duress of the ticking clock. I sure hope I'll be able to do it again sometime.


Cup Taster's Championship Milwaukee!


As a solid devotee of Alterra coffee for some 10 years, I am more than excited that I will be able to participate in the first ever Cup Taster's event on Thursday! As I understand it, this is the first time that this event has been open to the public, a contest to identify the odd cup of coffee in each series of 3 cups served. I have never been a "taster" in any event to date, save perhaps wine pairings in my own eating out for pleasure, so I'm curious to see where my palate racks up compared to other novice tasters. Of course, there will be plenty of pressure involved with professional Alterra tasters on hand as well - but I believe that we novices will taste separately from the Alterra professionals.

There are still a few open spots for anyone interested in participating, just send an email to scott@alterracoffee.com as soon as you are able. It will likely be an afternoon and evening full of entertainment, since the event is coinciding with a Milwaukee Film Festival party -Alterra is one of the sponsors of this year's festival.

So even if you don't feel up to the challenge of tasting, (and you aren't already attending the Banned: Books, Bites & Libations event at the Great Lakes Distillery), head over to the Prospect Avenue location on Thursday and observe the tasting. I stopped in to the newly renovated space last week, and, as always, the design of the new building is stunning. Huge cafe areas with community and private tables, beautiful natural light from huge skylights, and a spacious patio area that I'm assuming is at least 3 season worthy. (A few pics of the new cafe renovation can be found on meanlittleseed's flickr photostream...)

I can't wait to see how well I'm able to taste under pressure... Hope to see you there!

Daring Baker Challenge September 2010: Sugar Cookies.

The September 2010 Daring Bakers’ challenge was hosted by Mandy of “What the Fruitcake?!” Mandy challenged everyone to make Decorated Sugar Cookies based on recipes from Peggy Porschen and The Joy of Baking.

I guess to be honest, I wasn't overly excited about making sugar cookies for this month's challenge. And also, to be honest, I've never made properly thick and decorated ones. Never having made something is one of the best reasons to become a Daring Baker, but I still wasn't excited. For our challenge, we were to make cookies using Peggy Porschen's recipe and to decorate them with Royal Icing in the theme of "September".

September. I kind of consider the whole month my birthday, and my son started school, and the great Midwestern humidity usually subsides, breathing into us the idea of Fall. What theme could I choose? Pencils or apples for school? A birthday cake or candle? Pretty little Autumn leaves in shades of orange and yellow? Well, I guess it's time to confess I only truly completed half of my challenge this month.


Since my little Boy-O is completely fascinated by sea life right now, we went to the local restaurant supply last Thursday and looked hopefully for a whale cookie cutter. There were no whales, or sharks, or any other sea creature. There was a little train, so that is what he picked. I imagined that I could maybe eliminate use of food coloring by just piping white accents on them, because ever since I read this article, I can not bring myself to knowingly purchase or make anything with artificial color. It actually makes me mad that so many things have fake color, and also that I have a tiny little 4 color box in my pantry for emergency egg colorant needs.

I originally thought that if we found a whale, I could tint the icing the palest shade of blue imaginable, and use an inedible dried black bean for an eye... but since we got a train, I didn't know what I would end up with.


This sugar cookie dough recipe is the last one you will ever need. It is simple to work with because it is so soft. Instead of chilling the dough and then trying to roll, it is rolled out to almost a half inch (!) thickness and then chilled. No refrigerator hard butter to try and subdue into a workable sheet of dough. Since it was soft, I used the flat edge of my chef's knife to 'knock' in into a square and then eased it into the thickest sugar cookie I've ever made. My family traditionally has sugar cookies at Christmas and Valentine's Day, and my Mom always rolled them on the thin side. When I've made them myself, I've rolled them impossibly thin as well, so much so that they tend to brown unevenly, yet be delightfully crisp.

I rolled mine so thick that they bordered on shortbread. I was happy that we chose such a small cookie cutter, since they are so rich, but I'm happy I made them so formidable. I still had no idea, even as they baked, what I was going to do to decorate them. I was remembering the painstakingly painted sugar cookies I saw at Dean & Deluca the first time E and I went to New York. They were $10 a piece. I remember thinking as I stared at a mountain of cookies in every conceivable color that someone would likely come in and purchase a dozen. They were impressive, and obviously left an imprint on my mind - a vision that I still have no real desire to attack personally.

As I began pulling the cookies out of the oven, a strange thing happened. The trains turned into something else. For the life of me, I could only see Pachucos. My mind raced to see how in the world I could come up with natural black food colorant so I could ink in fedoras and faint mustaches, suit coats and white ties.


There he is: El Pachuco

Then I realized, that I do have a theme, and it is school related. In college, I was fortunate to have one really great drawing teacher. I'm not so into drawing really, but as it turns out, I have a gift for talking my way into being a good artist of sorts. I found that at our critique sessions that followed each assignment, I could wiggle my way into having a passable piece of art, and it's funny that I ended up liking whatever it was that I concocted a whole lot more after the fact. I had no idea what I was going to say going in to it, but I was able to defend myself and my work with tenacious, lawyer like prowess.

So, peering over my cooling cookies, my head filling up with drawings of zoot suits and baggy trousers, I figured that in my own way, I did accomplish my Daring Baker Challenge - even without putting icing on the cookie. These cookies last without frosting for a good 30 days, and I have a fridge with 3 kinds of leftover frostings and a good amount of Dorie Greenspan's chocolate pastry cream. Dorie's pastry cream on top of these cookies is probably the most decadent and butter/egg laden thing you could consume, but it would also be one of the most opulent cookies ever to make the journey down to your belly. Fully worthy in my book of $10 each, even if not beautiful drawn upon.

I realized this month that I wish I could have a bakeshop where I could draw pachucos on cookies for hours at a time if I felt like it. Maybe I wouldn't feel guilty about colarants and I could make them any color I wanted. I ask you, where have you ever seen a lucha libre pachuco cookie? And, one that tastes as good as this one did? I can promise you if CakeWalk ever opens it's doors, this cookie will be on the shelves:


This dough would be easily adaptable to many flavor variations. Since it was my first time with it, I stayed the normal, vanilla extract route. When I make them again I'm looking forward to playing around, lime zest comes immediately to mind. The baking time does vary depending on the thickness and shape of your cookie, and also the pan. I baked some on a perforated pizza pan, and they were done much quicker than the ones baked on a regular sheet pan. You can also decide to bake them soft or a little on the crispy side.

This recipe was also dead on in the weight measurements. I measured by standard means, and for fun checked the grams and ounces. It was on in every instance.

Basic Sugar Cookies: (The Daring Kitchen, via Mandy Mortimer and Peggy Porschen)
Makes Approximately 36x 10cm / 4" Cookies

  • 200g / 7oz / ½ cup + 6 Tbsp Unsalted Butter, at room temperature
  • 400g / 14oz / 3 cups + 3 Tbsp All Purpose / Plain Flour
  • 200g / 7oz / 1 cup Caster Sugar / Superfine Sugar (I spun my regular sugar in a coffee grinder/spice mill)
  • 1 Large Egg, lightly beaten
  • 5ml / 1 tsp Vanilla Extract / Or seeds from 1 vanilla bean

Cream together the butter, sugar and any flavorings you’re using. Beat until just becoming creamy in texture. (Tip: Don’t over mix otherwise you’ll incorporate too much air and the cookies will spread during baking, losing their shape.) (I mixed it on the lowest setting of my stand mixer using the paddle attachment.)

Beat in the egg until well combined, make sure to scrape down the sides of the bowl.

Add the sifted flour and mix on low until a non sticky dough forms.

Knead into a ball and divide into 2 or 3 pieces.

Roll out each portion between parchment paper to a thickness of about 5mm/1/5 inch (0.2 inch)

Refrigerate for a minimum of 30 minutes. (I left mine at least an hour or more.) (Tip: Recipes commonly just wrap the whole ball of dough in cling wrap and then refrigerate it for an hour or overnight, but by rolling the dough between parchment, this shortens the chilling time and then it’s also been rolled out while still soft making it easier and quicker.)

Once chilled, peel off parchment and place dough on a lightly floured surface. (I just left in on the parchment that I rolled it out on and rolled it out between two sheets of parchment. Then, I recycled the parchment by using it on the baking sheets...)

Cut out shapes with cookie cutters or a sharp knife.

Arrange shapes on parchment lined baking sheets and refrigerate for another 30mins to an hour. (Tip: It’s very important you chill them again otherwise they’ll spread while baking.)

Re-roll scraps and follow the above process until all scraps are used up.

Preheat oven to 180°C (160°C Fan Assisted) / 350°F / Gas Mark 4.

Bake until golden around the edges, about 8-15mins depending on the size of the cookies. (Tip: Bake same sized cookies together otherwise mixing smaller with larger cookies could result in
some cookies being baked before others are done.
) (Tip: Rotate baking sheets half way through baking if your oven bakes unevenly.)

Leave to cool on cooling racks.

Once completely cooled, decorate as desired.

(Tip: If wrapped in tinfoil/cling wrap or kept in airtight containers in a cool place, un-decorated cookies can last up to a month.)

Since it is such a good combination, you must have the chocolate pastry cream recipe firmly at hand as well... It makes quite a lot, but you will eat it all, trust me.

Dorie's Chocolate Pastry Cream (Dorie Greenspan, Baking From My Home to Yours)

  • 2 c. whole milk
  • 4 large egg yolks
  • 6 T. sugar
  • 3 T. cornstarch
  • 1/4 t. salt
  • 7 oz. bittersweet chocolate, melted
  • 2 1/2 T. unsalted butter, cut into 5 pieces, at room temperature
Bring the milk to a boil.

Meanwhile, whisk the egg yolks with the sugar, cornstarch and salt in a large heavy bottomed saucepan. (I used my 5 1/5 qt. dutch oven, and I wasn't sorry I did.) Whisking without stopping, drizzle in about 1/4 c. hot milk - this tempers the yolks so they don't curdle. Still whisking, add the remainder of the milk in a stady stream. Put the pan over medium heat and, whisking vigorously, constantly and thoroughly (make sure to get the edges of the pan), bring the mixture to a boil. Keep at a boil, still whisking, for 1-2 minutes. Remove from the heat.

Whisk in the melted chocolate, and let stand for 5 minutes. Then whisk in the pieces of butter, stirring until they are are fully incorporated and the cream is smooth and silky. Press a piece of chocolate wrap on the surface of the cream, and refrigerate until chilled. (I like to transfer it to a clean bowl after all that mixing, and before putting it in the fridge.)

Dorie says that it lasts 3 days, but I think you can let it go a little longer. She used this particular cream as a cake filling, and also recommends it as a dip for madeleines or sables...


And so I make my case for icing-less sugar cookies. Dip them in what you like: coffee, tea, chocolate, or dare I say melted cheese... leftover frostings cluttering up your fridge. And when you go through the process of rolling and chilling and baking, maybe your cookie cutters will morph on you and something you haven't thought about in a long time will emerge, ready for story telling time.

A very big thank you to Mandy at What the Fruitcake? - and you must go and check out her site. She is amazing!!! Also remember to check in at the Daring Kitchen website to find links to other Daring Bakers and their takes on the humble sugar cookie.