Daring Baker Challenge February 2011: Panna Cotta, Wisconsin Style

The February 2011 Daring Bakers’ challenge was hosted by Mallory from A Sofa in the Kitchen. She chose to challenge everyone to make Panna Cotta from a Giada De Laurentiis recipe and Nestle Florentine Cookies.


I love Daring Baker Challenges. I think part of the reason I like them so much is the planning stages that can take the better part of a month, and then fortuitously change at the last second. The reveal date for our monthly challenge is always the 27th, and today I baked the final stage, another version of oatmeal cookies - but more on that in a bit.

Panna Cotta is essentially an Italian "milk jell-o". I have eaten all kinds of custard in my life, but can't say that I've ever eaten this eggless version. I didn't know what I was missing. When I began planning my approach, I thought I would make at least two different kinds of panna cotta, and complete the lacy florentine cookies earlier in the month. I couldn't see why you would want to eat a butter laden cookie with a milk and cream laden pudding, I guess... and my Husband isn't able to eat heavy milk desserts, but is somewhat fond of cookies.

As you may remember, earlier in February was when the sprouting grain bug really hit me. I immediately altered the Florentine recipe to include the sprouted spelt flour, and while I was at it, used brown rice syrup to replace the corn syrup. The thing I discovered about Florentines is that the amount of butter (a staggering 2/3 cup), and the state of the butter's coolness, directly affects the end cookie. Since the butter is melted and the other ingredients added, the first cookies I baked spread out into near impossible thinness. It could be because I also used rolled oats instead of quick oats. Sometimes, I wonder why I don't ever just follow instructions.


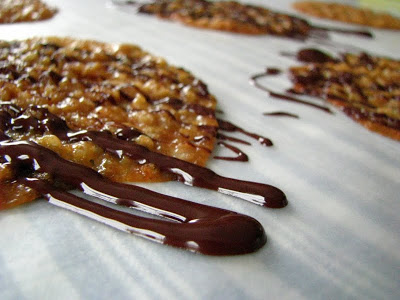
All of my alterations added up to an impressively thin cookie, somewhat chewy and toothsome, that crisped up when stored in the freezer. I froze the remainders intending to make ice cream: I have developed a habit of saving nearly all leftover DB Challenges to make ice creams, which isn't really a bad idea most of the time. I did use metric weights for these.

RCakeWalk's Florentine Cookies (heavily adapted from Nestle's via the Daring Kitchen)
  • 150 g. (2/3 cup) butter
  • 160 g. (2 cup) rolled oats
  • 95 g. (2/3 cup) sprouted spelt flour
  • 230 g. (1 cup) raw sugar
  • 60 ml. (1/4 c.) brown rice syrup
  • 60 ml. (1/4 c.) half and half
  • 1 t. vanilla
  • pinch of salt
Preheat oven to 375 degrees.

Melt butter in a medium saucepan, and remove from heat.

Measure oats, sugar, flour, brown rice syrup, milk, vanilla, and salt into a medium sized mixing bowl, and pour the melted butter over. Mix well.

Drop a tablespoon of batter, onto parchment lined baking sheet. Leave plenty of room between cookies (I got about 5 on a sheet pan). The first batches I scooped out were very "liquidy". As the butter hardens a bit, the cookies seem to spread out less, and you can gently flatten the balls of batter with a spatula or your fingers.

Bake for 8-10 minutes, until the edges look somewhat firm and even a little caramelized. The baking time varies with the dough temperature, so just keep an eye on them. Let them rest on the baking sheets for at least several minutes to let the cookies set. I like to carefully move the parchment (with the cookies on it) carefully to a cold, empty baking sheet to speed cooling.

When cookies are fully cool, you can drizzle with melted chocolate, or sandwich two cookies together with melted chocolate. (250 g. or 1 1/2 c. chopped chocolate will be more than enough for the whole batch.)

Store between layers of waxed or parchment paper, in a covered container at room temperature - or in the freezer.


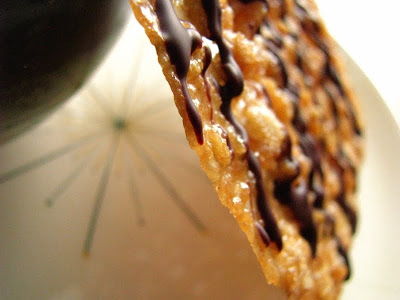
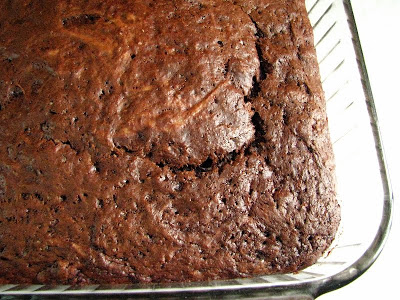
The Florentine cookies were good, but on their own, they kind of left me wanting. I guess when I think of cookies, I want something that has a little more bite to it, something less "dainty". I really think they will be nice in ice cream, where they will add a bit of character and crunch to plain vanilla.

When I turned my attention to the panna cotta portion of the challenge, one of my favorite food idea people was there to help me: Lo. One of the things I appreciate most about bouncing ideas off of Lo is her impeccable palate. Of all the people I've met, I will give her the best taster award. She is just the one I want in my corner to ask what something needs, when I taste it myself and can't figure it out. While we had a nice email exchange about flavor possibilities (including goat cheese, as a possible savory option), I settled in on making Rishi Tea's Cinnamon Plum Panna Cotta. Peef and Lo had recently made a Cinnamon Plum Ice Cream that they loved...


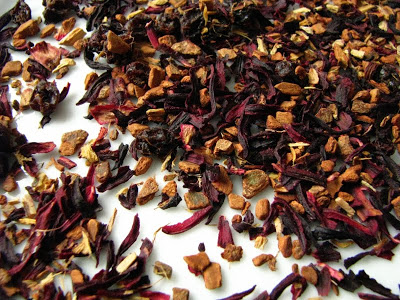
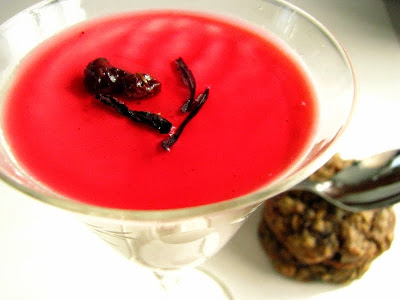
Rishi's Cinnamon Plum tea is really a thing of beauty. Many times, I've tried herbal teas that were overpoweringly floral or artificial tasting. This one is so well crafted that no one flavor overwhelms the others, and it is as pretty to look at as it is to taste. Their panna cotta is made by first steeping the tea in the cream to infuse the flavors. I didn't expect it to be as subtle as it was, but it was perfect! The faintest lavender color, and not at all too sweet. In contrast to the Florentine cookies, I followed the instructions exactly. Except when it came to discarding the used tea.


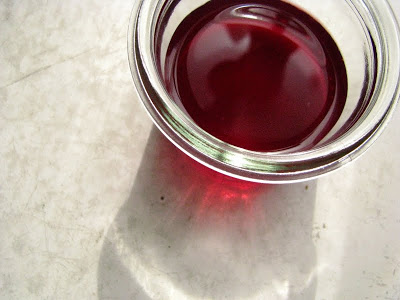
Cinnamon Plum Tea "Simple Syrup" will be used for more than panna cotta in the future.

Rishi Cinnamon Plum Panna Cotta (Rishi Tea)
  • 2 cups heavy cream
  • 2 cups whole milk
  • 1/2 cup sugar
  • 4 T. Rishi Organic Cinnamon Plum Tea
  • 3 T. cold water
  • 1 envelope Knox Unflavored Gelatine
In a large saucepan over medium heat, warm the cream, milk and sugar, stirring to dissolve sugar. Bring mixture just to a simmer, but do not let it boil. Remove from heat. Add tea, stir and cover. Steep for 10 minutes.

Meanwhile, in a medium bowl (4 quart size), add the cold water and sprinkle the gelatin evenly over the top. Let stand for 5 to 10 minutes.

Pour the infused cream mixture through a fine sieve, pushing on the tea with the back of a spoon to extract all of the cream. (This is where I did not discard the tea!) Return the cream to the pan and re-warm.

Pour the warm tea over the gelatin in the bowl. Stir well until gelatin has completely dissolved.

Divide the panna cotta mixture evenly among 8 teacups, small bowls, or ramekins. Cool to room temperature, cover each cup with plastic wrap, and chill until set (about 2 hours).

While panna cotta is chilling, make the syrup. In a small bowl combine the following:
  • 2 T. Rishi Organic Cinnamon Plum
  • 4 t. sugar
  • 2 T. hot water
Stir until sugar dissolves. Let steep for 5 minutes and strain syrup, discarding tea (I used this Discarded tea to make a pot of tea for me to drink while writing this...). Cover and chill until ready to serve.

To serve (according to Rishi):
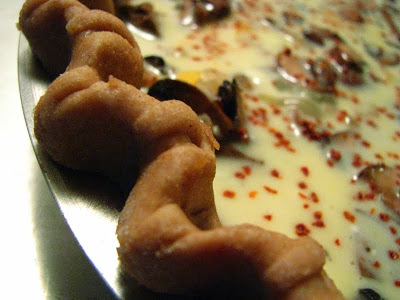
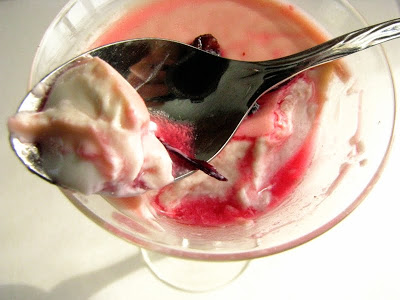
Garnish each panna cotta with 2 or 3 pistachios, 2 or 3 dried currents, a drizzle of the syrup and a tiny dash or two of ground cinnamon.


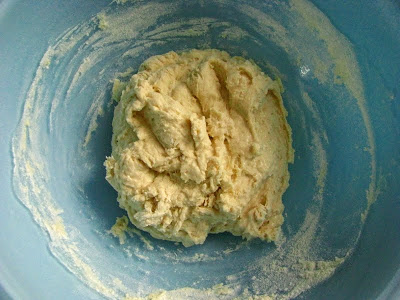
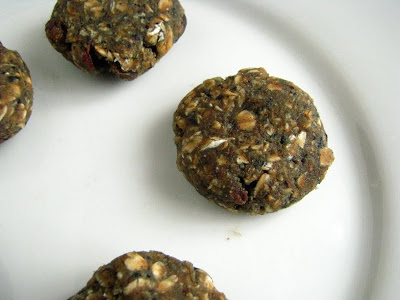
I was supposed to toss the cream infused tea, but just could not. After munching on a few of the plumped up currants, and insisting Sasa do the same, she said "Don't toss it, Rebecca. It smells like Oatmeal Cookies." To which I responded: "Oatmeal Cookies! I was supposed to serve the panna cotta with oatmeal Florentines!" I figured there was no excuse to waste that amazing "used" tea, and got out the Vita-Mix.

I ground the leftover tea into a "tea flour" with 1/2 c. rolled oats and a tablespoon or so of wheat flour. It smelled exactly as an oatmeal cookie should, like home, healthfulness, and a warm, line-dried blanket.


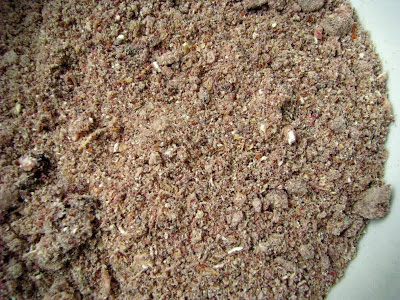
Since the tea was soaked and softened a bit, I would imagine that it could be ground in a food pro or regular blender. It's worth trying. I'm imagining that tea flour could be substituted for a portion of the flour in a whole host of favorite recipes.

(Cinnamon Plum Tea) Oatmeal Cookies

makes about 2 dozen
  • 1/2 c. butter, room temperature soft
  • 1 egg
  • 1 t. vanilla
  • leftover Cinnamon Plum tea from Panna Cotta recipe blended with 1/2 c. oatmeal and about 2 T. wheat flour (about 3/4 c. total)
  • 1/2 t. baking soda
  • pinch of salt
  • 1 1/2 c. rolled oats
  • 1/2 c. whole wheat flour
  • 3/4 c. raisins
  • (could add a touch more cinnamon if you like really cinnamon-y cookies)
Cream butter, sugar, egg and vanilla together until lightened.

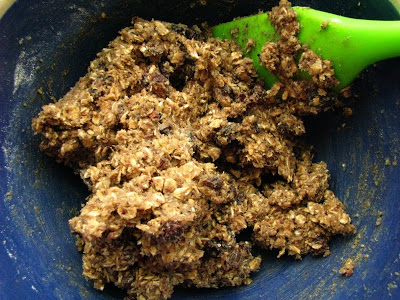
In a separate bowl, combine "tea flour", baking soda, salt, rolled oats and flour and stir to combine well.

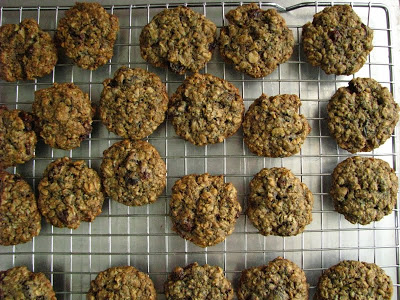
Add to butter mixture and mix well, then add raisins and mix well again. (The batter will be stiff.) Refrigerate dough until cold (I left mine chill overnight).

Preheat oven to 350 degrees.

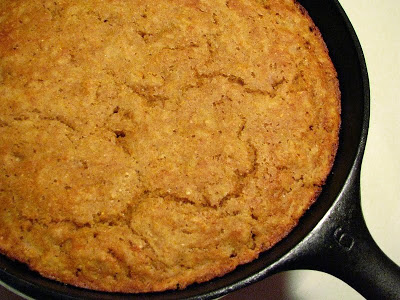
Roll balls of cookie dough about 1 1/2 T. big, and flatten gently between your palms. They don't spread too much, so you can place them about 1 1/2 inches apart on the baking sheets. Bake 10-12 minutes, until they look brown around the edges and somewhat set in the middle. Cool on pans for 5 minutes before removing to a rack to cool completely.


When I tried my first bite of panna cotta, I was overwhelmed. It was so rich and creamy, and not at all as "gelatinized" as I thought it would be. I used my favorite Crystal Ball whole milk and heavy cream, which in my opinion is more milky tasting than any milk I've ever had. After a bite or two, I took a bite of a cookie and discovered why you need something buttery and crunchy with panna cotta. It's a match made in foodie heaven. (One note about the using the Crystal Ball cream and milk: because it is not homogenized, the tops of some of my panna cottas buckled a bit as the cream rose to the surface. It didn't affect the flavor or texture at all, just the visuals. Fortunately, I could cover with a thin layer of the tea simple syrup to disguise it!)

The tea cookies tasted much more of tea without the panna cotta accompaniment, but were so delicious alongside that it wouldn't matter to me which way I'd make it. You would think that now I am Cinnamon Plum Tea'd Out, but I am not.


So thanks to my Daring Baker Challenge, my month was bookended by oatmeal cookies, I learned why people are crazy for panna cotta, and I developed a way to use up leftover tea. I also deepened my love for Rishi, and vow to try more of their herbal blends. I am curious if more herbal tea can be ground up and added to baked goods! Thank you to Mallory for a nice challenge choice, and be sure to check out the Daring Kitchen for recipes and the blogroll.

Chocolate Sourdough Cake Redux


It's really a nice feeling that I have not discarded any sourdough starter in well over a month. A steady appetite for experimentation (and pancakes) uses up any surplus with ease. My palate is curiously adapting to less sweet and less refined desserts although, you would never know it come Daring Baker reveal day on the 27th...

Early in the sourdough starter days, I made a vegan chocolate sourdough cake that was very good. I have made several others since, vegan and non-vegan, and still hadn't settled on that recipe that I know I'll automatically grab whenever I need a chocolate sourdough cake. Yesterday, I found it. This cake is moist, slightly sweet, and holds together well. It is a tad bread-like, but fully rooted in dessert territory - given that it's roots are from King Arthur Flour's recipe bin.


I slashed the sugar, heaped the cocoa powder, and upped the fermentation time - although I will plan ahead next time to give a full 12-24 hour fermentation to the starter/flour mix. I also cut the recipe in half, since me and 9x13 cake pans are not the best of friends. Our relationship is complicated, and generally ends with me devouring too much of my new friend's content in too short a period of time. 8x8 cake pans are much more suited to my demanding dessert demeanor.


Chocolate Sourdough Cake (adapted from King Arthur Flour)
  • 1/2 c. well-fed sourdough starter
  • 1/2 c. milk
  • 1 c. AP flour
  • 1/2 c. butter, room temperature
  • scant 1/2 c. sugar
  • 1/2 t. salt
  • 1 t. vanilla
  • 6 heaping T. cocoa powder (natural process)
  • 3/4 t. baking soda
  • 1 t. or greater espresso powder
  • 1 egg
Combine starter, milk and flour in a mixing bowl and let ferment. (KAF says at least 3 hours, but you can go longer.) After ferment time, proceed:

Preheat oven to 350 degrees.

Using a hand mixer, cream the butter, sugar, and salt together until lightened. Add vanilla, cocoa powder, baking soda, espresso powder and egg, and mix thoroughly.

Add the sourdough/milk/flour ferment to the chocolate-butter mixture. I found it easiest to use a sturdy spatula to mix the two - be firm but not vigorous and also be patient. Stir to combine until very few streaks of sourdough remain, and the batter looks like batter. It's sticky stuff!

Pour into a greased 8x8 glass baking dish, and use a metal knife or spatula dipped in water to spread batter evenly in the pan. The cake does "dome" a little, so you can try to push a bit more batter into the corners than into the center if this matters to you. Bake for 30-35 minutes until a tester in the center comes out clean.

You can use whatever frosting you like to top it after it cools completely - I just went with a simple American-style buttercream in a thin layer.


In case it needs to be said: I Love Cake. No matter my health consciousness or obsessive nutritive behaviors, there is nothing quite like a slice of cake on a plate at the end of the day. Culinarily, it gives me something to look forward to (and kind of prevents me from seeking out sweets throughout the day), and as a parent, it gives me a bargaining chip. I think I like baking cakes as much as I like eating them, and it never hurts to have something somewhat nutritious and homemade to offer my boys for dessert. Now that I have this one perfected, I'll likely try messing with the flours or sweeteners - I can never leave well enough alone.

I get to wondering if there is some such thing as an actually nutritionally viable cake, one that doesn't just serve it's eater as a recreational deliciousness. While I fantasize that this would be a wonderful thing, really what would the fun be in that exactly? What is the point of dessert if not to be doing something that isn't a bit out of the ordinary, right? Any way you look at it, this chocolate sourdough cake is going to be hanging around my kitchen for awhile. Depending on how fast I eat it, that is.


Non-Rustic Sourdough


I would say that I'm my own worst critic. When it comes to things like bread, anyway. People (maybe some phobic of yeast baking) may look or taste what I've accomplished and be satisfied immensely, but I am a harder sell. My first several loafs of sourdough were ephemeral. They embodied what I always held up in my imagination that bread should be: simple, earthy, crusty, chewy. As my starter is aging, however, I notice that the easy baking of my first labors are behind me. Perhaps due to the maturation of the wild yeasts at work, or maybe just this cold, dry then damp again weather, my breads lately are leaving me wanting.

I've just returned from a long, relaxing weekend out at the "farm"... lounging in front of the fireplace, watching movies and playing games when the just barely gone snowbanks were replenished from above with snow and freezing rain. Visiting home is always restorative to me, even more since I usually get to cook a bit in my Mom's luxury kitchen. I always have help and conversation, and best of all I don't have to do all the dishes myself - and the group effort is exciting when I am solitary most of the time. On the drive back to Milwaukee, I began thinking about how I'd step up my sourdough methods - how I could be more calculating, and where I could turn to learn more about this morphing starter. When I wanted a bread for tonight, and only thought of it this morning, I figured where better to turn than King Arthur Flour.


Strangely, this bread is completely the opposite of all the wonderful sourdough qualities that I expect from bread. That doesn't mean that it isn't wonderful. It is soft, slightly sour with an almost spongy interior. (I mean spongy in the best possible way, mind you.) This is the bread that your picky son and husband will want to eat as a sandwich, but the bread that will still satisfy you, the self-proclaimed bread-snob.

The reasons that I didn't want to try this bread when my starter was first viable, were exactly the same as the reasons I now wanted to try it: it had both starter and commercial yeast, it made 2 loaves, and it used a stand mixer to knead. All of my bread snobbery is now officially laid to rest. All bread has it's place, and this one will fit well in my kitchen alongside soup and salad, or just plain accompanying cheese. I'm betting it will make great toast, too.


After first rise, shaped into elongated loaves.


After second rise, I always poke the dough to see the response.

I love King Arthur Flour's website. They always have a lot of information, and who else boasts a comprehensive help line via email or good old-fashioned telephone? Their recipes are sound, and their dedication to bread completely obvious. I like to think if I ever have extra money and a weekend to myself, I'll fly over to Vermont and take a few classes...

That said, I did change up their recipe just a little. I didn't need the bread to be done lickety-split, so I decreased the amount of commercial yeast. I also used a combination of weight and volume amounts. Another thing I love about their recipes is that you can toggle between weight and volume measures. Endearing, don't you think?

King Arthur Flour's Sourdough Bread (slightly adapted from KAF's recipe)
makes 2 loaves
  • 1 cup sourdough starter, well fed
  • 1 1/2 c. lukewarm water
  • scant 1 t. instant yeast
  • 1 T. sugar (I used raw)
  • 2 t. salt (I used Kosher)
  • 5 c. ap flour (I used the weight measurement of 21 1/4 oz. - and I still needed to add a little extra)
Mix all ingredients in the bowl of a standing mixer. Knead with a dough hook until the dough is cohesive and smooth, about 5 minutes. I needed to add a bit of extra flour - I added until the dough made a smooth ball that wasn't too sticky.

Transfer dough to a lightly floured surface and knead by hand to get a feel for it. I kneaded by hand for several minutes. Put dough into a lightly oiled bowl, and let rise until doubled in size (this took about 2 1/2 hours for me).

After first rise, gently turn dough out onto the same floured surface and cut into two pieces. Lightly form into two elongated loaves, and place on a lightly oiled baking sheet (or use parchment paper, I used a sil-pat and lightly oiled it). Cover with a towel, and let rise until "very puffy", at least 1 hour (I let it go almost an hour and a half).

Preheat oven to 425 near the end of the second rise time.

Since I don't have a water spray bottle for my kitchen, I lightly wet my hands with warmish water and gently rubbed the surface of the loaves. Then slash each loaf twice, quickly but firmly with a serrated knife. Immedieately place in the oven, and bake for 25-30 minutes. Mine took the entire 30. Bread will sound hollow when tapped on the bottom, and feel light for it's size. Let cool completely before cutting.


I knew it was just the day for a bread like this. Yesterday, my Husband was saying how he ate rather poorly when I was gone, and felt like eating less meat, since he feels better when he eats this way. (!!!) I tried to contain my excitement as I mentally plotted my veg attack for the remainder of the week during our dinner last night. This is just the thing I live for, since I do like meat, I just don't like a whole lot of it.

In 3 days, we'll have been married for 6 years, and this kind of information is still thrilling to me! We may not have everything in common, but I know that I have the best possible mate for me, and that is what it's all about. I know when he takes a bite of this bread at dinner tonight, my reward will be in his asking for seconds. That is how I know something is good. He may not be as rustic as I am, but he is mine, and I love him!


This post has been Yeastspotted.

Alone = Quiche.

Quiche. That misunderstood brunch or dinner delicacy that is wrongly accused of being girlie, chic (or chick?) food. Whenever I have the opportunity to make dinner solely for myself, I like to use it to my advantage by making quiche. It's filling, versatile, and uses up whatever needs using up - and it requires just enough work to make me feel like I'm worth the fussing over. Besides, I like eating it straight from the fridge for lunches too.


Most people would serve quiche alongside some kind of green salad, but not me. Since I usually partake alone, I fortify it with whatever veg I can, and chalk it up to a one dish meal - a casserole that is so much more attractive seeing as it comes at me baked into a pie. This leads me to believe I know why quiche has the bad-rap of being girlie food: usually it contains no meat. When my Husband (who was on his way out to a basketball game) saw, and likely smelled, the results of my casual labors coming out of the oven, he said "what! I like quiche" to which I responded "since when?" (that was code for "keep away from my leftovers"). My filling was really of no matter to me tonight. What I was really after was a trial run of Sally Fallon's yogurt dough, made from 100% whole wheat that ferments with yogurt and butter prior to baking.

As with most of these new-to-me nourishments, this yogurt dough did not disappoint. It was actually light and flaky, and as complementary to a savory pie as I could see it being to a sweet one. Most whole wheat baked goods seem dense, but not this pie crust. It held up to the filling without sogginess and the edges browned and crisped up nicely. The flavor had just a nuance of graham cracker, which made me immediately think that the next time I get a taste for chocolate pudding pie, I will most certainly use this crust - though likely I'll add a tablespoon or two of honey to enhance it's nutty sweetness.


Sally Fallon's Yogurt Dough (Sally Fallon, Nourishing Traditions)

I used half amounts to yield 1 pie crust - otherwise, it will make two. (Sally says that the recipe will allow enough for two 10 inch, French style, tart shells - and that it cooks more slowly than doughs made with white flour.)
  • 1 c. plain whole yogurt (I used my homemade, which is made with 2% milk)
  • 1 c. butter (1/2 lb. or 2 sticks), softened
  • 3 1/2 c. whole wheat flour (or she recommends spelt flour)
  • 2 t. sea salt
  • unbleached white flour for rolling out
Cream yogurt and butter together. Blend in flour and salt. Cover and leave in a warmish place for 12-24 hours (I left mine only about 8 since I didn't plan too far in advance).

Sally recommends rolling out on a pastry cloth lightly dusted with flour, but I used a lightly floured wooden board, and had no problem with sticking whatsoever.

She also says that if you are baking for a pre-baked shell, prick the bottom well with a fork and place in a cold oven. Turn heat on to 350, and bake for 20-30 minutes. For the quiche, I filled it and baked in a preheated 375 degree oven for 30-35 minutes, and it worked perfectly.

UPDATE:  For using this as a quiche crust, I find that it works best to pop the formed crust into the freezer for 30 minutes to firm it up nicely prior to filling and baking.  It's a soft dough at room temperature, so if blind baking, be sure to line with parchment and fill with weights.


I always use Mollie Katzen's approach to quiche, the dog-eared page 131 of The Enchanted Broccoli Forest guiding me on my way to chic (or chick) dining. Tonight, I only had a bit of Wisconsin Colby cheese, a half pound of mushrooms and an onion. I used garlic, Aleppo and thyme to season, and along to my egg and milk custard, I added about 1/4 c. of the cultured "sour cream" I kind of made by adding my villi yogurt culture to heavy cream. I'm always surprised at the complexity in the flavors of something that has so few ingredients. Of course, that wheaty yogurt dough crust helped quite a bit, too. (I used the same basic Mollie Katzen formula to make another memorable pie, the Wisconsin (Ramp) Pie I made last spring.)


I often wonder what it would be like to cook only for myself again, not worrying about the other members of my family and what their picky palates would prefer. I'd likely eat quiche more than twice a year, I'm sure. When my son saw that there was a pie cooling on the stove, he wanted to try some, until he got right up next to a bite I held out for him - dashing all my sincere hopes that he would enjoy the eggy, mushroomy goodness that I was unable to share with anyone. I'm not giving up, I will offer until there is nothing left for me to offer. Instead, he ate leftover sourdough pancakes that I popped into the toaster to warm.

So, to each of us, our own fermented grains, I suppose. I feel happier eating these soaked and fermented things, still as excited and wide-eyed at the flavors and as eager as ever to share them with others. Convinced my own food revolution will transform at least my household if it goes no further than that. That, or just annoy my fellow family members... But, this pie was great and smelled great. I'm going to get them, if it's the last thing I do!

Soaked Cornbread and Other Things I'm Loving.


Whenever I start a sit down dinner on a Friday night, I remember to appreciate. It would be easy for me to feel a bit bad that I'm not going out and about, seeing shows or fine dining (or just plain dining out), but rather am home-bodied and set for nourishments of my own creation.

My days have been kitchen heavy. Figuring now that this "nourishing diet" thing has really stung me hard, I try and super-nourish my boys, picky as they are, at the expense of creating more work for myself. This morning, I started the cornbread that we'd eat for dinner tonight, and I was careful not to mention to anyone within my earshot all day that it contained yogurt and whole wheat flour. It fermented a good 8 hours at room temperature, before I added the eggs and remaining ingredients, and scooped it gently into a generously buttered cast iron skillet: a number 6 as seen above. It baked up feather light, and no one the wiser that it was actually nutritious.

I wish I didn't get so overwhelmed at the flavors of these things. If the only thing I could tell you about traditional diets it that they are a bit time consuming, and that you'd probably have to quit your job and be nearly Amish to do a good job of it, some of my readership (such as it is) would be spared the little spark in his/her own mind to give it a go. But the truth is, the flavors are so much better than the quick versions, and I don't mind the planning ahead a bit. This cornbread in particular makes me feel as if any yellowish cornbread version could not hold a candle when compared bite for bite. And, having only a paltry 3 leftover wedges leftover only confirms my suspicions.


image from Amazon.

I rented the Culinary Institute of America's New Book of Soups from the library a few weeks ago, and the inspiration has led me to success in incorporating more soup into our diet. I count it a personal success that tonight's soup had cleverly disguised acorn squash politely cubed to the exact same size as some red potatoes that were sprouting up to heaven from my CSA box last fall. No one was the wiser, and even the bigger of the two boys ate an impressive amount of the veg from the Bolivan Beef Stew. (The little one choked down his 5 bites before negotiating more cornbread.) I think it helps that no matter my excitement, I act as if nothing is new and I couldn't have made a more mundane supper - even if I really think nothing is further from the truth.

The best thing about renting a book written by a renowned authority like the CIA is that things are simple and rely on core ingredients and simple technique. I actually followed the directions for this soup, and tell me: who follows directions for soup? Well, I guess I didn't fully follow. I used a quart of home canned tomatoes instead of 2 cups of plum tomatoes and 1 cup of beef stock since I didn't have any on hand, and also subbed in a couple spoonfuls of my candied jalapenos for a fresh, stemmed, seeded, and chopped one. But, I did not add garlic and the last time I checked, doesn't almost every soup on the planet have garlic in it? CIA has an awesome soup book, and you should check it out.


whole wheat, soaked cornbread.

Since I'm on the subject of awesomeness, and I read everywhere that urban beekeeping is the new hot thing, I am proudly devoted (for some time now) to Gentle Breeze Honey. Situated in Mount Horeb, Wisconsin, Gentle Breeze produces a wonder. This honey is affordable, raw, and comes in pint or quart canning jars that I can reuse. They are even thoughtful enough to make their labels easy to peel off after a 5-minute soak in warm water! At about $10 a quart, it isn't a luxury honey that I have to judiciously spoon onto a corner of my bread and savor. I can loll about in it's tastiness, using it to bake with, and still enjoy it perfectly well on a piece of toasted sourdough bread. At this point, I am not jumping on the beekeeping bandwagon. I am supporting Gentle Breeze Honey, and finally remembering to write down why I love them so much.


image from Gentle Breeze Honey.

I used it both in and on this remarkable soaked cornbread. Really, the pre-mixing takes less than 5 minutes, and then assembly later in the day maybe another 10. Patience is a virtue, but especially for things as delicious as this - when the payoff makes you look forward to being a habitual planner. Since I appear to be in full out love-fest mode, I really love this website Kitchen Stewardship as well. Many of their recipes come with "levels of healthiness", which is to say that they have quick versions, soaked versions, and other adaptations all written into their base recipes. I like that a lot, since sometimes we aren't all on the same page and we need a bit of variation.

Soaked Cornbread (Kitchen Stewardship - I only adapted the way I put things together...)
  • 1 c. yogurt
  • 1 c. yellow cornmeal
  • 1 c. whole wheat flour
  • 2 eggs
  • 1/4 c. coconut oil or butter (I used about half and half)
  • 2 T. honey
  • 2 t. baking powder
  • 1 t. baking soda
  • heavy pinch of salt
At least 8 hours before you want to make cornbread for dinner, mix together yogurt, cornmeal, and wheat flour. Make sure it's well combined, and leave it at room temperature (somewhat warm) to ferment.

When ready to make cornbread, preheat oven to 400.

In a small bowl, beat eggs. Add in honey and melted butter and/or coconut oil and beat together well. Then, add in baking powder, baking soda, and salt, and stir. (It will start to fizz up, but I like to add the baking powder and soda to the eggs because you reduce the risk of a Boy-O telling you something doesn't taste good in the finished baked good...)

Because it starts to fizz up, be ready to pour it into the fermented cornmeal/flour/yogurt bowl right away after you make sure you blended it well.

Mix until everything is well incorporated, and to tell you the truth, I used my hands. I didn't want to run the risk of over beating, and my hands were clean. (Actually, I just used my left hand, since it's good kitchen logic to leave one hand clean - you know, just in case.)

Pour batter into a well buttered number 6 cast iron skillet, or an 8x8 glass baking dish. Total baking time will be about 20-25 minutes, but I found that I needed to reduce the heat to 350 at the 15 minute mark since the edges were starting to brown a bit too quickly. A tester should come out fairly clean when inserted near the center. Let cool in the pan several minutes before cutting into it.


As another week passes, and I am still happily geeking out about traditional foods, I read this link to the Northwest Edible Life that Sean from Punk Domestics shared today. In a nutshell, it's funny but good information that I thought about most of the day. After all, I don't want to be the person that looks down on others and the way they choose to eat, I just get so excited (usually due to taste) and then want to share. I find myself wondering if others think that I'm that "Urban Homesteading A**hole", except that I'm not raising chickens and bees in the backyard, and struggle yearly making a garden I'm actually proud of. I sure hope not. I just sincerely hope that if you are the least bit curious, and you have an "epicurean palate", you will give soaking grains a try.

Not only because it's getting closer to Valentine's day, I love soaking grain. I love my Family. I love Friday night at home. I love being a geek. I love that it takes me a full 2 hours to do the dishes after dinner because I refuse to dry a dish, and because I have to pause to play with puzzles. I love that I am able to share things I love with you... since sometimes I can't divulge as much information as I'd like to my picky boys. Thanks a lot!