Sourdough Surprises: Twisted Breadsticks

sourdough cinnamon twists.

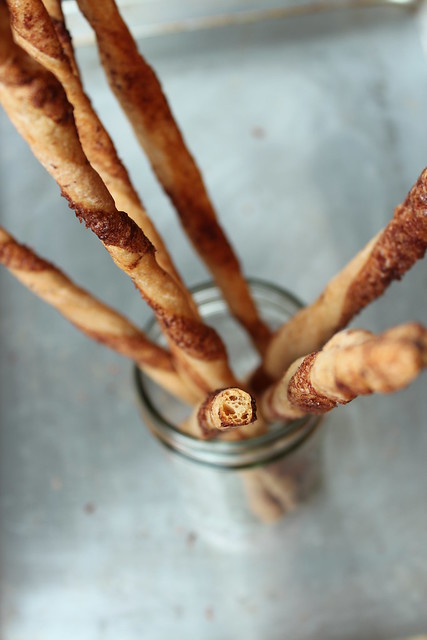
The bake-along challenge for the Sourdough Surprises group this month was twisted breadsticks.  Thin breadsticks, also called grissini, are something I actually make quite frequently - typically out of a portion of pizza dough as a precursor to a pizza dinner night.  I had never attempted a twisted variety however, and thought I'd try to sweeten things a bit by using a heavy dusting of cinnamon sugar - and a grating of Callebaut bittersweet chocolate for good measure.

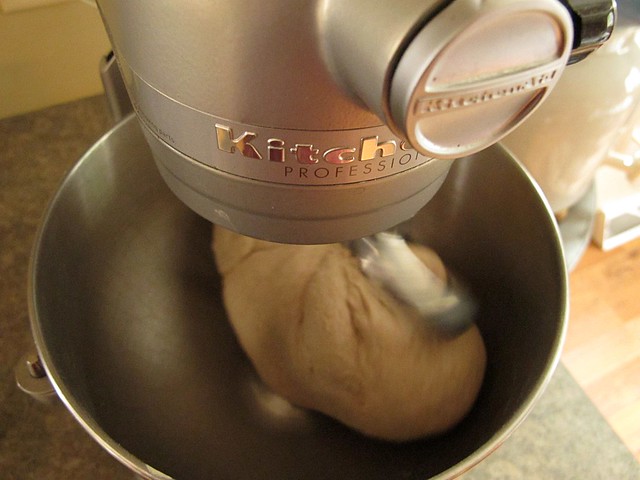
The dough was easy to throw together, and quite a quick time frame by comparison of other sourdough projects.  The bulk ferment time was only about 2 hours for me, with folds at the 40 and 80 minute marks as recommended.  I may have let the dough sit a bit longer, but only because I got busy with other things.  I think it helps that my starter has been aggressively vigorous lately.  Maybe the Autumnal rains have some part to play in that!


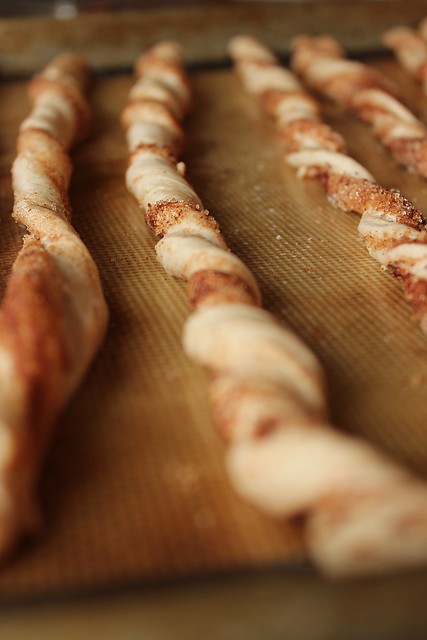
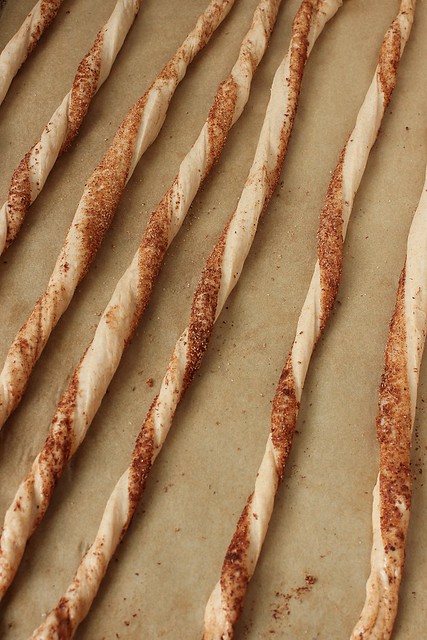
I divided the bulk of dough into 3 portions, and carefully formed them into rectangles about 7x4 inches big.  I brushed them heavily with melted butter, sprinkled on cinnamon, sugar and then grated bar chocolate across the tops.  I may have dotted a bit more butter across the top as well.  Each rectangle, I cut into 8 pieces, but next time I would go with 16 since they would be thinner.

When dealing with grissini, thinner is always better.  They bake up completely crisp that way.

sourdough cinnamon twists.

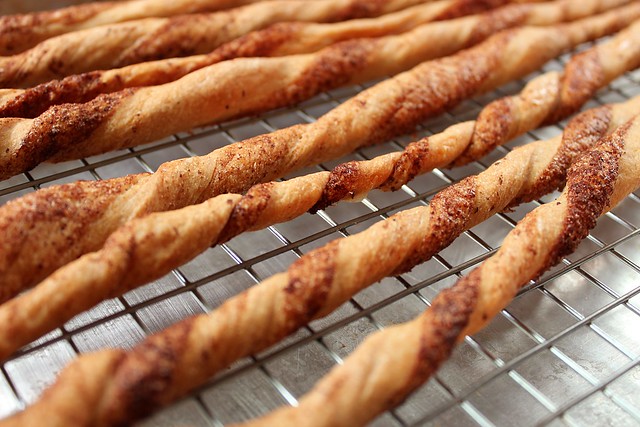
You may look at the photos and think they aren't that thick, but they do have some oven spring.  And the undulating nature of the dough creates parts of the breadstick that take longer to bake.  I let them bake for about 35 minutes, and then let them cool on the pans.  Even then, I still had a few that weren't crisp throughout.

That didn't stop us from eating them!  The flavor dramatically improved as they became completely cool.  When warm, I wondered if I had made a mistake in trying a sweet application.  The wheat flavor of the dough seemed like it would have been better paired with olive tapenade as suggested.  But when cool and crisp, the cinnamon-chocolate decision was definitely justified.  I would make them again, and I will remember to make them thinner and perhaps make half the recipe since the yield was too many for eating in one sitting.  Breadsticks are never quite as good the next day.


You can find the dough recipe here.  And remember that if you enjoy baking with sourdough, you can join the baking group as well!  Check out the details on the Sourdough Surprises website.


Improvising: Pear Almond Galette

I have a newer friend who doesn't really know how to cook, or bake.  She tries, and when she tells me about her trials I can't help but note to myself that cooking and baking are definitely arts - and the arts come easily to some and not so much so to others.  Not that you can't become a better cook or baker by simply working at it:  this is the point where I think personally I have arrived.  After you do something enough times, you stop worrying if you are doing it right, and you just do.

pear almond galette

When considering that I wanted to have a nice dinner for my family yesterday evening, I didn't really know where to begin.  I didn't even know what I had a taste for.  I had soaked and cooked a half pound of pinto beans and had them ready in the fridge for several days, just waiting for a application, and that seemed like a good place to begin.

I'm not always one to rely on printed recipes anymore, but I do frequently use them as inspiration - and I even will admit that I truly love the Epicurious iPhone app for just this reason.   (Though this isn't really a technology-related post, I'll even go further to say that I would probably be a perfect candidate for the iPad or other tablet device solely for kitchen use.  I do not have one to date.)  Epicurious has made their entire library of recipes available, decades of Gourmet and Bon Appetit magazine pages right there for me to filter.  I typed in "pinto beans" and found what turned out to be the most delicious version of pot beans I've made in a while - Dominican Beans.  It wasn't long until I ran an errand to pick up some fish for tacos and just like that, dinner was served.

Because every nicer dinner at home should also have a dessert, I also searched the app for a suitable starting point that could make use of the bowl of ripe pears I had on the table and the leftover empanada dough I had in the fridge.  I was just a few taps away from one of the best fruit desserts I've made in some time.

pear galette

pear galette

Like my kitchen-challenged friend, there was a time when I would have been uncertain where to start in altering a printed recipe to use what I had on hand.  I believe that the world of food blogs has opened a brave new world of opportunity for home cooks; we now have the empowerment to be creative and alter for alteration's sake - improvising to suit ourselves and to share not only with friends and family, but a growing "audience" of new acquaintances who can hopefully also learn and alter along with us. 

This improvised pear almond galette actually started long ago.  Back before I had ever made a single tart, I had picked up a tart pan at a discount store.  It is an odd size, 7 inches across the bottom and 8 when measured across the top.  Now I thought most tart tins had straight sides, but that could be why I found the pan in the first place, neglected in part because of a non-conformist nature.  My Daring Baker Challenge emplanada dough last week left a lot of scraps to be re-rolled... and I did re-roll it and then store it in a plastic bag on a plate so it would remain round and flat.  Days passed.  Pears ripened.  Lemons were gone and oranges and limes were all that remained in the crisper drawer.  And finally my galette was formed with the help of all of these happenstance things. 

My Husband loved it, which is also definitely something to record!


Galettes are technically free-form pies, some of which are nearly covered completely in flaky crust.  I used my tart tin to keep everything initially contained, and then removed the form halfway through the baking time so that it would brown uniformly.  The original recipe link has a pastry crust recipe that include a little extra dose of almond extract, if you use your favorite pastry, do as I did and increase the almond extract in the cream layer.

Improvised Pear Almond Galette (adapted from Self)
  • pastry crust, to fill a 7-8 inch tart tin
  • 2 pears, 3 if you have a larger pan
  • zest of half an orange
  • cinnamon sugar to liberally dust the top
  • a few cold pea-sized bits of salted butter
For the "cream" layer:
  • 1 egg white
  • 3 T. powdered sugar
  • 3 T. ground almonds (I ground them in my coffee grinder)
  • 2 t. melted butter
  • heaping 1/2 t. almond extract
  • pinch of salt
Preheat the oven to 400.  Line the tart tin with pastry crust that is rolled to about 1/8 inch thick.

Make the cream layer by whipping the egg white with the powdered sugar until good and frothy (and slightly thickened).  Add the ground almonds, melted butter, almond extract and salt and continue to beat until well combined.  Place in the fridge when you slice the pears.  (I did use a hand mixer for this.)

Peel, core, and slice the pears into 16ths (cut each quarter pear into 4 slices).  Place carefully in a large bowl, and grate the orange zest over.  Mix carefully with your hands so the slices remain whole.  

Take the cream out of the fridge and pour it into the center of the pastry.  (I shook a layer of cinnamon-sugar over the pastry crust first, since my crust was not sweetened at all.)  Beginning in the center, arrange the pears in a concentric way.  Two pears fit my pan exactly, with two slices leftover for me to eat.  Shake cinnamon-sugar heavily over the top, and carefully fold the edges of the dough down gently over the edges of the pears.  

Place the tart pan on a sheet pan and bake for about 20 minutes - until the center is somewhat set and the pastry edges have some color.  Remove the sheet pan from the oven, and carefully remove the tart pan side from the galette.  (I had both hands in  oven mitts, and balanced the bottom of the tart pan on one hand when removing.)  Return the panless galette to the oven, and bake until the center isn't wobbly at all, and everything is nice and brown, about 10-15 minutes longer.  (Your times may differ with your choice of pastry crust.  Just keep an eye on it.)

Turn off the oven, but turn on the broiler to high.  Dot the top of the galette with a few bits of butter and another shake of cinnamon-sugar for good measure.  Place under the broiler for a minute or two until the top is bubbly and deeply caramel colored.  Cool the galette on a wire rack completely before slicing.

slice

I stored the leftovers in the refrigerator due to the eggy bottom layer, and it was as good cold the next day as it was the day of at room temperature.  The pears keep their firm "pear-ness", and orange and almond are always happy company.  Even though I may have liked my crust with a bit of sweetness, I really liked the crunchy, plain pastry flavor of the one I used - and I had the bonus pleasure of using up something already on hand.

pear almond galette

It is possible that all recipes are merely suggestions.  When I read through Michael Ruhlman's Twenty earlier this Summer, I recall him stressing heavily that to cook well, first think.  Whether using a recipe or an idea of a recipe, thinking through your process before beginning is a probably the best way to start.  Surprise and stress is greatly reduce when your brain is the first thing you consult in the kitchen... and no matter how experienced you are in those arts, it is always a good reminder.

I used to think that anyone can cook.  I still do actually think this, but I've also come to realize that it is just as important to recognize that there are people who just love to eat and who simply really appreciate eating great food.  I am never happier than when I find new friends of this nature, those with whom the pleasures of sitting around nibbling on somethings are the greatest joys.  Being at home in the kitchen or not is no longer the issue, but the acknowledgment of good taste is.

Daring Baker's Challenge September 2012: Empanadas

Patri of the blog, Asi Son Los Cosas, was our September 2012 Daring Bakers’ hostess and she decided to tempt us with one of her family’s favorite recipes for Empanadas! We were given two dough recipes to choose from and encouraged to fill our Empanadas as creatively as we wished!


I thought about this challenge a long while before actually beginning.  Our challenge was actually for the empanada gallega, which is technically more of a "casserole style" empanada.  But as I watched lots of Spanish-language YouTube videos of women folding the empanada dough deftly around fillings, I knew that I really wanted to try the individual, hand held empanadas instead.  I read over many recipes for doughs, noting that there were differences in those destined to house fried pastries and those for baked. 

Then, I had my first actual phone conversation with Deena - who I met in person this Summer, but I still somehow considered an "Internet friend" only.  All of a sudden, she felt like a real friend, someone to discuss food on the phone with.  I found myself wishing I still had the long, spiral-corded wall phone in my kitchen, the one that was easier to balance on your shoulder when doing the dishes and chatting.  She told me about the blog Laylita's Recipes, (after we talked about, and I remembered, these emapanda-related tuna and cauliflower versions that she made) and all of a sudden I was knew exactly what kind of empanada I would make, those filled non-traditionally with beets, Swiss chard, and goat cheese.

beet filling

I haven't made empanadas before.  I have made pasties, which are somewhat related - as are most pastry wrapped half-moons, I suspect.  To all of our neighbors south of us here in North America, emapanadas are an almost everyday food, a good way to use up a bit of leftover meat and veg (or even just cheese) in a maybe not so wholesome way, but in a very satisfying one nonetheless.

I think the reason it was so easy for me to decide on beet empanadas is because the wholesomeness quotient was certainly raised by using such high-nutrient vegetables as beets and chard.  I knew I'd be eating these alone, so I made just enough for me (and froze most of my dough rounds for another day).  I allowed enough extra filling to make a pizza for myself a couple of days later, and I just ate the last 1/4 c. of filling for lunch today alongside the last of my toasted rye bread and some salty Amish Swiss cheese.

Making the filling is easy:  just saute some garlic and onion in butter or oil until softened somewhat, add a few leaves of finely chopped chard and some salt and pepper and cook it down until wilted.  Add to a waiting bowl of (roasted, cubed) beets, cool slightly, and crumble in enough fresh goat cheese to satisfy you.  The secret ingredient is some fresh oregano added after the cooking.  My goat cheese was a widely available brand with peppadew peppers in it. (Laylia's recipe is here.)

beet filling empanada

The dough we were provided for the challenge was a yeasted dough, but I wanted a quicker dough, with some fat but not so much that the pastries felt greasy.  Since I was so excited about Laylita's Recipe blog, I decided to just try her dough as well.  A full 6 oz. of butter was perhaps more than I though necessary for a "healthier" empanada, but I decided I wanted to splurge.  After all, I've never made empanadas before... and it felt like a bit of a celebration.  I rolled the dough to about 1/8 of an inch thick, which felt a little on the fat side, but I saw why as I began to fold the edges.

I moistened the edges of the dough with water and pinched them together as I saw in so many videos.  After pinching, which really flattens the outer edge, you start back at the beginning and fold a crimp down the length of the curve.  (Here is a favorite video, you can see her folding over the crimp at 2:35.)  By the fourth try, I had it down, and that one was easily the prettiest one of the bunch.  It's the one on the lower right:

empanadas
Laylita recommends filling the empanadas, then letting them chill for 30 minutes prior to baking. 

I made (and ate in one sitting, mind you) just 4 empanadas, technically empanaditas since they were a scant four inches across.  I even baked them efficiently in my little toaster oven.  After brushing them with a beaten egg, I beat another egg and that's what my son ate for dinner.  As they baked, I quickly made a sauce, also based on how Laylita ate hers.  To some whole milk yogurt, I added some minced garlic, a whole fresh cayenne pepper from my garden, a large handful of minced cilantro, lime juice and some salt and pepper.  The spicy dipping sauce was what made eating them feel more like a meal and not just a snack.

empanadas (2)

I ran out of time to make another, more independently inspired batch of emapandas.  I do have two very small leeks and some ancho peppers from my garden, still sitting out on the counter.  I intended to have them sauteed and added to some cheese to fill 4 more rounds that still sit well covered in plastic in my fridge.  Maybe tomorrow.  I also saved the scraps from cutting out the dough rounds and rolled a single 7-8 inch round that I thought I could top a pot pie with... but there is just so much appetite in a week!  Fortunately, pastry dough does tend to keep well under refrigeration for several days, and in the freezer even longer.  I'd say that the 6 oz. of butter is going a long way as well.

empanadas (3)

Be sure to have a look at the Daring Baker blogroll for other empanada inspirations, and at the original recipes that Patri provided us!  Even if I (once again) didn't follow instructions, I had a great time making something I've never made before!

On Rye. (Notes, not Recipes...)

I haven't given much thought to rye.  As a cereal grain, I suppose I like it well enough, but I'm fairly certain this was my first time baking it into a loaf - and it was a naturally leavened loaf at that.  The only rye product I had in the house to turn into rye flour for this recently baked experiment was rolled rye flakes I had gotten some time ago at my co-op, and I'm not sure if my finished bread was a direct result of less than optimum rye flour or not.  Either way, this bread was most delicious, and it piques my interest to work with this grain a bit more.

This is just an account of my first rye bread, baked with instruction from Peter Reinhart (who I'm sure will appreciate that I'm not writing down every one of his recipes from Crust and Crumb into my blog).  I did follow his ratios, and I built a rye starter in a single afternoon from my standard resident starter.  This added a day to the bread with an overnight rest in the fridge, but it was all just in wait time, not really active work time.  On his recommendation, I also added a tablespoon of cocoa powder and two teaspoons of instant espresso powder hoping for a deeper external coloring.  An exceptional tongue may be able to detect it, but I can't say I could.

pain au méteil

Pliny the Elder, the ancient Roman philosopher and naturalist who had a penchant for cookery, said that rye is "a very poor food and only serves to avert starvation" and spelt is mixed into it "to mitigate its bitter taste, and even then is most unpleasant to the stomach."  The three day building of this rye bread most definitely served to break down those parts of the rye plant destined to be indigestible.  And the greater wheat flour content tempers any would-be-overwhelming bitterness as well.

The French term this type of rye bread with more wheat than rye "pain au méteil", and the instruction in Peter Reinhart's Crust and Crumb called to bake it deep as possible without burning... but I couldn't bring myself to go much darker than this.  I am going to go on a rye mission, grinding coarse rye flour from rye berries and not rolled flakes of rye - and I'll bake the pain au seigle as well, which is the version that contains more rye than wheat.  I'm also going to try to bake on a stone, and burnish the crusts out with longer baking times.

ka back in action

I've happily been able to return to machine-kneaded doughs; my loving Dad fixed my not-so-old stand mixer by replacing gears and grease, when I was certain that my mixer was heading for a landfill .  I've had it back for two months already, and have been afraid to use it...  It works just great, and I hope that it will now withstand some workouts.  (Though, I'm overly careful, and unlikely to be baking any bagels any time soon.)

windowpaning

Rye flour contains far less gluten than wheat, but yet the dough seemed to reach the "windowpaning stage" faster than traditional, all-wheat breads I've made.  From the photo, you can see that the gluten hasn't quite developed at this stage.  Two minutes later, it stretched thin and without breaking into holes.  It was a lovely dough, and it felt good to have a traditionally kneaded dough in my kitchen after so many months of merely "folding" high-hydration doughs.  Even though (with kneaded doughs) I let my mixer do the bulk of the work to save my hands where I can, I never resist the pleasure of a minute or two of quality "counter time" with a dough!

I formed the dough into two loaves:  one round and one oblong.  I have a proper brotform for the round loaf, but improvised another small basket for use as an oval support.  The breads rose much more than I anticipated after they were formed, risen, and then retarded overnight.  The round loaf must have been better formed, since it didn't appear overproofed when I scored it.  The oblong loaf deflated and had an almost tough "skin" that made pretty patterns impossible.  I used Chad Robertson's 50-50 mix of rice and wheat flours to dust the bread cloths thoroughly, though I might not have needed a cloth at all in my brotform that is well-seasoned.

I brought them out of the fridge, and let them sit at room temp for about a half hour as the oven heated.  Unlike Reinhart, I baked them both in covered iron pots - the oblong one just barely squeaking in, thus its rather homely looking appearance.  I heated them to 500, then dropped the heat to 450 just after popping them in.  I uncovered them after 15 minutes, and baked about 20 minutes longer.

pain au méteil

But like their related Human Beings, no matter what they looked like, it was what was inside that mattered.  Gentle, small holes, with a slightly more regular pattern than the breads I've been used making lately.  The crust was thin, brittle, and easy to chew; the texture of a slice had enough resistance to be interesting without being boring.  I ate the heel, plain without adornment, amazed that wild yeast produces such amazements with such a little help from me.

pain au méteil

Returning to a well-loved bread book after so many months away felt unnaturally calming.  I remembered immediately why it is one of my favorites, and one that produces excellent results, even if my results are most definitely different than those described in black and white.

I ate this bread for lunch today, it's second day, sliced very thin and toasted, topped with super ripe avocado, fresh sliced San Marzano tomatoes, coarse salt and pepper and some arbequina olive oil I decided I had to try (and it was so good I'm glad I did).  I actually can't wait to taste this bread as it ages a few more days, I have a feeling that the flavor will only continue to develop.

I'm also very excited to get rye berries for flour.  While I'm at it, I may pick up some hard wheat berries and grind that for flour too - it may make for a denser loaf, but perhaps an appreciation for heavier Winter loaves in on the horizon...

Sourdough Surprises: English Muffins

This is the second time I've participated in a newly formed baking group Sourdough Surprises.  The monthly bake-along choice for September was English muffins, a baked good particularly close to my heart.  Over a year ago, I worked tirelessly trying to perfect the sourdough English muffin; I made so many English muffins in a week, that I knew I had to hit on something - and I definitely did.  (This final version I thought was the best, but all of my trials were completely edible).

When I read the challenge was going to be English muffins, I knew there could be no better time than now to test-drive another Tartine dough.  I already knew it to be wonderful, since it was one that Chad Robertson had based his famous baguettes on. That same dough was coaxed into a classic, muffiny shape... and it did not disappoint.

sourdough english muffin
Tartine english muffins
Did you notice the bright yellow exteriors on a few of the muffins?  That's because I used my cast iron skillet the day before to fry some vegetables in turmeric.  It stained the pan.

The dough is a hybrid of commercial yeast and sourdough starter.  A poolish, created by letting a small amount of active dry yeast ferment in a flour mixture for several hours, is combined with sourdough starter (in my case, the 100% hydration starter that I keep perpetually on my counter).  I altered the amounts to suit one sheet pan, but otherwise, it is the very same dough that made this thin-crusted, naturally seamed loaf named Fendu.  I loved this bread wholeheartedly, so I knew that the same dough coerced into English muffin form would also delight.

Untitled 

What I loved about this recipe, is that the bulk of the work is done the day before.  When you bake the muffins, you have only to cut them out with a circle cutter, and fry them in some butter - clarified if you follow the Tartine instruction.  I cut some of the leftover spaces into tiny, bite-sized muffins, but I don't think the scraps would rise much if re-rolled.  There was a small lump of dough that was sacrificed. 

cutting 

Since I keep my starter well fed and ready to go, I do not mix Robertson's "leaven" as directed for this particular recipe.  I instead substitute the same amount of starter. and make sure that I feed it just a little bit before building the poolish.  (Since the poolish is mature and ready in about 4 hours, and my starter is most active 4-6 hours after feeding, I mix the poolish about an hour after feeding my starter for the day.)  

Tartine-Method Sourdough English Muffins (adapted for starter and quantity from Chad Robertson)
yield 1 dozen 3-inch muffins, plus a few bite-sized

poolish:
  •  100 g. ap flour
  •  100 g. water
  •  1 1/2 g. active dry yeast
to build dough:
  • 200 g. well fed starter (a teaspoon should float in a glass of water)
  • 250 g. water
  • 200 g. poolish (it should be all of the above)
  • 325 g. ap flour
  • 175 g. bread flour
  • 12 g. salt (but I feel this is too salty.  I actually salt to taste - I add 1 1/2 t. kosher salt, and taste the dough to correct.)
 To make the poolish, mix everything in a small bowl, and let ferment 3-4 hours at room temperature (or overnight in the fridge, but I haven't done that).  

(Both the poolish and the starter should pass the "float test" as described above; a teaspoon should float in a glass of water.)

To mix the dough, pour the water into a large bowl.  Add the poolish and starter and stir to blend well.  Add the ap and bread flours, and use your hands to mix well until no floury bits remain.  Let the dough rest for 30 minutes.  I didn't forget about the salt:  we won't add it just yet.

Transfer the dough to a large, clean, clear container for the bulk fermentation.  Bulk ferment should take about 4 hours, and every 40 minutes, fold the dough.  The salt should be added with the first turn (or 40 minutes after transferring to the clean bowl.

When the bulk fermentation is complete, turn the dough out onto a well-floured towel (use flour that is 1/2 regular ap flour and 1/2 rice flour - it prevents sticking really well) that is spread flat over a sheet pan.  Let it rest for 10 minutes in a mound, then dust the top with rice flour/ap flour mix and ease the dough into a rectangle of even thickness.  Dough should be about 1 inch thick; aim for uniform thickness overall.  Cover with a clean, lint-free towel, and place in the fridge to rise overnight or 8 hours.  (I worried that it would dry out, so I placed some plastic bags loosely over the top of the towel.)

Take the dough out of the fridge 30 minutes before baking them.  Ready a heavy cast iron skillet, and clarify some butter if you like.  Do not cut the muffins until ready to place them in the skillet.

Brush the skillet with butter, cut a 3-inch round of dough and immediately place it in the hot pan.  Pick up each carefully, and hopefully you used enough flour and nothing sticks!  (In a number 8 skillet, I could fit 3 muffins at a time easily.) Cook for 2-3 minutes on the first side, until brownish - or as brownish as sourdough can get.  Carefully flip, and continue cooking 2-3 minutes more until they appear done.  Try to let them cool somewhat before slicing, they continue to cook for a minute or two after removing them from the heat.

(Robertson says they'll keep well in a covered container at room temp for a day or two, but I prefer to freeze what I can't eat in a day.  Let them come to room temperature before splitting them open and toasting them, but that can take up to 2 hours.  An impatient bread fiend can dangerously wiggle a paring knife around enough to split a mostly frozen puck enough to get it into the toaster oven.  But that does involve a stabbing hazard.  You have been warned.)

Tartine english muffin 

I really liked these muffins, but I can't say that I liked them any more than the ones I've made in the past.  I think because I first used this dough as a loaf bread, that flavor of bread lingered in my mind, the craggy holes of English muffin-dom seemed imbued with regular bread flavor.  Because other recipes I've made had a bit of whole wheat flour and a small amount of milk and/or sweetener, the texture of the middles seemed more akin to what I think of as a true English muffin.  But that is all just particulars, since this is a perfectly respectable muffin in all ways. 

And, since they rest overnight - it feels like there is no mess the next day when you go to bake them.

muffin sandwich
Fried egg, cilantro-raisin chutney, and hot sauce on a fresh sourdough English muffin.


Do you love to use sourdough and want to bake along?  You don't need to have a blog, you can find out more on the Sourdough Surprises website.  With the busy Summer behind me, I'm definitely looking forward to the coming months of bakery! 

Oh, and be sure to check out the other participants:

This post has also been Yeastspotted.