Crackers & Dips Giveaway Winner!

I entered the numbers 1 through 18 into Random.org's number generator this morning, and the winner of Ivy Manning's amazing new cracker book is Anna H.!  Send an email to my address under the "About Me" link and let me know your address and I'll get your prize out to you right away.  (If you happen to be local, maybe we can arrange a meet?)

Thanks to everyone who entered, and I hope you all will pick up a copy of Crackers & Dips!

Crackers & Dips: Ivy Manning's Latest Book (And Giveaway!)

Ivy's Skinny Mints

When I think about Ivy Manning's new book, I can't believe that I've been looking forward to seeing the final result since October of 2011.  Time seems both to linger and fly in waves, and looking back over the amount of time that has passed since I first became acquainted with Ivy and was welcomed into cookbook testing with vigor seems oddly surreal.  

Ivy and I have never met; we were introduced online by another online friend who I have actually met in person, Deena Prichep.  Last Thanksgiving, I looked forward to an evening dinner with Ivy as she visited her homeland of Wisconsin, but an unfortunate flu plagued her (and I was iffy about eating, being newly pregnant) and the opportunity slipped by, drowned under the weight of even more passing time.  The good thing about this passing time is that I know Ivy and I will one day finally sit down to supper together, and when dark days hit, I think about this with great anticipation.

I read a lot of cookbooks.  Some year, I should actually keep track and write them all down.  I've talked about this before, how my library was my greatest resource when I was somewhat economically challeged this past year. Kind souls have somehow graced me with copies of books found in thrift shops or book sales, even the occasional author sent me a review copy of a new work I really wanted, when even those $13 meager dollars sent to Amazon were going to be a stretch.  Good things have a way of making themselves available to those who really appreciate it I think...
Amaranth Crackers with Cheddar and Pepitas served with Roasted Tomatillo and Avocado Dip
 (Photo courtesy of Chronicle books.)
 
While things on the personal finance front are finally looking up, my bookshelves could quickly grow heavy with new titles that are worth owning, and Ivy's newest book is definitely among them.  Crackers & Dips:  More than 50 Handmade Snacks is a DIY foodist's dream: and I should know, because I got to make and taste firsthand quite a lot of the contents.  The books that usually find permanent residence in my house are the ones that I grab not only for inspiration, but because I know that the recipe will work on the first go - if I'm making it for the 20th time, or just last minute for company.  The other necessary criteria for cookbook ownership is beautiful design, and this book is also beautifully photographed and illustrated, a unique combination of photography (by Jenifer Altman) and chalk drawings (by Kristina Urquhart).  There might not be a better book suited for both gift-giving and practical use!  Every recipe in this book is going to work for you, for snacking, appeasing the kiddos, gift giving, or party-going.

A School of Fish Crackers (Gluten-Free!)
(Photo courtesy of Chronicle Books)

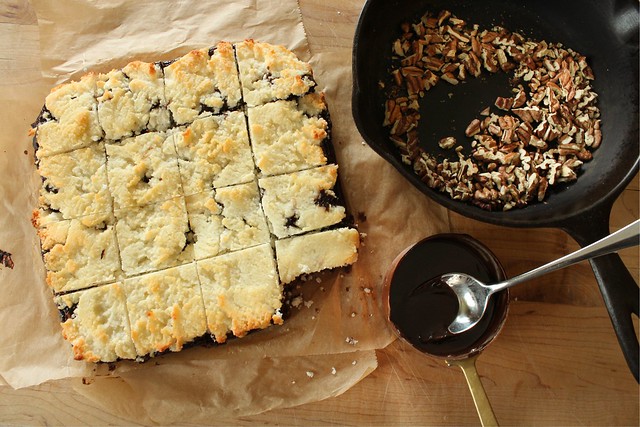
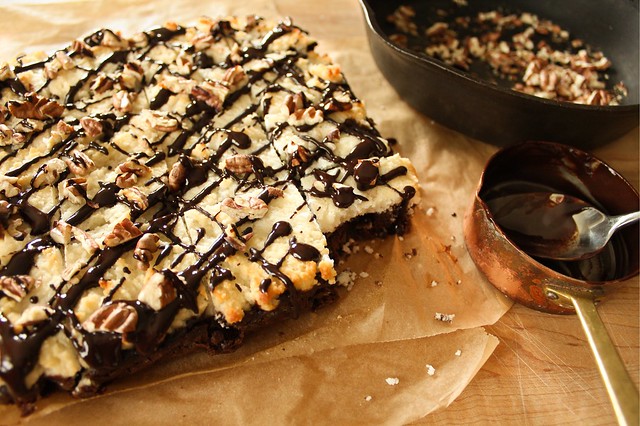
I decided that to celebrate the release of this book, I'd make one of the crackers that I didn't get a chance to test: the Skinny Mint Chocolate Grahams.  Billed as a dessert cracker, these would remind you of a much tastier version of the classic Girl Scout classic.  And after reading this article on the suspect ingredients in them, I feel all that much better to have a really good DIY version!

I love baking by weight, since it is much faster than measuring all the ingredients traditionally, and is more consistent.  This book has metric weights for all of the ingredients listed. I know that when doing my portion of the testing, I double checked the volume to metric ratio, so even if you bake by volume, you can be assured of a good result.
"
Skinny Mint Chocolate Grahams (Ivy Manning, Crackers & Dips: More Than 50 Handmade Snacks)
  • 14 T. (200 g.) unsalted butter, at room temperature
  • 1/2 c. (100 g.) sugar
  • 2 T. honey
  • 1 1/2 t. peppermint extract
  • 1 1/2 c. (185 g.) all purpose flour
  • 1 c. (130 g.) whole wheat flour
  • 1/3 c. (30 g.) unsweetened cocoa powder
  • 1 t. baking soda
  • 1/2 t. fine sea salt
  • 1 c. (170 g.) bittersweet chocolate chips
  • 1 t. canola oil
Preheat oven to 350 f. (180 c.).

Line two baking sheets with silicone baking mats or parchment paper.  In the bowl of an electric mixer or in a large bowl using a handheld mixer, beat the butter, sugar, honey, and peppermint extract together until fluffy, stopping occasionally to scrape down the sides of the bowl.

Sift both flours, the cocoa powder, baking soda, and salt into a medium bowl.  Add the dry ingredients to the butter mixture and mix on low speed until the mixture forms moist crumbs; do not overmix.  Gather up the dough with your hands (it will come together when squeezed), and divide the dough into two equal-size pieces.  Form each piece of dough into a rectangle measuring 4x6 inches, cover in plastic wrap, and refrigerate for at least 30 minutes and up to 2 days.

Place a piece of parchment paper on a work surface and lightly dust it with all-purpose flour.  Place a portion of dough on the paper, dust it with flour and place a piece of plastic wrap over the dough.  Roll the dough out until it is 1/8" thick, picking up the plastic once or twice to make sure there are no creases in the dough.

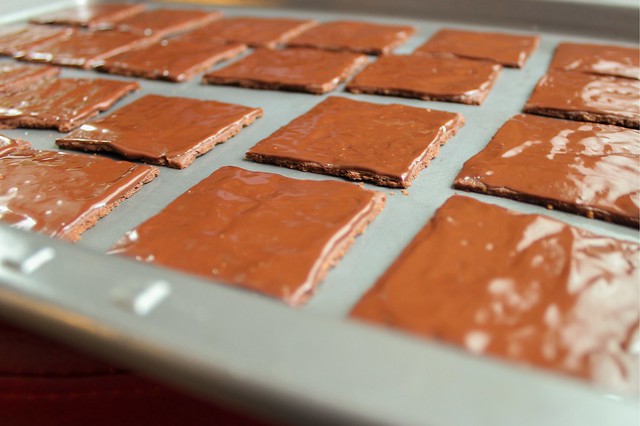
Cut the dough into the desired shapes using cookie cutters, and use a lightly floured spatula or bench scraper to transfer the crackers to one of the prepared baking sheets; reserve and chill the scraps.  Prick each cracker a few times with a fork or comb and bake until they are crisp and smell chocolaty, 10-12 minutes, rotating the sheet once from front to back while baking.  Transfer the crackers to a cooling rack.

While the first batch of crackers is baking, repeat the rolling and cutting process with another ball of dough; the chilled scraps can be re-rolled once.

In a small microwave-safe bowl or a double boiler, melt the chocolate chips until smooth.  Remove from the heat and whisk in the canola oil.  Using an offset spatula, spread about 1/2 t. of the melted chocolate mixture over each cracker and place them on a baking sheet.  Refrigerate the graham crackers until the glaze is set, about 30 minutes.  Once the glaze has set, store the crackers in an air-tight container in the refrigerator for up to 2 weeks.
"

Ivy's Skinny Mints
Ivy's Skinny Mints

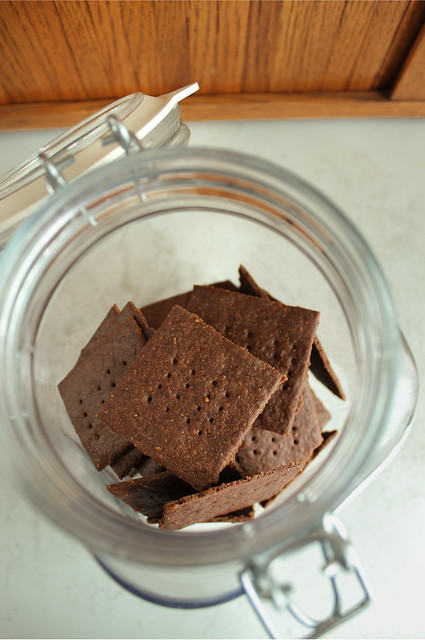
In my whole foods kitchen, I successfully substituted sucanat for the sugar, and olive oil for the canola.  I also like to roll out the crackers directly on a silicone mat with a piece of plastic wrap over the top.  I found that I didn't need to use any additional flour that way.  I also cut the crackers into squares in part because I was a bit lazy, but also because there is less waste that way.  And besides, that way I get to nibble every ragged edge of chocolate mint graham cracker myself.

Ivy's Skinny Mints

So now for the fun part:  I was given a copy of this book to giveaway!  This is the first giveaway that I've had that didn't contain something that I made myself (Pomegranate Jelly or Candied Jalapenos), or something that I bought to giveaway (WMSE Rockabilly Chili Cookbook).  Historically, I am a small blog with a dedicated readership, so your chances to win this beautiful book are very good.  I wouldn't mind if you share the post and the word about Crackers & Dips with your friends however, because I know they would appreciate a homemade batch of crackers too.  To enter, just leave a comment below before midnight next Friday, May 17th.  I'll choose a winner using a Random Number Generator on Saturday the 18th, and post it here and on the CakeWalk facebook page.

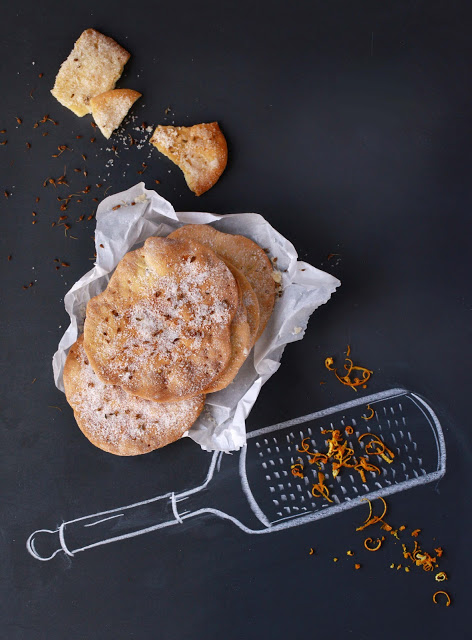
I'll leave you with the image of my favorite recipe from the book:  another dessert cracker made with rich olive oil, orange blossom water and aniseed.

Spanish Olive Oil Tortas
(Photo courtesy of Chronicle Books)

This recipe is alone is worth the cover price, especially when you consider that a gourmet, wax papered bag of pretty Ines Rosales crisps costs quite a bit in specialty food markets... and isn't it so much better to make it yourself anyway?

Congratulations to Ivy Manning on a gorgeous accomplishment!


Disclaimer:  I did receive a copy of this book for review, and another to giveaway.  My opinions of this book are my own, well deserved, and are not embellished!

(Paleo and/or Gluten-Free) Strawberry-Rhubarb "Bars".

It is no secret that I have a wicked sweet tooth.  I have made great strides in consuming less sugar, specifically less desserts, but lately?  Man.  I am really craving the sweet stuff.  I'll go ahead and blame the pregnancy hormones, which is fun and easy to do - but so far, I'm doing a pretty good job of not giving in to overly refined sweets.  Part of the reason is that I'm finding naturally sweetened things to help me out.  The post-suppertime call of dessert is after all a part of my genetic make up, and who am I to buck the mold and abstain?

rhubarb strawberry bars, gluten-free

I will also publicly confess that I don't think I should be eating rhubarb.  This kills me, because rhubarb is one of my most favorite things - especially during this time of the year when you can't barely log onto your computer without finding a half dozen stellar looking rhubarby treats.  Rhubarb is part of the nightshade family, and one of the foods that I've self-diagnosed as a trigger for my skin problems.  Last spring, I may have overdosed on the kuchens and jams... and my hands really paid the price.  But this week there was one last bag of frozen, chopped rhubarb from last year in my deep freeze, and after this gorgeous post by Alanna at the Bojon Gourmet I figured I'd risk the minor skin irritations and come up with a no-refined sugar dessert for myself.  (Even though I'll likely have to make Alanna's version when the new crop rhubarb finally gets here!)

I suppose this dessert is mostly paleo friendly;  it's definitely gluten-free and refined sugar free.  It's also very much on the not-too-sweet side, leaving just enough room for a scoop of vanilla ice cream on the side, though I've been just as happy having a generous spoonful of full-fat plain Greek yogurt on top. To coerce my son into having some, I just added an extra drizzle of maple syrup over the top which made it plenty sweet enough to convince him that he might just like rhubarb after all.

rhubarb strawberry bars, gluten-free

If you use frozen rhubarb and strawberries, there is no need to defrost them first.  I think the flavor of the dessert is better the next day, after it has fully chilled and had a chance to "set up".  These are the type of bars that require eating with a fork, unless you are very cautious and eat over the sink.

Strawberry Rhubarb Bars
  • 2 c. chopped rhubarb (frozen is fine)
  • 1-2 c. sliced strawberries (frozen are fine)
  • 1 T. rapadura
  • 1 T. maple syrup
  • 1 T. cornstarch or arrowroot powder
  • 10 dates
  • 3 eggs
  • 1/2 c. sprouted almonds (50 g.) ground into a meal
  • 1/2 c. (50 g.) unsweetened, dried coconut
  • pinch of salt
  • 1 T. rapadura
  • 1 T. olive oil
  • 2 T. butter, cut into small pieces
Preheat oven to 350.  Butter a 9x9 glass baking dish and set aside.

In a medium bowl, combine rhubarb, strawberries, 1 T. rapadura, 1 T. maple syrup, and cornstarch and stir well to combine.  Pour into prepared baking dish.
Using a blender, blend the eggs and dates until they are fully blended.  Pour over the rhubarb and strawberry mixture.

In a small bowl (or the same bowl you used to mix up the rhubarb and strawberries) combine the almond meal, coconut, salt, rapadura, oil, and butter and mix with your fingertips until you reach a good crumbly consistency.  Spread evenly over the top of the dessert.

Bake until puffed and lightly browned across the top, and a tester inserted in the center comes out clean - about 1 hour.  Cool completely to room temperature, then store in the refrigerator.  Serve with an extra splash of maple syrup, vanilla ice cream, and/or plain Greek yogurt.

gf coconut topping

Spring in Wisconsin is off to a slow start - which is really excellent news for maple syruping, but not so good news for us sun-starved northerners.  In many places around the country, the rhubarb is already up and ready to cut, but we're still waiting for a bit more warmth here to be so lucky.  Then, I'll replenish my frozen stores and continue to repress my physical sensitivities to this most wonderful marker of spring.  I'm sure I'll be figuring out a few more ways to enjoy rhubarb without so much sugar!

rhubarb strawberry bars, gluten-free

Sourdough Surprises April 2013: Sourdough Pasta.

The Sourdough Surprises challenge this month was pasta.  I have to confess that while I have tried a whole lot of sourdough things, I have never considered adding starter to pasta before this challenge.  Sourdough starter really makes good pasta.

sourdough pasta

Since I am still obsessed with the Ken Forkish bread-making ratios, I often have extra 80% hydration starter to use up.  The day I mixed up this pasta, that is exactly what I used.  The recipe that The Gingered Whisk suggested worked well with my starter, I just added flour to feel (about a cup if I remember right) and kneaded by hand for several minutes until the dough felt most like the many traditional pasta doughs I've made in the past.  I also used a whole egg and 2 egg yolks, because I had a couple of extra yolks to use up.  Then I sealed it up in a glass bowl and just tried to be patient.  I actually had to punch it down a couple of times, as the starter was active enough that it was raising the dough...

I let my pasta ferment at room temperature for a full 7 or 8 hours, ensuring it was a truly fermented food.  By the end of that time frame however, it was late afternoon when I started rolling it through my Pasta Queen; I hadn't planned a meal around fresh noodles.  I rolled them to the level 6 (of 7 levels) thickness, then tossed them in plenty of flour, as my Mom does when cutting rustic soup noodles... then I decided to dehydrate them for using another day.

sourdough pasta

I only recently discovered drying out pasta in the dehydrator, and it really works well.  My only problem is that I need to keep my dehydrator in the basement for space reasons, and in addition to sometimes several trips up and down the stairs with loaded screens, sometimes I forget that I've left something in there for days after the drying has finished.  Not so much a problem I guess, but this pasta I forgot about for about a week before the Sourdough Surprises Facebook page posted a challenge reminder!  Then, I carefully brought my screens up and packed the fully dried noodles into jars.  They were more fragile than traditional noodles I've made, but when I boiled some quickly (as in fully cooked in three minutes) they were delicious and tender.  Maybe tender to the point of nearly falling apart... but that could have something to do with the dehydration.  Next time, I'll mix up pasta early in the morning and cook it fresh for comparison.

sourdough pasta

My boys devoured my sourdough noodles, which I only buttered and salt-and-peppered.  It was the fastest meal ever, since I pulled some frozen beef stew from the freezer and pan fried some finally here spring asparagus.  It really had a marvelous texture, despite being robbed of some looks.

I was very happy to be challenged to make pasta this month - and I can't wait to see some of the pastas that others have made.  I certainly want to try some stuffed pastas when I remember to allow more time, and I know this isn't the end of my sourdough pasta-making!


(Magic) Bars. And Paleo Diet.

My state is known as the drunkest state.  It's a fact that I'm not so proud of, and certainly one that bears no bragging rights in my opinion.   My city is founded on capitalizing breweries and brewers, Eastern European immigrants taking advantage of our excellent water resources and creating an environment where it's pretty easy to find a good beer, if not a few too many good beers.

Perhaps working in tandem with the drunkest state moniker are the  numerous corner bars dotting the city.  They give us the feeling of a being larger city than we are, and if you are not participating in the binge culture, there is also a sense of civic pride in our hand-craftiness.  Good things are indeed made in Wisconsin.

Not the least of which are bars of another sort, the cookie type hastily pressed into pans to avoid the more time consuming labors of shoveling drop cookies into and out of the oven every 12-15 minutes.  I assume it's a trend passed down by the same ingenious Midwestern predecessors, that at every church potluck and every summer picnic someone brings a pan of bars.  I think I took this for granted (or maybe didn't even acknowledge it) until a dear out-of-town friend visited years ago with her boyfriend at the time.  He had never been to the Midwest, and it was he who first mentioned the connection about bars and the Midwest to me.  And, wouldn't you know, my mother-in-law came over that very afternoon with a delicious pan of "Hello Dollys", a classic bar cookie for me to serve to my company...  I remember he was thrilled.

Paleo magic bars.

In my own kitchen, where I can't really spend too much time, cookie baking usually rules outright.  But cookies also run the risk of being too easily snatched and hastily eaten by yours truly.  They also have a lot of sugar, usually both white and brown to tame the tenderness issues often plaguing them.  I'm still dutifully trying not to give in to sugary temptations, and this results in not baking so many cookies anymore.  And then there is the business of all that grain...

I am endlessly interested in health as it pertains to staying out of the mainstream medical system.  That is probably the most driving force in my personal sugar reduction:  I know that nothing good can come from sugar.  Lately I see an increasing interest in the Paleo diet, or other similar diets that preach the exclusion of glutenous grains, adopting a more primal way of eating.  In general, I'm never going to subscribe heart and soul to a diet that leaves me devoid of all carbohydrates, especially when I am a baker at heart.  But more and more I can really see the appeal and benefit of these diets to mainstream America.  It's good to spread the gospel of heavy helpings of fruits and vegetables, and it's good to demonize the processed food industry.

So many people are so much busier than I am, and have far less time to soak, sprout, and obsess over what kinds of grain should be eaten.  In these cases, perhaps it is better just to cut grain out altogether?  Most people can benefit from eating more vegetables, and even more quality (well raised and sourced) meats too.  After all, paleo diets really are just whole food diets that focus on raw materials and not packaged cheats - and that is what is most important.  I'll support that type of diet!

Aside from health issues, I find it a great challenge to bake healthy, low or no-sugar desserts that satisfy both my need to bake and my desire for sweets.  I'm finding that desserts labeled "Paleo" fit that bill nicely.  One of my best recent finds has been a Facebook link called Just Eat Real Food.  It is exactly what it purports to be, real food links from across the Internet where it seems I'm spending less and less time.  It's nice to have a resource of links like that, one where I found this recipe for Paleo Magic Bars the other day.  Last night after supper I mixed them up and baked them, and I could barely get the kiddo out the door to school fast enough this morning to finish them up.  Our stormy morning was good for cracking a few more of the in-the-shell pecans my neighbor gave me anyway.

Paleo magic bars

For the date or date/fig paste called for in this recipe, I used leftover from the raw/vegan fig bars I made recently.  To make it, soak dates (and/or figs) in boiling hot water for about a half hour, then run them through a food mill or food pro with a bit of the soaking water until they have a jammy consistency.  I would think a half cup of dried fruit would give you more than enough paste for this recipe.  Also, make sure that your honey is "runny" and not crystallized and you will have an easier time of things.

Paleo Magic Bars (barely adapted from the Healthy Foodie)
makes 1 9x9 inch pan

bottom layer:
  • 1/3 cup date (or date/fig) paste(see note above)
  • 1/2 an avocado
  • 3 eggs
  • 2 T. raw honey
  • 1 t. vanilla
  • 2 T. coconut flour
  • heaping 1/4 c. cocoa powder
  • 1/4 t. baking soda
  • 1/4 t. cream of tartar
  • pinch of kosher salt
  • handful (50 g. as the Healthy Foodie suggested) sprouted almonds, medium chopped
top layer:
  • 1 1/2 c. unsweetened, shredded coconut
  • 2 T. melted coconut oil
  • 2 T. softened coconut "manna" or butter (like this, or make your own)
  • 1 T. raw honey
  •  2 egg whites, beaten to soft peaks in a medium sized bowl
chocolate drizzle:
  • 1 T. melted coconut oil
  • 1 heaping T. cocoa powder
  • 1 T. raw honey
  • handful of toasted and chopped pecans for garnish
Preheat the oven to 365.  Brush a 9x9 glass pan with coconut oil, and line with crisscrossing sheets of parchment paper.  (This aids in removing from the pan later.)

In a food pro, combine the date paste, avocado, 3 eggs, honey, and vanilla.  Process until very well blended, about 30-60 seconds.  In a small bowl, mix coconut flour, cocoa powder, baking soda, cream of tartar, and salt with a fork until well blended.  Add to the contents of the food pro, and pulse just until combined, about 5 good pulses.  Spread the bottom layer into the prepared pan, taking care to smooth into the corners.

Rinse the food pro container out well, and add the coconut, coconut oil, coconut manna, and honey and process until well blended, about 1 minute.  Add this mixture to the soft peaked egg whites, and fold in gently until well combined.  Spread this mixture carefully in an even layer over the chocolate layer.

Bake in the preheated oven for 22-25 minutes until lightly browned across the top.  Cool on a rack for an hour (until room temperature) then refrigerate overnight or until well chilled (about 6 hours).

When chilled, make the chocolate drizzle by combining the coconut oil, cocoa powder and honey in a small bowl.  Add a little extra coconut oil if it seems too thick, you are looking for a thin drizzle consistency.  Drizzle across the top of the bars, and sprinkle with the pecans.  Store in the fridge, in part so you don't eat them all right away.

Paleo magic bars

These bars are much less sweet than traditional sweetened condensed milk versions of magic bars... but they still really satisfy.  I won't claim that they satisfy as much as a giant wedge of traditional magic bar, but they do not leave you feeling guilty and with a "why-did-I-just-eat-that-whole-thing" kind of feeling.  And, they are made entirely with real, whole foods.  I especially like that my picky kid liked them, and that they sneak in avocado, which is tremendously underused in chocolate bakery...

Paleo magic bars.

So what about you?  Are you also seeing a shift to more healthful, whole foods with less refined carbohydrate emphasis?  I think the Paleo trend is here to stay for awhile, and I am kind of glad.  I'm not about restriction and arguing over the color of my potato (though for the record, I do prefer sweet potatoes), but there are a lot of valid ideas surrounding this more natural way of eating and viewing food.