Seedy Crisps and Cheese (Balls), or In Which I am the only person in America not making Super Bowl foods.

I guess you could say that I really dislike most sports. I never enjoyed playing organized sports, grew up in a family who never paid any mind to what sport was in season, and generally was never interested at all in using my free time to watch them either in person or on television. I embarrassed myself terribly each fall Friday when guessing the high school football team's final score in one of the Coach-taught classes I took, since my number combinations were never actual possibilities. I forget why I even took part in this, I think a reward was involved for the winner.

My view of sports changed somewhat when I met my Husband. I watched more baseball in the summer of 2004 than I did in my entire life to date, and to tell the truth, it did seep into my blood a bit. But baseball is not where the sporting events my Husband follows ends - in fact it is just one of many sports that interest him. If I made a list of sports I could watch that he does enjoy in order of my relative enjoyment (and I'll limit it to 10 items here...) it would be as follows (number 10 being most tolerable):

10. Baseball
9. Wrestling
8. Boxing
7. Hockey
6. Soccer
5. Golf
4. Basketball
3. Tennis
2. Mixed Martial Arts (MMA or UFC)
1. Football

I'm not sure why I hate football more than any other American alive, but I think it has something to do with the fact that I can not understand the rules at all. Can't and don't want to, if I am being honest. This past week or so, I've read a lot about what food bloggers will be having for their Super Bowl parties, or have had at parties in the past. I now have a whopping 5 Super Bowl parties under my belt - and kind of feel bad that I can't really identify to the most American of sports and food spectacles.

As a kid, Super Bowl Sunday was just another Sunday to us. I honestly do not recall my Dad or brothers ever being interested it it. And it wasn't until 1999, that I asked R1's husband and he tried explaining the rules to me a little. It was usually on Packer-football Sundays that she and I would either go for a walk or go shopping in pleasantly dead stores instead of me practicing how to understand a spectator sport. (If I am being fully honest, I will say that in 2001, I did watch the entire Super Bowl for the first time in my apartment in Wilton, armed with some now-forgotten knowledge. I was more interested in the commercials, and I think my little brother came and brought a bag of chips with him - so that was kind of a party...)

When I checked my computer this morning, George Gaston, of A nod is as good as a wink to a blind horse, had commented on one of my posts. I sometimes don't get to reading as many other food blogs as I'd like, just since I don't spend too large a portion of time in front of the computer. I clicked over to see what he was up to and read the most wonderful description of his love for spreadable cheese balls and parties when he was a child. He was chided for his love of the Cheese Ball, but he came up with a recipe for one that I knew I had to make. Since I had a free day today with dinner already complete (and a Super Bowl party to attend tomorrow with nothing to bring), I thought I'd give it a go.

But in my mental preparations, I knew that I couldn't make a Cheese Ball without first having some kind of cracker to spread it on, so this is where I began:

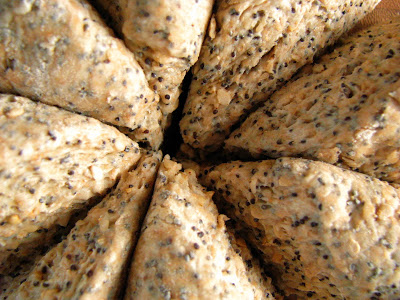
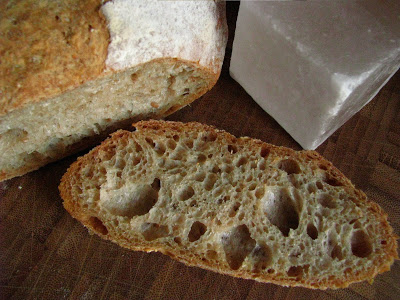
Alton Brown's Seedy Crisps. I love this recipe, and that it really isn't a messy dough to work with. It's fairly forgiving, has a great flavor, and even keeps well stored in glass for a couple of weeks. Whenever I think of crackers, I think of Alton, since he "doesn't trust his cracker making to elves in trees" and insists in weight measurements for accuracy in baking. I printed out his recipe from Food Network, though it was also featured in one of his books, and usually weigh the water but not the dry ingredients with fine results. You can roll them with a pasta roller as I did, or by hand. Your thickness directly determines the cooking times, so watch carefully.

Seedy Crisps (adapted (but really only the weights) from Alton Brown)

  • 5 oz. whole wheat flour (I use 1 c.)
  • 4 3/4 oz. AP flour (I use 1 c.)
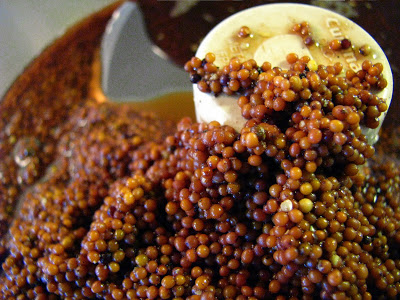
  • 1/3 c. poppy seeds
  • 1/3 c. sesame seeds
  • 1 1/2 t. table salt (they are a bit salty, you could use 1 t. and be just fine I think)
  • 1 1/2 t. baking powder
  • 3 T. olive oil
  • 6 1/2 fl. oz. water (this is less than a cup, but more than 3/4 c.)

Mix all of the dry ingredients in a medium bowl and then add the olive oil. Stir with a spatula until well mixed. Then add water, and stir/mix/fold until a dough appears. Turn it out onto a lightly floured surface and knead it 4 or 5 times until it feels like a proper dough. Try not to overwork it. Cover with a towel and let it rest 15 minutes.

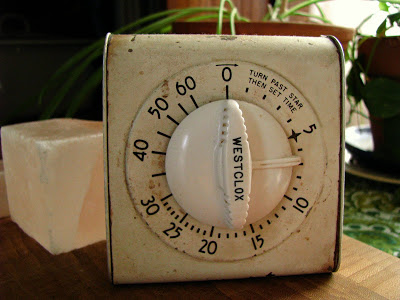
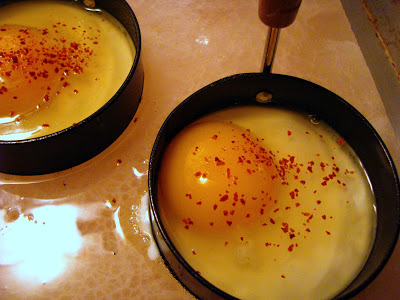
Heat oven to 450 degrees, and use the center and above center positions in your oven for the racks. Cut dough into 8 pieces (like a pizza, is the way I do it), and roll with the pasta machine to the thinnest setting without tearing the dough (5 on my Pasta Queen), or roll by hand as thin or thick as you like. (For thin crackers, aim for 1/16 of an inch thick, and for thick 1/8 of an inch.

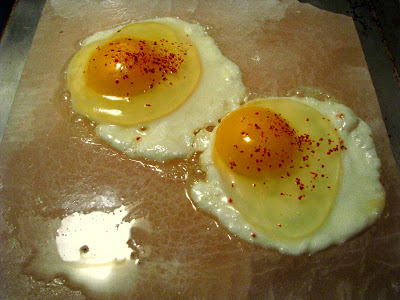
Alton likes to transfer the large sheet of dough to a parchment lined sheet and bake it whole, breaking it apart when it cools. I did a couple that way, but then cut the rest into strips with a pizza cutter and transferred them to parchment lined sheets with a spatula. It's slightly more work, but less mess in the long run.

Thin crackers will bake about 4 minutes on the first side, then 2-3 more on the other (but I did mine 5 minutes, then flipped and let them bake another 3-4 until they were nice and brown). Thick crackers (according to the recipe) will bake about 6 minutes on the first side, then 4-6 minutes on the second.


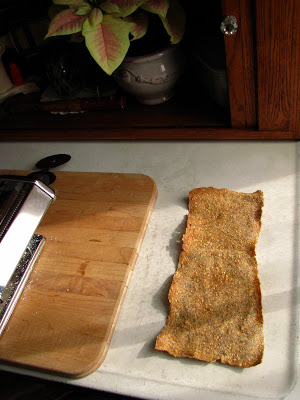
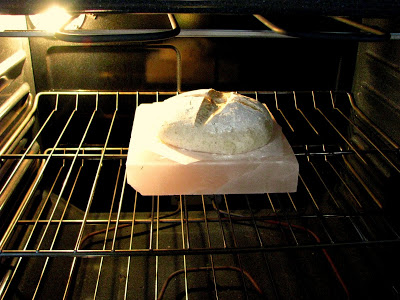
The large sheets looked like rustic sheet music, and when I broke off a piece I ate it immediately with a spreading of whipped Novia Scotia blueberry honey that my Parents brought me from their last vacation. I though if I had some prosciutto with the honey, that would have been really perfect. Then I thought, an aged Swiss cheese and that spicy mustard would be really perfect, too. I imagined the possibilities as I took advantage of my hot oven to bake my sweet potato for George's recipe. It was a huge sweet potato, and took almost an hour.

Wait a minute, a Cheese Ball and I'm baking a sweet potato? Go ahead and click over now, since I know you are so curious, and I'll wait for you.

You can see why I was so intrigued by this recipe. It was actually mostly good for you, and so pleasantly absent of that port wine veining, that you know has got to be a FD&C color of some sort. I hardly altered it, too! I did use more jalapenos, and actually didn't add the nuts because I forgot, but that was it. Then, I just left it "dip shaped" instead of classically "Cheese Ball shaped", since I didn't want to fuss.

I made a half recipe since I thought I'd be snacking on it for a week by myself. I even had mental planning to make some bagels for the other 4 oz. of cream cheese, and even the Cheese Ball spread that I knew I would like. Then, I asked my Husband if he wanted to try some "dip", since I knew he already liked the crackers. Success! Am I going to divulge the secret and orange ingredient? Not unless he asks. Now I'm *almost* wishing I was having a Super Bowl party to serve it for.

Please take the time to check out the many amazing recipes and great writing on George's site. you may find a few surprises that you are now glad you won't live without! I know I'm going to be keeping closer tabs on it, too.

In search of healthier granola, (or in which I discover Toasted Muesli)

Last weekend, I found myself in need of granola. Normally, I make a batch once a month - but that was before the Boy-O came into the obsessed with granola food phase. Now, he requests granola for 3 meals a day. At least he's moved on from the peanut butter and jelly sandwiches (and with that, I find myself making a lot less bread), but I actually had to make another batch today, since the other was nearly gone. Granola making is an easy task; you don't even need to accurately measure if you don't feel like it. You can use what grains/seeds/nuts/dried fruits you have on hand, and have a completely different experience every time you make it quite by accident. Normally, I don't write down what I'm doing as I'm doing it, but in my quest for a healthier granola, I did.

I did ship off a quart jar of my last batch to a new "Internet friend", so that accounts for something, but since the Boy-O is seriously garnering most of his nutrition now from granola, I am forced to seek out ways to increase the healthiness a little. Last weekend, I replaced all of the refined sugar with agave syrup and honey (I used to use a little brown sugar) - but today I went a bit further and used rolled grains that were higher in protein: kamut and wheat flakes. I had never tried kamut before, and while munching a few of the raw, flattened grains, I could tell they were much tougher than plain old oats. They also had a peculiar striation pattern that made me think of gnocchi.

Kamut, is an older varietal of wheat, so is not gluten-free. From my last Daring Baker Challenge, I learned that oatmeal is GF, if it is processed in a facility that does not allow cross-contamination with other products. Kamut grains are roughly 3 times larger than regular oats (though not in their rolled state), and contain about 8 grams of protein per half cup serving. There are 5 grams of protein in regular rolled oats, at least according to the co-op bulk bins. So, for a Boy-O who won't eat meat (other than bacon), seldom eats an egg, and is rather picky about greens in general right now, I figure those 3 little grams must add up!

I didn't have any particular reason for trying out this grain. As I perused the bulk grains aisle as the co-op, I actually wanted to try the quinoa flakes because I know that quinoa is a complete protein. Since they were out, I asked a worker which were his favorite and both the bins of his recommends were barren as well. It wasn't a good day to shop the bulk aisle I think, and in the end I just went by amount of protein on the nutritional information cards. I figured that the grains would toast mostly the same as rolled oats, and in the end, I was mostly correct.

Last Saturday's batch had a couple of T.'s of olive oil in it, but since I had a small portion of butter out on the counter in its wrapper, I figured to use it up. It gave me a change to use one of my favorite garage sale finds, an incomplete set of copper measuring cups. I can put them directly on the heat to melt butter, and one of them is a 3/4 c. measure which comes in handy and is not normally included in modern measuring sets. They are like miniature pots, really.

My method for granola making is always the same, I mix the dry and ingredients separately, toss them together in a stainless mixing bowl and then spread onto a baking sheet. I have found that I can either line the sheet with parchment or leave it unlined and it doesn't make much difference especially when using little to no added fat. I always add the dried fruit after baking, but when there is still a little warmth left in the granola.

Ultra Crunchy Granola (or Toasted Muesli)

  • 1 1/4 c. kamut flakes
  • 1 1/4 c. wheat flakes
  • 1 1/2 c. thick rolled oats
  • 1/2 c. coconut (I like the Let's Do...Organic brand, and it's actually really inexpensive in Whole Foods!)
  • 1 c. walnuts, chopped
  • 1/4 c. sesame seeds
  • 1 t. cinnamon
  • pinch of Kosher salt
  • 1 1/2 T. butter
  • 1/2 c. agave syrup (I used raw dark for the first time, and was pleasantly surprised at the flavor)
  • 1/2 c. raisins
  • 1/2 c. dried cranberries (more or less of any dried fruit, really)

Bake at 350, stirring every 10 minutes until it looks as brown as you'd like it. Remember, that it gets crunchier as it cools. This batch baked for about 30 minutes.

I could hardly wait for it to cool enough to try. Everything I've tried with agave syrup lately I've ended up loving. It's so delicious on its own, and really gives a pleasant amount of sweetness without being at all sugary. It has the added benefit of absorbing slowly into the bloodstream, preventing the sugar spiking effect that is the bane of Mothers everywhere. Prior to this, my favorite sweetener for granola was a combination of honey and maple syrup. I hate to say, that maybe this is going to become my new staple - especially since it was so crunchy I decided to soak it like a muesli.

I do love muesli, as I described here, normally in the summer when I enjoy eating a cold breakfast. Just a moment of forethought before bed, and the oats magically transform into "fully cooked" by morning. I never thought of soaking a granola before, but tried it right away since the crunch factor was so high with the kamut. Even a quick 30 minutes in the refrigerator covered in milk, and the grains swelled and the cinnamon popped - I did use the cassia, which I reserve for just such this kind of welcomed effect.

If 30 minutes was a serviceable soaking, then 8 hours was completely transforming. I just tried a spoonful that I've had soaking since about noon, and it is silky and delectable. Now, I can't wait for breakfast tomorrow.

It's Not Too Late for a Very Important Date...

I think dates are some of my favorites in the vast world of dried fruit. While figs are charming, there are seeds to contend with. While raisins are workhorses, especially when soaked to proper plumpness in either liquor or boiling water, they can err on the side of sweet. Dates, however, are perfectly palatable in sweetness and texture when properly stored. In either sweet or savory application, there is no better candidate for versatility either. Tagines with lamb and dates are perfection in my mind, and these cookies that I'm about to share with you are now officially on the Food Obsessions list in the sweet category.

One of my favorite new blogs is innBrooklyn, which is a design/food/green living/technology/knitting blog run by Noerah and Talia. They began late in December, and have a number of good ideas - and all of it makes for a unique experience each time you visit. I couldn't wait to try these Date Biscuits that were posted on Jan. 30th, but I made myself wait judiciously until the very last piece of my chocolate cake was gone. For those of you keeping track, I actually kept a chocolate cake on my counter for 8 days. Boy-O and I were the only eaters, and though it wasn't my favorite recipe, it got the job done in the dessert department.

Now this will tell you something, since normally, I would have made the date biscuits anyway and then tried not to eat two desserts simultaneously. I'm well on the road to reducing my consumption by just simply making less food. This is hard for me! I love to bake especially, and to not turn on my oven is excruciatingly hard. But not only did the day finally come that my cake was gone, in true innBrooklyn green living fashion, I didn't even need to turn on my oven to make these amazing "cookies".


This recipe melts butter stovetop, and adds the remaining ingredients without heat involved: a no-bake method. I'll let you look over at the link for the proper recipe, but will note that it calls for British Marie Biscuits, which you may be able to find in a specialty foods store, but are very closely related to Maria cookies, which are widely available in the Hispanic food section of many stores. I weighed a package on my digital scale, and removed just one cookie to get the 200 grams called for in the recipe. Bet you can guess where that one went...

At this point, I'd have to say that SOMEone NEEDS to make a pie filling based on this date/butter/cocoa powder filling! My first choice would be none other than Gina, the Goddess of Pie. If the GOP can't find a way to turn this recipe into the most delicious pie ever made, I'd be surprised. The only other alteration I made to the recipe was to let the date mixture cook just slightly after I added the egg to make sure it got hot enough, since I melted my butter at a pretty low temperature. After adding the hot mixture to the Maria cookies, I found it near impossible to stop "sampling", hence my dreams of a forthcoming pie.

We had pretty snow globe snow most of the day yesterday, and as I used the remaining afternoon light to photograph these roly morsels, I thought how perfect to make such snowy looking things on a day like this. Promptly after photography, the eating ensued. Bite sized things are always hard to resist, and these are deservedly no exception. Boy-O loved them, and I had to be a good example and not eat them all in one sitting. My confession is that they are probably almost half gone, and that just thinking about them makes me want to go and sneak another. But like I said to Lo earlier, they can be nearly be construed as healthy, what with all of the fiber packed in there svelte, round selves, so why not?

Mustard and Muffins

A frequent sight around my kitchen are magazines with marked recipes, a case in point:

The top of this stack was from a year ago already, and was found when attempting to de-clutter some organized, obviously, but overwhelming stacks of recipes to try in my hutch cabinet. I confess that I actually have a problem getting rid of recipes that I think I'll try someday, and it isn't until the weight of a shelf or my well-hidden stashes get filled up to capacity that I consider some clearing out and paring down.

I also find it exceedingly difficult to toss out back issues of Saveur. I think I have every issue of my 4 plus year subscription run. They are stored neatly, but recently have reached the capacity of the shelf holding them - so I need to decide what to do. You can bet that most of them contain as many flags as the issue above. But that above issue will have to stay, since it was one of my most favorite "episodes" of the Saveur 100: The Home Cook Edition.

It came out in February of 2009, and peppered throughout were condiment recipes that I knew would make the list of keepers. In the back of my mind, I thought at some point last year I would have made them all, but sadly I'd either forgotten or was busy with other things while the pile of Sadly Neglected Things to make grew steadily in the hutch.

It's such happy occurance to remember, and revisit, those brightly colored flags of the forgotten - since I just found a new obsession: Spicy Guinness Mustard.

It always amazes me how easy some of the best and most versatile kitchen condiments are among the most easy of things to create from scratch. This no effort recipe simply needs to be mixed up, rest for 24-48 hours, and then blended into spicy emulsified oblivion.


I had to include this above shot, since the Saveur test kitchen photos accompanying the original article used a bowl of the same design as this dish I use for underneath my plants. Strange coincidence.

I only needed to let the mixture rest 24 hours, since the mustard seeds surprisingly swelled to double their size. I do love the smell of vinegar, which was the predominate aroma surrounding my project so far, and I was more than a little surprised at the spiciness that emerged after the spin in the food pro. One (over indulgent, since it actually brought tears to my eyes) sniff into the top of the whirring machine and I was instantly transported to my Dad's ever present little Inglehoffer jar on the top shelf of the fridge when I was a kid.

I always think of my Dad when I eat (or now make) spicy brown mustard, and my Mom for plain yellow (preferably French's), since those are their tastes respectively. I don't think I would have thought to claim a side in this happy Mustard War until now, when I am certainly convinced that Spicy Guinness Mustard is THE mustard of choice for me.

So why Muffins and Mustard, you ask? Because last week, Deena at Mostly Foodstuffs made Dorie Greenspan's Corniest Corn Muffins, where she also dictated the recipe, and I remembered how much I loved them. As I was invited to a Soup Nite, this was the perfect time to remember them, and thanks to Deena, I also remembered not to over mix.

Dorie uses a cup of fresh or frozen corn (frozen in my case), and also said to use up to 1/3 cup more corn if you so desire. I opted to chop up the same amount of some of my candied jalapenos for one batch, and some piquant Peppadew peppers for the second - which is the correct choice in my book since these muffins are on the sweeter side of corn-muffindom, and they can handle it! Luckily, I had an extra muffin - the larger, more rotund, gentleman seen below:

He gets his looks, which really is more of a muffin top physique, from baking these If You Care muffin liners without popping them into a muffin tin first. I actually never knew you could bake them on their own, until reading the side of the box one day. It's a good thing to know.

Since the corn muffin scent was lingering intoxicatingly in the air as I whirred up the mustard (3 short minutes is all it takes - it took longer to clean up the dishes from the mustard making ordeal!) I knew that taste test would have an inevitable outcome:


Not bad on a sweet Corniest Corn Muffin... but even better on a plain cheese sandwich on fresh bread - my lunch of choice yesterday when I ate so much mustard in one bite I had the dreaded "Wasabi Effect". Boy-O was looking at me wondering how he got saddled with such a strange and obsessive Mami...

Adventures in Saltware...

It doesn't take much effort for me to get excited about experimentation in my kitchen. I actually found it hard to sleep the other night after the Salt Block cooking class, just imagining what fun I'd have playing around the next day. My first order of business was to get some better looking photos with a full charge on my batteries and some much appreciated sun coming in the dining room window.

That miserable looking spider plant on the right may do well to soak up some much needed light in its new location: I've had it since high school, and this is the final piece.

The first thing I needed to do was bring the Saltware up to temperature slowly. Since this was my first experience, I may have been a bit overly cautious, and waited a full ten minutes from the time I heard the *beep* signaling the increase, before inching up 20 degrees at a time. As I had started at 200 degrees, this seemed to be taking a while. I used my favorite timer, pictured below.

Around 300 degrees, I started to notice that the incremental temperature change seemed to be speeding up. I started to increase by 25 degrees every time I heard the *beep*, and before long, I was finally at the 450 mark. I had formed my small round of bread (from my recipe of stored dough) prior to the oven heat, and made sure to use a small enough amount so it would fit nicely on the 8x8 salt block.

I also took Chef Malavenda's tip of letting the dough rise on parchment, and then sliding it out from under it about 5 minutes after it hit the salt - making sure that the dough was set enough that it wouldn't move. I think the bread turned out fine, but not too noticeably different than the breads I usually cook on a stone. I also noticed the flavor wasn't noticeably different, but I'm wondering if I shouldn't crank the oven up to 500 next time, and try and slide the dough right onto the slab.

It was delicious bread, and because I used no steam in the oven, the crust was nicely chewy. The interior texture was about normal, if not a little more moist, and it was very, very tasty. I even ate some today with butter (something that never happens in the privacy of my own home), after Chef Malavenda said to store unsalted butter on a slab of salt, since it slowly draws out the flavor.

I decided I had to make fried eggs for supper, since I had fresh bread, some local Saxon cheese, and a still warm salt slab. I began my oven heat increments a bit faster, since the block was still fairly warm to the touch, and when I hit 450 degrees I placed the stone stovetop on top of a sheet pan, just in case.

As soon as the salt slab was in place, I poured some extra virgin olive oil, and brushed it around evenly. I knew immediately this was the proper choice for my inaugural egg-frying experience. The fruity, mineraly steam that rose from the salt was intoxicatingly good. I quickly opted for further insurance, and used egg rings until the eggs were just barely set. I wasn't sure just how hot the stone actually was, and was a bit worried that they would run a little too much.

Just a quick sprinkle of Aleppo pepper, and a quick bat of my right hand by my left out of the salt dish... old habits are hard to change! You can kind of see in the above photo how the salt seemed to "crack" under the weight of the oil and eggs - it even seemed to have changed color when the eggs were removed. It is so interesting to see how natural products change as you use them! (It also reminded me of when GOP and I decided to crack an egg onto the black, hot asphalt of the next door bank parking lot one particularly scorching summer's day. It did not work, if you're wondering...)

After the photo, I remembered the cheese!

Perfectly salted fried eggs, with dreamily runny yolks were my reward! I was so excited at the taste of these eggs on their own, I couldn't even bring myself to add my usual hot sauce. I gratefully lapped up all of the yolks off the plate with the help of a bit more bread, and called it a night.

After a few hours, the Saltware was still warm, but cool enough to handle. I gingerly ran it under warm water to clean it, and towel dried it before leaving it to air on a wire rack overnight, again intrigued at the feel of such a mass of salt under warm, running water. I also remembered that in my last post about the Saltware class, I shamefully neglected to mention the POSH salt founder, Linda Castelli.

She was a Registered Nurse and then a lawyer before finding her passion for salt, and indeed inventing the concept of using the salt to actually cook food, instead of just flavoring the food with the salt. These slabs come in a variety of sizes, and even have been custom fit to line pizza ovens and table side grills of adventuresome restaurants. As long as you are careful, the slabs appear to last a long time, and I can't help but draw the similarity to a human being: resilient and sturdy, yet inelastic and fragile. Perhaps it's due to our own salt content that has increased our in interests in baking salts, cooking salts, finishing salts and now Saltware. Whatever the reason, you can be sure that the hype is very deserved, and that I certainly will be doing a whole lot more experimentation!