Bread in a Pot, or In Which I am now Fully Obsessed with Lahey's Method.

Yesterday, I finally was able to bake the loaf of bread that dreams are made of. Airy yet substantial, crusty yet soft, Lahey's bread is truly a delicious loaf - and one that even novice bakers can understand and accomplish easily. Really, my baking began 24 hours prior when I mixed up the no-knead dough from the Jim Lahey method outlined in his recent book, My Bread. I had been anticipating this loaf since last year, when I made the library hold. I know there are many Lahey recipes floating around in cyberspace, but for some reason, I wanted his words, in his book, in my brain before I embarked what I knew would become yet another step in bread baking obsession.

But first, I had to make a stop: Bliffert Hardware, adjacent to the Alterra Coffee complex on Humboldt. Sasa and I were right there so she suggested I stop in, and I was so glad I did. It is a nice, manageable hardware that is bright and well organized. I was going to just rig the lid of my LeCreuset oven, since I didn't order a stainless steel handle. When I set foot in the hardware, I had thought I would get a screw the same size as the LeCreuset handle screw only longer, and then screw on a couple of bolts to help assist me in lifting. The kind hardware store man (and his young son) got me set up with a metal cupboard door handle which was even better, and only cost me $3.50. I know that he has saved me frustration and probably burns, so I thank him heartily.

A stainless handle from LeCreuset will run about $10-15, and of course will fit properly, but I like my handle. I poked an awl through a layered piece of aluminum foil and slipped it through before screwing on the handle, just to ensure I'd have a nice tight seal. Even though there is still a bit of play in the actual handle, it is in no danger of falling off.

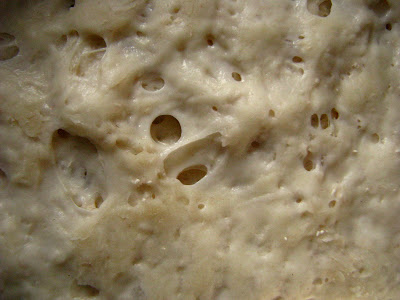
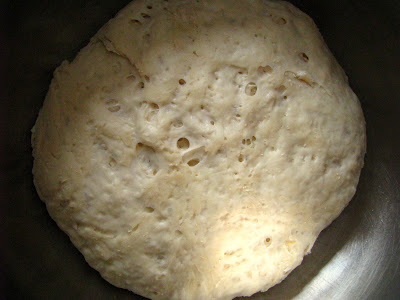
Handle complete, I moved on to the dough. I only had a little bit of wheat bran left, but oat bran to spare, so I dusted a towel with both before letting the dough accomplish its final rise. On closer inspection of the directions, I should have formed the dough into a more uniform loaf, but I was happy for my first go at it.

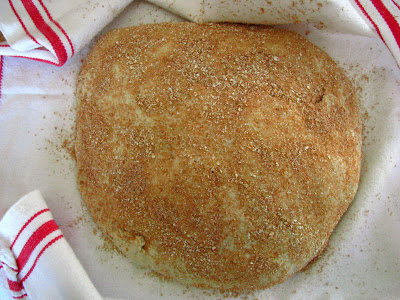
Within 2 hours, it was a huge mass of dough - nearly the diameter of the pot it was going into! Next time I will be sure to tuck it into more of a controlled shape. I will not complain, since this was my reward a mere 45 minutes after it took its nap in a 475 degree oven:

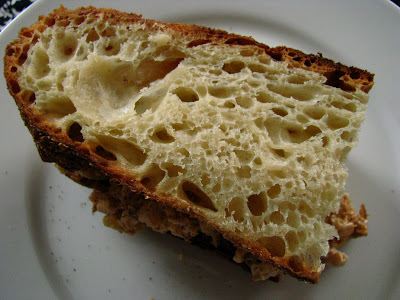
Uncannily looking like the examples in the book, I knew the time passing before I could slice into it was going to positively drag. Even though I wasn't hungry in the slightest, good bread has that completely mysterious way of arousing a deep hunger that you didn't know existed. I am absolutely certain that I would never be a participant in any diet that included low-carbs or no-carbs...

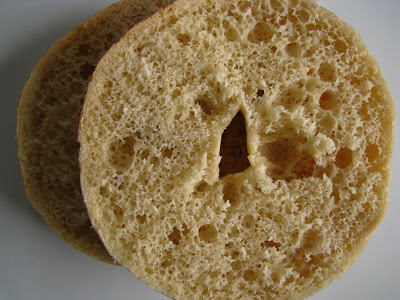
I ate, and I'll be honest, 3 good sized slices with some Wisconsin cheddar cheese while standing in front of the stove and examining its custardy interior (in the acidic light that renders close up photography unbefitting). In my opinion, Artisan Bread in Five is still good bread indeed (especially if you want to have it mixed up and waiting in the refrigerator for you to use on a whim...), but this bread has a completely different texture and personality - like an older and wiser cousin. In part, I think, due to the small amount of yeast and the long time spent soaking up the atmosphere before the dough is actually baked.

One problem I always have with homemade bread is how to store it. I know that it should not be put in plastic, and should be stored cut side down on a non-porous surface. I know this, but can't figure out how people either consume enough bread in one day so that storage isn't a problem, or how they enjoy eating that bread when all the air involved inevitably enhances the staling process. While I love a good panzanilla, some fat homemade croutons, or even toast, I can't very well go on eating aged bread every other day - I like a loaf to make it until at least day 4.

Wishing I knew all of the answers, I knew that this loaf was too special to squirrel away into my kitchen cupboard, inappropriately stashed in an open plastic bag - my version of a compromise. I decided to try a new method: I put it back into my lidded cast iron pot, and was beyond excited when I checked it today and it was perfect. The crust was still good (not fresh out of the oven good, but certainly not "I took it out of a plastic bag" good), and the cut edge was not even dried out. I'm excited to check on the progress again tomorrow, but since there is only a half loaf remaining, I'm betting it won't make it through another day. Because I couldn't make toast for breakfast today, I set my sights on lunch.

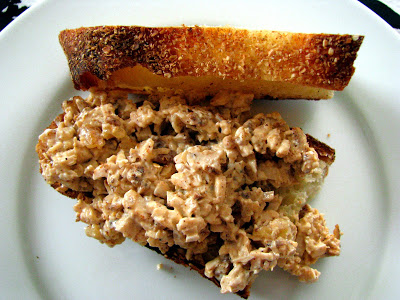
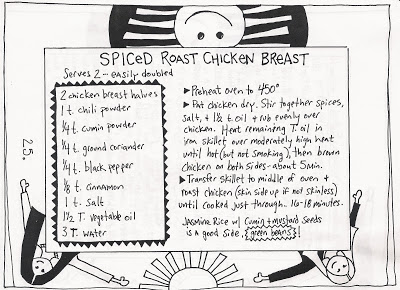
An accidental lunch at that, since I took a leftover Spiced Roast Chicken Breast, which I finely chopped and added it (Economy Spread style) to a bit of mayonnaise, a generous squeeze of lemon and a handful of walnuts. The best and easiest sandwich filling, and perfectly deserving of such amazing bread. I can't believe I never thought of making it before, most likely because usually there are not many Spiced Roast Chicken leftovers! I cut thick slices of my bread and was happy at the lack of jaw power it takes to enjoy this stuff... it's a really perfect bread, like I said.

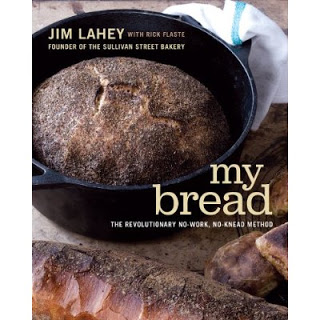
You can find Lahey's basic bread recipe here at the NY Times, though the oven temp is higher in the book for the same ingredient list (475 degrees instead of 450 degrees). With my second Lahey success, you certainly know that there are going to be more My Bread experiments showing up here very soon. I'm sure I don't have to relate again how amazed I still am that just 4 or 5 casually thrown together ingredients can result in something so worthwhile and delicious. I'm a sucker for trying crazy complicated things, but on a day-to-day basis, I really enjoy the ability to produce quality homemade things that are simple, tasty and reasonably priced. Lahey fills the bill on all counts, and forever will hold a place in my heart.

Spiced Roast Chicken Breast

Did you know that I wrote a cookbook? Well, not personally, and certainly not glossy and published, but back in 2000 my friend E and I made a compilation of our favorite "recipies" to give as Christmas gifts. I contributed 25 recipes, and was responsible for the page design. E contributed the balance and did the layout and copy tasks. It proved to be a lesson on many levels. Not only is it more difficult to compile a book than at first it seems, but the layers of organization that are required to end up with something that echos the original vision is tough. I think I do speak for both of us, that it looked nothing like we were anticipating...I know that my funny drawings surprised me when I saw them emblazoned across each page.

More than the lessons learned in joint efforts, I still appreciate our cookbook since I actually still use it. The recipes were our favorites a decade ago, and some of them are still mine today. Weather it is the Don Chapellet's Zeppelin Pancakes pilfered from the hand of Marion Cunningham, or Marcella Hazan's pesto recipe, I grab this little tome frequently to remind me of the proportions, or to be inspired by the many fish recipes E included.

Last Thursday night, I had to make some chicken since I had pulled it from the freezer, but didn't have a plan since I was running errands late into the afternoon. Fortunately, my trusty cookbook also contains one of my most favorite recipes of all time. I originally made the recipe for Spiced Roast Chicken Breast after it was included in the April 2000 issue of Gourmet, in a column I remember being particularly interested in because it only contained recipes using 5 ingredients. Besides that, it is a foolproof way to quickly roast chicken pieces or plain old breasts: started on the stove top in a cast iron skillet, and then gracefully transferred to the oven to finish, enabling the assembly of the rest of the dinner without worry. The spice combination is just made quickly of pantry staples, but is just interesting enough to call attention to itself. No one thing stands out, so you can serve almost anything with it, and the chicken stays almost magically moist.

The first time I made it was when I had my new boss and friend, GOP, over for dinner shortly after I began working at the Square Pie. We loved it, and I have made it countless times in the years following. For that first dinner, I served with Jasmine Rice with Cumin and Mustard Seeds, and a haystack of my Mom's home canned green beans. It probably is still my favorite way to serve it, but I love it with mashed potatoes and broccoli as well. I call upon it in moments of stress, and it makes me look like a "domestic goddess", sorry Nigella!

You'll notice that the recipe originally calls to preheat the oven to 450, and you can do this. Lately, I've been using a lower oven to give myself a little more dinner assembly time - 375 degrees. I also frequently mix up a double batch of the spice mix so I can spread it liberally on the chicken. It creates more of a spice crust this way.

Spiced Roast Chicken Breast (my version from Gourmet Magazine's original)

  • 2 chicken breast halves, boneless and skinless (or bone-in and skin on)
  • 1 t. chile powder
  • 1/4 t. ground cumin
  • 1/4 t. ground coriander
  • 1/4 t. black pepper
  • 1/8 t. cinnamon
  • 1 t. salt
  • veg or olive oil

Preheat oven to 375 degrees.

Mix all the spices, salt and pepper together in a small bowl. Add a tiny amount of oil to moisten into a paste. Rub into the chicken well, and let it sit a few minutes while the cast iron skillet heats over medium high heat.

Sear the meat about 2 minutes per side - a minute or two longer per side if using bone-in chicken. (Start with the side you want to present up first, so when you pop the pan into the oven, the prettiest side is up when it comes out.)

Transfer pan to oven, and continue baking until the chicken is done, about 15-20 minutes depending on the size of the pieces and if you use bone-in chicken.

Let the chicken sit for several minutes before serving to re-distribute the juices.

If you need a last minute Valentine meal tomorrow, you can pull this out of your hat in a mere half hour - and I'll guarantee, you'll be a very popular person around the dinner table.

Happy Valentine's Day!

Maya*Made, Remade: My search has ended for a healthy cake.

Last fall, Maya*Made posted a recipe for her Grandmother's One Bowl Apple Cake. It is a supremely easy and delicious cake, not to mention lightening fast to prepare. Dorie Greenspan said of her Swedish Visiting Cake, a cake of similar ease in her Baking Book that "Her (Ingela Helgesson) mother used to claim that you could start making it when you saw guests coming up the road and have it ready by the time they were settling down for coffee." Peeling the apples is even optional. I made it immediately after reading about it using the bounty of fall apples. In fact, I made it many more times into late fall, each time lowering the 1 cup of sugar to to see how much I could lose without noticing.

Since it's pear season, I've been stocking up on them each time I go to the co-op. They take a few days to ripen, so every trip seems to replenish the ones that finally ripen to eat. For some reason, I remembered the Apple Cake, and figured to make a pear cake last week. I swapped out the white flour for whole wheat, and used a scant 1/2 c. of sugar, and used one Bosc and one Anjou pear. Delicious, yes, but in my quest to eliminate refined sugar completely, I had to make it again this morning using light agave syrup.

Last week's cake, under snowy powdered sugar dust...

One thing that endears this cake to me, besides being from a Grandmother, is that it is baked in an 8 inch cake tin. Something about an 8 inch tin reminds me of the 1950's that I didn't experience firsthand. Portion sizes were in check, martinis were an acceptable 3 fluid oz., and desserts were pleasantly simple and not the size of a basketball. This cake remains moist and keeps well, though not for a whole week, since it was gone in 5 days.

This morning, I was cakeless and Boy-O slept in, so my feet hit the floor and I rushed off to preheat the oven. By the time the preheat is over, you can be ready to pop this cake in the oven.

One Bowl Pear Cake (adapted from Maya*Made's Grandmother)
  • 2 c. diced pears (I don't measure, the amount is very forgiving. I don't peel either!)
  • 1/4 c. agave syrup, light or dark
  • 1/4 vegetable oil (I used grapeseed)
  • 1 egg
  • 1 t. baking soda
  • 1 t. cinnamon
  • 1/4 t. Kosher salt
  • 1 t. vanilla extract
  • 1 c. whole wheat flour
  • 1/2 c. chopped walnuts

Preheat oven to 350 degrees. Butter and flour, or use baking spray, to coat an 8 inch cake tin.

Place diced pears and agave syrup in a large bowl, and stir to combine.

(Now, you can do this in one bowl, but I do it this way:) Measure oil in a one cup measure and crack the egg over it. Beat it lightly, then add to the pears and stir.

Add dry ingredients and stir to combine (again, I do sift them into another bowl, and then add). Mix until just combined, and stir in walnuts. Try not to over mix. The batter is very thick.

Empty the batter into a 8 inch cake tin, and spread with a spatula to even out. Bake for 30-40 minutes or until the toothpick comes out clean. (Mine took only 30 minutes to bake.) Let it cool in the tin on a rack for 10 minutes before removing to a rack to cool completely.

So there you have it! A cake that tastes as good as it is for you. After it cools, you can sprinkle confectioner's sugar over the top, but if you let it sit, it will disappear in the moistness. I didn't even feel bad trying a piece mid-morning with my coffee. You can imagine my excitement as I will try to incorporate other ingredients into this basic method... the near future will have a date and coconut trial reminiscent of those delicious Date Biscuits from innBrooklyn.

Maya*Made is famous for her remade creations, proudly reusing common household finds to brighten the lives of her readers and everyone who knows her. I'm sure she would be proud that she inspired me to remake her Grandmother's recipe, and I'm thankful she posted the inspiration! You can find more inspiration from Maya*Made on her blog, or purchase a piece of her usable art in her Etsy shop. One of my favorite things about blogging is finding family recipes from other families. It gives an immediate glimpse into a day in the life of someone else, and somehow makes a little connection to a complete stranger. I know this recipe is going to stick around in my family for a very long time.

Pizza via Jim Lahey: Where have you been all my life?

I am not sure what rock I've been residing under, but in my enthusiasm for Artisan Bread in Five Minutes a Day, I neglected the King of no-knead bread: Jim Lahey. It was Mr. Lahey who started the no-knead bread revolution, back in 2006 if I'm correct. Late last year, I read reviews of his recent book, My Bread, and immediately dropped it into my Amazon cart (my favorite way to not-shop...) and into the 19 person long hold list at my library.

Photo from Amazon.

I had no idea when my copy would finally be available for perusal, but when the call came, I rushed to the library and rushed back home. Then I rushed through the first section last night which is a concisely written account of why Jim bakes and what makes him so excited about it, and then dove exuberantly, and head first, into the meat of the story: the recipes.

Bakers are a curious sort. I did a stint at a local Breadsmith, back in my copy-shop days. When I was a "roller", as we called ourselves, it was mere weeks until my forearms felt as if I could take on Sylvester Stallone in Over the Top and have a chance. This was my first official foray into the world of doughs, and I did learn a lot. To my amazement, our breads there were all cultivated from scratch, beginning around eleven p.m. prior to my 4:30 a.m. start time. Those were happy times, for me to learn the way proper dough should feel, the smell of it in a crazy hot oven, and even the cleanliness of the whole process. If today I ever should I find myself breadless, I still don't feel bad grabbing one of their loaves, and each bite brings back those sleepless days.

So much is written
on bread, the staff of life. It has a similar construction to our own bodies, and really is a whole food when made properly. I know for a fact that I probably could live on bread alone, as I'm sure many people in the past have for periods of time. I've been content the past couple of years to rely on my stored dough technique that Artisan Bread in Five allows, (and I'm not demeaning it, since it is taste worthy and easy above all) but that doesn't leave much for experimentation in the bread realms of Rcakewalk...

I didn't know that I would be making any of Lahey's recipes today, but figured since I didn't pull anything from the freezer, and didn't have any idea
what to make for supper without leaving the snowdrifted driveway, I figured it was a prime chance to make one of his pizzas. (I can officially say: Mom and Dad, listen up - this is the pizza that you both will seriously love. It's cracker thin, ultratasty, and only takes minimal mess and effort to produce. Not to mention the fraction of clean up time, compared to when I drag the pizza stone out at your house!)

I have
long been an advocate of the pizza stone, which renders me hot and busy for pizza parties, but this pizza is baked at 500 on a sheet pan. I could make 2 at once, prevent the overheating of myself and others, be the "hostess with the mostess", and still present a stellar product. Oh, Mr. Lahey, where have you been all my life?


Look at that gluten!

I opted to use the weight versions in the book, since he gives both metric weights and volume measurements. At first, I was suspicious that my scale was not as accurate as I assume, since the dough was decidedly stiff. I kept to the recipe, indeed to the gram, and am happy to report that it turned out perfectly.


The sheet pan is greased with olive oil, and the dough is coaxed to as large and thin as it can be coaxed. I made his simple Pomodoro pizza, by weighing out 14 oz of my home-canned tomatoes and mixing a glug of olive oil and a heavy pinch of salt in. When I weigh home-canned tomatoes, which are quart jars, I set a strainer over a bowl and zero out my scale. Then, I feel like I'm approximating the texture of "diced" supermarket canned tomatoes. I added in about 2 T. of the reserved juice, and found it was a perfect amount for a sheet pan sized pizza.

I used my knife skills to shave off incredibly thin slices of yellow onion, about a 1/4 c. and scattered these over the sauce, and also heavily scattered on the crushed red chile peppers. The Roman style of these pizzas dictate the absence of cheese, I believe. But since we are here in Wisconsin, I had to add some... but not until the pizza had baked about 15 minutes, and looked like it had only about 5 more minutes to go.

It is unfortunate that the sun was down, and there was no natural light to be had... you'll have to suffer through the dim incandescent lighting pics, and use your imaginations. Better yet, get some bread flour, and give it a go!


After my Espanol studies this evening, I may have to mix up the bread version to make tomorrow sometime (he calls for 12-18 hour rest, but up to 24 hours in the winter, so I should probably wait until tomorrow), even though I may be endangering myself by removing the plastic handle from my LeCreuset pot.

His method relies on the "oven within an oven" - or a covered pot of ceramic or cast iron origins. I am not the most graceful (or as my Mother will confirm, the neatest) of all bakers, and a handle-less lid is worrisome. I'm hoping I can find something in my tool kit to jury rig the top, rendering it easier to lift. For those that are not as impatient, I know that LeCreuset does sell high-temperature handles that interchange with the stock handles, which are only heat safe to 375 degrees. While I knew this, and that my library hold was coming, I neglected to purchase one. If I'm at all as excited with the results, you can be sure that one will be on its way to me post haste.

I know I keep saying that one of these days, I'm actually going to purchase the items in my Amazon cart. I think it's going to be very soon, my friends. Some books I just have to have due to their incredible photography and inspiration, not to mention recipes of simplicity and pure perfection. Jim Lahey has made the cut, and you can bet a smiley-faced box will be on the way to me soon. Meanwhile, there are many links to the Lahey Pizza, but I haven't noticed in the several I perused that they are the exact published version. The recipe I used included a small amount of sugar, salt, yeast and bread flour. I'll leave you to seek it out, since I'm certain that you'll be glad I did.

Beef and Bagels: More for the list of Things I'll Never Buy Again

One of my favorite quotes, though I don't know who said it, is "Anywhere is walking distance if you have the time". While this is certainly true for me, especially in Summer, Winter laughs at me for being so housebound and passionately in love with my kitchen, that I hardly walk around the block. Pathetic, I know. While kitchen love does last me most of the year, waning only slightly when it gets so hot that I don't even feel like eating, snowy and cold February days remind me that you can pretty much make anything in the kitchen if you have the time.

While Alton doesn't trust the Elves to make his crackers, I don't trust the dough conditioners, preservatives, and packaged meats laden with chemicals that have enable them to have expiration dates 2 or 3 years from now. All are hallmarks of the packaged foods industry, and the more of them I can keep out of my house the happier I'll be. My Husband enjoys beef jerky, and while I do not, a project in the kitchen is something I'm always up for. A happy one at that, since I know my tinkering will be well appreciated.

Being the cookbook junkie that I am, I am in the habit of combing the new release shelves at the library each week after story time. A few weeks back, I found Jam it, Pickle it, Cure it by Karen Solomon. Amid the amazing photography, and quippy writing, I found a recipe for beef jerky. It called for top sirloin or flank steak, but my extremely helpful Outpost butcher recommended rump roast. I called him in advance, and he had 2 pounds sliced and waiting for me on Sunday when I stopped to pick it up. He didn't steer me wrong, since as you can see, it was beautiful. The finished product was hitting the highest marks, too - I know when I hear the fridge door open and shut and an audible "just one more piece", that my work here is properly complete.

The recipe called for 1 pound of meat, but I figured to double everything, since I knew dried meat wouldn't last long around my house - even without me eating any... Be sure to start your project 24 hours before you intend to dehydrate it, since it begins it's life in the refrigerator.

Beef Jerky (adapted from Karen Solomon)

  • 1 lb. rump roast, sliced 1/8 - 1/4 inch thick
  • 1 T. Kosher salt
  • 1 T. tamari sauce (or soy sauce)
  • 2 t. dark brown sugar
  • 2 cloves garlic, minced
  • 1 t. dried chile flakes
  • 1 t. cracked black pepper

Slice the beef as thin as possible, or have your most helpful butcher do it for you! Remove as much fat as you can, since "meat can be cured but fat cannot" (Karen mentions that the fat can go rancid in storage, but I doubt ours will last long enough for that to be a problem).

Press out as much moisture from the meat as you can. (I actually forgot this step). If you don't have an amazing butcher, you can pound the meat between sheets of paper towel with a meat tenderizer or rolling pin (or a sturdy mug - which I don' t know why any cookbook would recommend! Pounding with glass in the kitchen just doesn't seem like a good thing to do in my opinion...)

In a bowl, combine all the marinade ingredients, and toss together with the beef. Place a rack over a sheet pan, and lay the meat on it in a single layer without touching. Refrigerate uncovered for 24 hours - this shortens the drying process.

Preheat the oven to 150, or 170 if that is the lowest you can go (at 170, pop a wooden spoon into the oven door to keep it ajar), and dry the meat for 3-5 hours. Start checking at the 3 hour mark. I found that mine was done in 3 hours. You want to see the meat is cooked throughout, and that it tears into strings. Let it cool completely, before refrigerating up to 6 weeks.

With very little effort, dried meat fans can have a nitrate-free and much healthier snacking experience.

The day I made George's Cheese (Ball) spread, I knew I had to make bagels. Since I've been relying so heavily on my freezers and not so heavily on markets, I've had a bit extra in the grocery funds - perfect, since I've never made bagels up to the proper specifications that Cook's Illustrated recommended. I dropped my $7 on a jar of Barley Malt Syrup when I picked up the meat on Sunday, since this elusive ingredient was omitted from every bagel making attempt of mine in the past. NO more! 1 T. of this made all the difference in the feel of the dough, and in the end product, and I'll never make them again without adding it. I also baked them on the stone, so the crust was better than any homemade bagel I've made to date as well.

I will make a mention that before I was graced with my Professional KitchenAid, this was the dough that caused my old under-powered KitchenAid to work its way from the back of the counter all the way down to our newly finished kitchen floor when I was out of the kitchen attending to a baby Boy-O. A nicely shaped, deep indentation in the floor was my reward for not attending my mixer for the 10 minute knead time. While the new model didn't budge an inch, I'd recommend watching your machine, so that this doesn't happen to you. Cook's Illustrated does not recommend making this dough by hand, or doubling the recipe, due to the stiffness of the dough. It is a force to be reckoned with.

Resting under refrigeration for 12-18 hours, under plastic wrap.

Bagels (Cook's Illustrated method from The Best Recipe)

  • 4 c. high gluten flour (after Googling, I used my King Arthur bread flour, which is higher in gluten than AP)
  • 2 t. salt
  • 1 T. barley malt syrup or powder
  • 1 1/2 t. active dry yeast
  • 1 1/4 c. lukewarm (80 degrees) water
  • cornmeal for dusting

Mix flour and salt in bowl of standing mixer.

Add yeast, water and malt syrup, and mix at lowest speed "until the dough looks scrappy", about 4 minutes. Increase speed to low, and continue mixing until the dough is smooth and stiff (but feels "pliable" almost like a play-dough), 8-10 minutes.

Turn the dough onto a work surface, and divide into 8 pieces, about 4 oz. each. (Yes, I weighed mine, since I'm crazy...) Roll them into smooth balls and let rest under a towel 5 minutes.

Form each dough ball into a rope about 11 inches long, and do not taper the ends. (I have marked the edge of one of my wooden boards that I use for doughs). If the dough is hard to get "traction" to roll, moisten your palms with a bit of water. Overlap the ends by about 1 1/2 inches and roll your hand through the center to seal the end. I actually dip the ends in water before doing this, and then pinch them together before rolling. Place them on a cornmeal dusted baking sheet (I lined mine with wax paper first). Cover well with plastic wrap, and refrigerate 12-18 hours.

20 minutes before baking, take them out of the fridge. Adjust rack to center position (with a baking stone if using), and preheat to 450. Fill a large pot with water and bring to a boil. Carefully lower bagels into water for about 35 seconds. You can try and keep them submerged, with a spoon or skimmer, or flip them after about 15 seconds like I do. You can fit 4 in your pot, if it's large enough, otherwise do 2 or 3 at time so they don't touch. Remove using a skimmer or slotted spoon to a rack, bottom side down.

Transfer to a parchment lined baking sheet or a baking stone, and bake for about 14 minutes until golden brown. Use a tongs to move them to a wire rack to cool.

You can put a topping right on them when they come out of the boiling pot, since they are rather sticky. Cook's Illustrated recommends sesame seeds, poppy or caraway seeds, dehydrated onion or garlic flakes, and/or sea salt. I left mine plain, and could not wait to have lunch today and test my theory of George's spread on a bagel.

I couldn't decide though, and opted for Economy Spread and Spicy Guinness Mustard on one half and George's Spread on the other. Let me tell you, George's Spread on a toasted bagel will make you banish traditional bagel toppings forever! Delicious! Like the best veggie cream cheese you've ever tasted.

I mentioned to Talia in a comment last week that I don't think I'll ever buy graham crackers again thanks to last month's Daring Baker's Challenge. I think that now I've found a couple more items to add to that list. If I have continue to have time on my side, I'll be willing to wager that I can keep that promise. I find myself wondering what else I can make in the remaining weeks until most of the mornings are spent outside...