Stecca'n It To You or Why I Continue to Love Jim Lahey


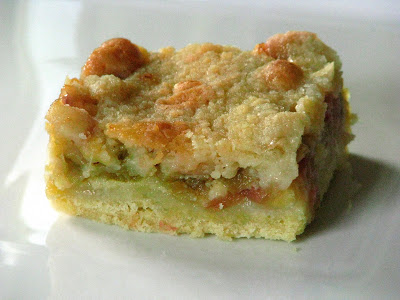
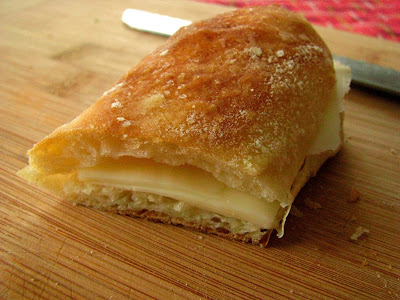
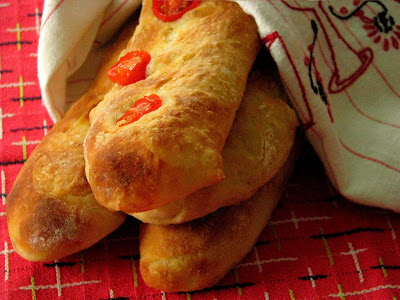
This above photograph is exactly why I could never commit to a raw vegan diet. Near perfect in both simplicity and taste, a fresh from the oven piece of bread with no more than a couple of slices of cheese could be my staple from now until the end of time. It's not boring, I promise you that - especially with Jim Lahey's recipe for amazingly quick and easy Stecca.

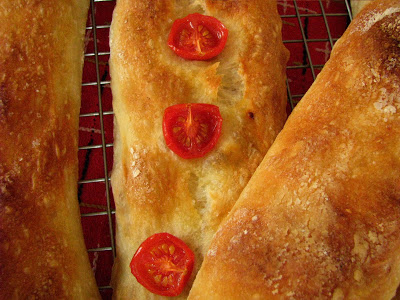
"Stecca" is Italian for "stick", and refers the shape of this baguette-style bread. It is just plain perfection how Lahey manages with each recipe in My Bread to give a distinct and unique characteristic to such banal ingredients as flour, water, yeast. A mere 1/2 teaspoon of yeast interacting with the home kitchen environment for 12-18 hours results in more flavor than any bakery purchased baguette I've ever tasted. This bread in particular confirms all the more my need to pilgrimage to NYC and wait on line at Sullivan Street Bakery just to see how in the world a bread could possibly taste any better.

Since I have been reading up lately on vegan and raw vegan diets, I almost feel pangs of guilt posting this baked good, in all of it's non-raw glory. I was even briefly considering (before slicing into this bread, that is) committing to a vegan/raw vegan diet exclusively for a set period of time, but I just don't know now. My head is swimming with information, and all I can think is that my Mantra (Everything in Moderation) needs a good chanting over and over and over again.

I really am fascinated with the various diets that come and go, and certainly there are many merits to vegan and raw vegan diets in particular, but I'm also reminded of one example the complete opposite of raw vegan: The Atkin's Diet. That one ended rather poorly for Dr. Atkins, but I guess the jury is still out on the exact state of his health. While I'd never subject myself willingly to a mostly meat and no carb diet, I may find myself meeting somewhere in the middle with my current eating habits. With so much conflicting information on human diet, I may very soon need to find myself sitting cross-legged in a corner and repeating what I do know to be the truth about most things in life, that really most everything is good for you in moderation.

In general, I do admit I may be a little on the "carb heavy" side of things, but with breads like this, I really just can't help it. It would be quite helpful if I had a neighborhood full of carbohydrate hungry Velociraptors to inhale all this demonic wheat with which I feel such compulsion to bake. But, something as simple as a loaf of bread so instantly elevates any dish it is served with (or sandwich that it turns into), that it almost seems puritanical. In my new raw vegan mind, I am thinking about all of the delicious soaked seed spreads I've been seeing, and thinking that I could make at least a tasty vegan sandwich if not a full raw vegan sandwich with this, and I am sure that very soon, I will be doing just that.

Ordinarily, I am downright pious in my abilities to wait until a bread is fully cool to slice into, but I only let this one cool down a little bit. I figured, I had 3 more to fall back on if the first one got mysteriously "ruined"! I think this bread would be optimum dinner party fodder, since it requires so little in the way of maintenance beforehand. I'd recommend planning 18 hours for the initial rise (less than 5 minutes of prep time), then three hours before eating, commence with the second rise (another less than 5 minute job). By the time you are ready for supper, you will be rewarded with semi-warm and amazingly fresh bread. I have always used the weight measurements in this book, and found them pretty consistent with the volume measurements.

Stecca (by the genius, Jim Lahey)
  • 400 grams (3 cups) bread flour
  • 8 grams (1 1/4 t.) salt
  • 1 gram (1/4 t.) active or instant yeast
  • 300 grams (1 1/2 cups) cool (55-65 degree) water
  • olive oil for pan and drizzling
  • flour for dusting
In a medium bowl, stir together flour, salt and yeast. Then, add water and mix about 30 seconds until you have a wet sticky dough. Cover and let sit at room temperature for 12-18 hours until the dough has at least doubled in size and has little bubbles on it.

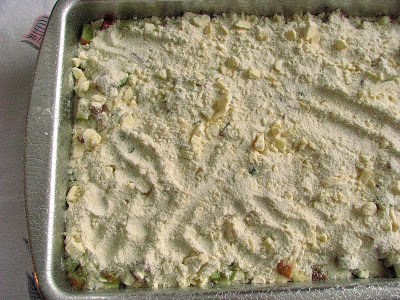
After this first rise is complete, generously (GENEROUSLY) dust work surface with flour. Scrape the dough out of the bowl in one piece, and fold it onto itself gently two or three times into a somewhat flattened ball. Brush the surface with olive oil, and sprinkle with 1/4 t. coarse salt.

Generously dust a tea towel (non-lint towel) with flour, and place the dough on it, seam side down. If it is still a bit sticky, dust it with a little flour, cornmeal or wheat bran. (I have a linen kitchen towel that I only use for bread that I never wash - it has a nice build up of flour already in it, which prevents the dough from sticking. If you do this, make sure to hang the towel up to dry thoroughly between uses so it doesn't mold.) Let the dough rise for 1-2 hours (I found it was closer to the 2 hour mark in my cool room-temp) in a draft-free place. About a half an hour before the end of this second rise, preheat the oven to 500 degrees, and oil a half sheet (13x18 inch) sheet pan with olive oil.

Cut the dough into 4 equal quarters, and gently stretch each piece evenly into a stick shape the length of the pan. Place on pan, leaving 1 inch between sticks. Brush with olive oil, and sprinkle each stick with a pinch of coarse salt.

Bake for 15-25 minutes (mine took only 15!) until crust is golden brown. Cool on the pan for 5 minutes, then move them to a rack to cool completely.


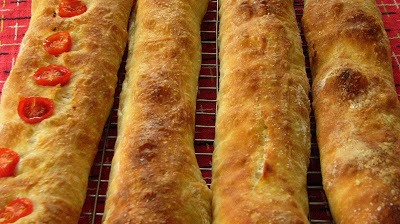
If you choose, you can line the length of a Stecca with halves of cherry tomatoes, cloves or garlic or whole olives, (Lahey said not to use the additional sprinkle of salt on the olive bread due to the salt in the olives), but I would recommend really pushing them down into the dough well since mine hovered closer to the top. Lahey also notes that if the breads get a bit soggy from sitting, you can reheat them in a hot oven to revive them - another great tip if you are planning them for a dinner!


If you eat bread, if you think you may ever decide that you want to try making bread, you should add Lahey's book to your "must have in the kitchen library" list. It seems like I'm all about having projects lately, and I know that I could not be disappointed with any recipe in this book. I have decided that I will be keeping track of my progress of working through the book under the Lahey Project tab at the top of the page. I can't promise any time frames, but I can tell you that given enough time and dinner companions, I will make everything Mr. Lahey has to offer me. I know that it will be a fine time for all eaters involved as well.

Vegan Monday part one: Raw Vegan Bars


raw vegan bars, originally uploaded by Rcakewalk.

When I got a friendly email last week mentioning raw vegan recipes, I realized that while I've made quite a few vegan things, I was really pretty clueless about raw vegan "cooking". I do come across many delectable looking raw vegan recipes, especially when I'm specifically looking for them, and decided that I am going to challenge myself to a month of Mondays of raw vegan recipes.

My clarifier here, is that it may not be a whole meal or something that I can convince my Husband (or that picky picky Boy-O) to eat, but it will be something that I eat, and hopefully will love.

It may seem that I started out pretty easy for week one: these fruit and nut bars from That Vegan Blog. But we are in Wisconsin, the state that may have invented the "Bar". Until I had friends visiting once from the East Coast, I never really knew that the rest of the country didn't make a big deal out of bars. It is a Midwestern privilege, and it's really a shame more states don't follow our lead since there are so many good ones out there worthy of bragging over.

These were everything they promised to be, and got me out of my Fudge Baby rut. The inclusion of raisins actually tempers the extreme sweetness of the dates, and makes these nearly irresistible.

Picky Boy-O loved these as much as I did, which wasn't really a surprise, and also means that they will go on the healthy snacks list that he can help me with. Call me crazy, but I may try these with the addition of some cacao nibs on my next run, as if they could be improved upon...

So there you go! Now my brain is properly reset for the Raw Vegan experience, I hope to find some killer things to experiment with before next Monday. See you then!

Deep, Dark and Dirty Secrets: A Love Affair with My Yard.


Align Center

I have a shocking confession to make. I love dandelions. There, I said it. I love how they smell, I love how cheerful they look dotting the yard. I love that my hands get sticky when picking them, and I love that they wilt magnificently when you try to keep them in a glass of water. I love that taste of their bitter leaves - though I don't eat them from my citified yard - and I love that my little Boy-O now likes to pick them and hand them to me and watch me smell them each time like I have never smelled them before. I feel a bit sad when Summer wears on and the bright yellow hats turn to bald heads...

I'm reminded of this storybook that I read and re-read hundreds of times when I was growing up. My worn and yellowed copy of Story Hour Readers Revised (Book Three) was bound in 1923. I'm unsure where I acquired the copy, but as a kid, I poured over the fairy tales contained within it's magical pages. My favorites still being abridged versions of The Brownie and the Cook and Black Beauty, an Aesop fable: The Cats and the Cheese, and this beautifully illustrated poem about Dandelion:


It may be the drawings that inspired my love of the dandelion - I couldn't really be sure. I know that now I am an adult, when I reread it's short text, that life itself indeed seems as shortly sweet as a poem meant for children... and all too soon another Spring will pass and the bounty of another Summer's produce will be upon us cooks to do and preserve with what we can.


It seems that those who love to cook (and eat) by extension, naturally grow gardens. I've had a garden in the yard of every apartment I've ever taken, and some were cared for better than others. When I first came to Milwaukee, Frankee came up for the weekend and we rototilled a proper green space along the edge of my driveway, enough room for trellising peas and other curiosities, even GOP graciously let me dig up her backyard of the Square Pie to plant tomatoes, basil and onions. Our first apartment after we got married had overgrown and sadly neglected gardens, that received my thorough overhauling, even though we moved out in June before I could see any fruits of my labor.

When we moved to our house four years ago already, my Father-in-Law helped me turn the ground behind my garage. At the time, it seemed like a good idea - and it still does every early Spring until the hedge of wildness grows up around it. Even though it is south-facing, last year I hardly got a ripe tomato, and green peppers and eggplants never matured. This year, I've decided to plant it full of shade perennials and attempt to be as good of a gardener as the generations of my family before me.


Sage.

My Grandpa O. is a great gardener, and in central Wisconsin tended a garden all the while my Dad grew up, planting in him too the enjoyment a backyard garden can bring. He still gardens each year, now in his '80's, as spry and able-bodied as ever. My Gram, grew an astounding array of haphazard plants, flowers and vegetables in northern Wisconsin. For years, after retirement, she grew for the farmer's market, and still had abundance left to share with any and everyone who may have needed it. Both of my own parents cultivate truly beautiful gardens, that are as gorgeous as they are productive. Neat rows alternating of corn, rhubarb, cosmos, pickles, peppers, all looking like the cover of an Organic Gardening magazine. Really, that is not an exaggeration, since they both enjoy the outdoors so much, that most of their free time is spent in enjoyment of yard work.

I assembled some raised-bed boxes in my back yard this afternoon, which along with my already established herb bed will get ample and full direct south-exposure sunlight. Already, I'm happy to see the shock of green chives, sage and lemon thyme poking up from what always strikes me as incredible odds given the cold and depth of a Wisconsin winter. Last year, I planted some herbs in an over sized planter, and grew too lazy to clean them out in the Fall. Good thing, because a good amount of Russian tarragon began growing inside the garage in early Spring, and now that I've moved it outside, it seems voracious in it's attempts to propagate itself. This is pleasant news for my egg-eating.


Every year, I say that I'm going to be better at growing gardens. Not that anyone who sticks a seed into soil can't be rewarded with something, but this year, I really want to "cultivate" a garden. Not only for it's production, but also for it's beauty. I vow to water and weed, I vow to take care in garden planning, and I vow to plant some flowers among the veg.

Lemon Thyme.

I know each Spring, it seems like an easy thing to vow, at least for me. I forgo New Year's resolutions in favor of this Spring resolution nearly every year, but now that I've committed at least in type, I am sure to follow through on that vow. I guess I'll have to wait and see if I can deliver on my promise, but I want to lead my little Boy-O into the same love of the natural world that I grew up with, be it citified or not. And it is so true that spending even the smallest amount of time cultivating even the smallest seed of a thing can result in amazing bounty. How lucky I am to be able to teach someone that!

Rhubarb Kuchen or in Which I Divulge Buttery Rhubarb Secrets

I think this recipe needs no introduction, and it certainly is not worthy of "lightening" that's for sure. In any dessert, it's usually a given that I will reduce the amount of butter or eggs, but in this family recipe, it would be something I would never dream of.

I grew up in a family of rhubarb lovers, which I count as fortunate since now that I've aged, I realize that some people detest it's tangy, sour taste. As long as I can remember, my Parent's have had a patch of rhubarb. Every Spring, we would have Rhubarb Kuchen, a recipe that came from my Dad's Mom. It is still my Dad's favorite dessert, and an easy one to enjoy in seasons other than Spring, due to rhubarb's love affair with the freezer.

The rhubarb that is currently established on my Parent's 'farm' is from my Gram's patch in northern Wisconsin. I'm hoping to get a few off-shoots of their plants to establish my own little patch in what I'm hoping will soon be my new raised bed gardens in my back yard. It always amazes me that generations of plants can thrive. In our culture of bigger, better and new, I find it so comforting to know that I can glean nutrition from a plant that was first propagated maybe 50 years ago. That is amazing.


Not only does it scream out to be eaten with ice cream, it keeps well in the refrigerator for at least a week, if you don't find yourself nibbling at it each time you open the door. Make this in a 9x13 pan, and if you you find yourself in a non-rhubarb-loving household as I do, you can make yourself insanely popular and give some away. I'm not sure where my Grandmother got this recipe, but I know it was from my Dad's side. I'll have to see if I can track down the pedigree. That side of the family really doesn't have any German ancestry, but fortunately for me, this recipe landed in their hands! While I most always bake with unsalted butter, I always use salted for this Kuchen, since that it what my Mom used.

Rhubarb Kuchen

Crust:
  • 2 c. flour
  • 2/3 c. butter, cut into 1/2 inch pieces
  • 1 egg
Filling or Custard:
  • 6 cups rhubarb, not defrosted if frozen (I used closer to 7 cups)
  • 2 c. sugar
  • 4 eggs
Topping
  • 1 c. sugar
  • 1 c. flour
  • 1/2 c. butter, cut into 1/2 inch pieces
Preheat oven to 350 degrees.

Using a food pro, (you can do it by hand) pulse crust ingredients until they look like "coarse sand". Spread them into the 9x13 pan, and press into a crust. Then, spread the rhubarb over the crust, mix the custard ingredients together, and pour over the rhubarb. Finally, pulse the topping (no need to have washed the food pro first), and sprinkle over the top. Bake for 50-75 minutes until the topping is nicely browned. It will firm up a bit more as it cools.


You will no doubt find yourself with a spoon, testing out a corner of this dessert as soon as it makes it's way from the hot oven... but it is just as lovely at room temperature or cold. Just out of the fridge, it has a bright rhubarb flavor and full buttery-ness about it. I like to eat it for breakfast, so that it's calories can be burnt off through the course of the day. But, I'm not above having it just before lights out, either.